
How to Activate PayPal in my eDirectory
Introduction
PayPal Standard is a widely recognized and trusted payment solution that allows you to securely accept payments from customers through your eDirectory website.
By integrating PayPal with eDirectory, you can provide your sponsors with a seamless checkout experience while allowing payments and subscription transactions to be processed through your PayPal account.
This guide will walk you through creating and activating a PayPal Business account, generating your PayPal API credentials, connecting PayPal to your eDirectory website, configuring the required Instant Payment Notification (IPN), and verifying that the integration is working correctly.
Before You Begin
Before configuring PayPal, make sure you have:
- A PayPal Business account
- An eDirectory Site Manager Account
- A live domain connected to your website
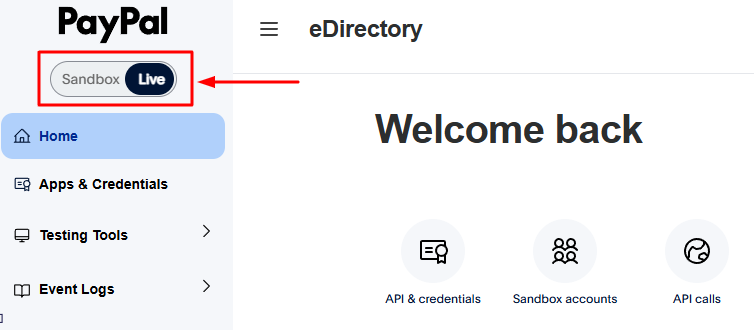
Important: PayPal must be configured in Live mode for your eDirectory website to process real payments. Sandbox credentials should not be used for your live eDirectory website.
Step 1: Create and Activate Your PayPal Business Account
1.1. Create a PayPal Account
If you already have a PayPal Business account, you can skip this step and proceed to the next section.
Otherwise, visit the PayPal website and create a new account.
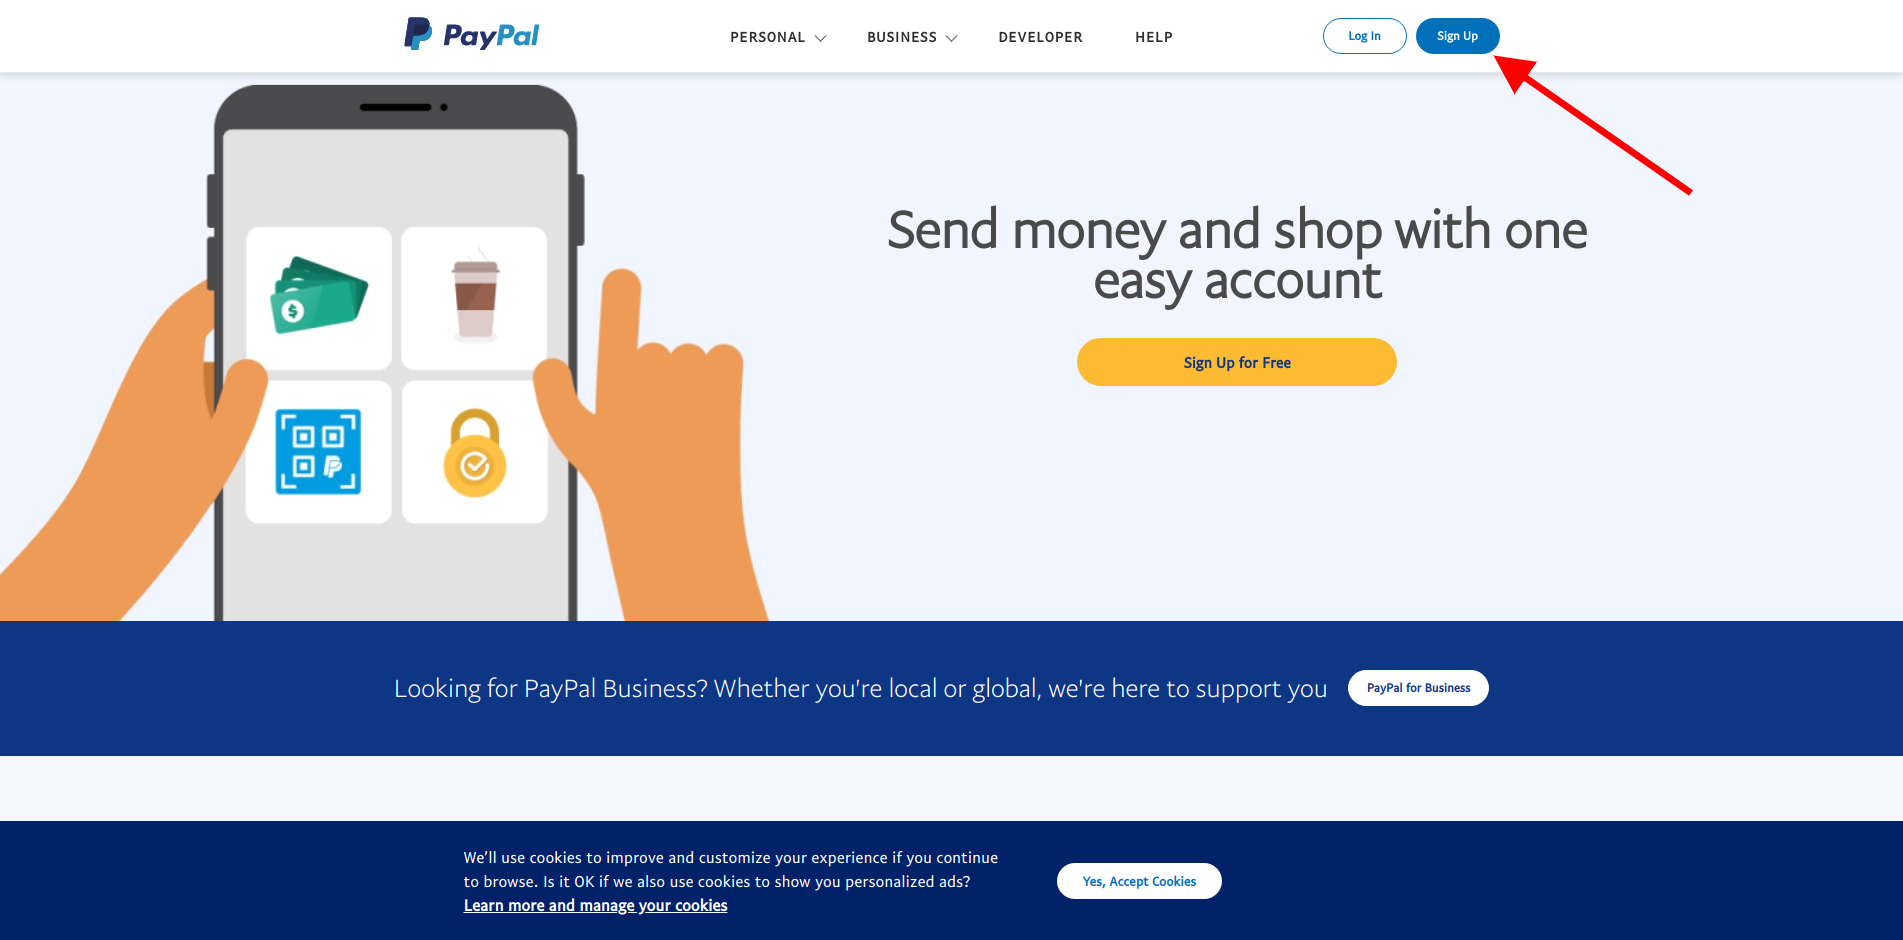
When prompted to select an account type, choose a Business account.
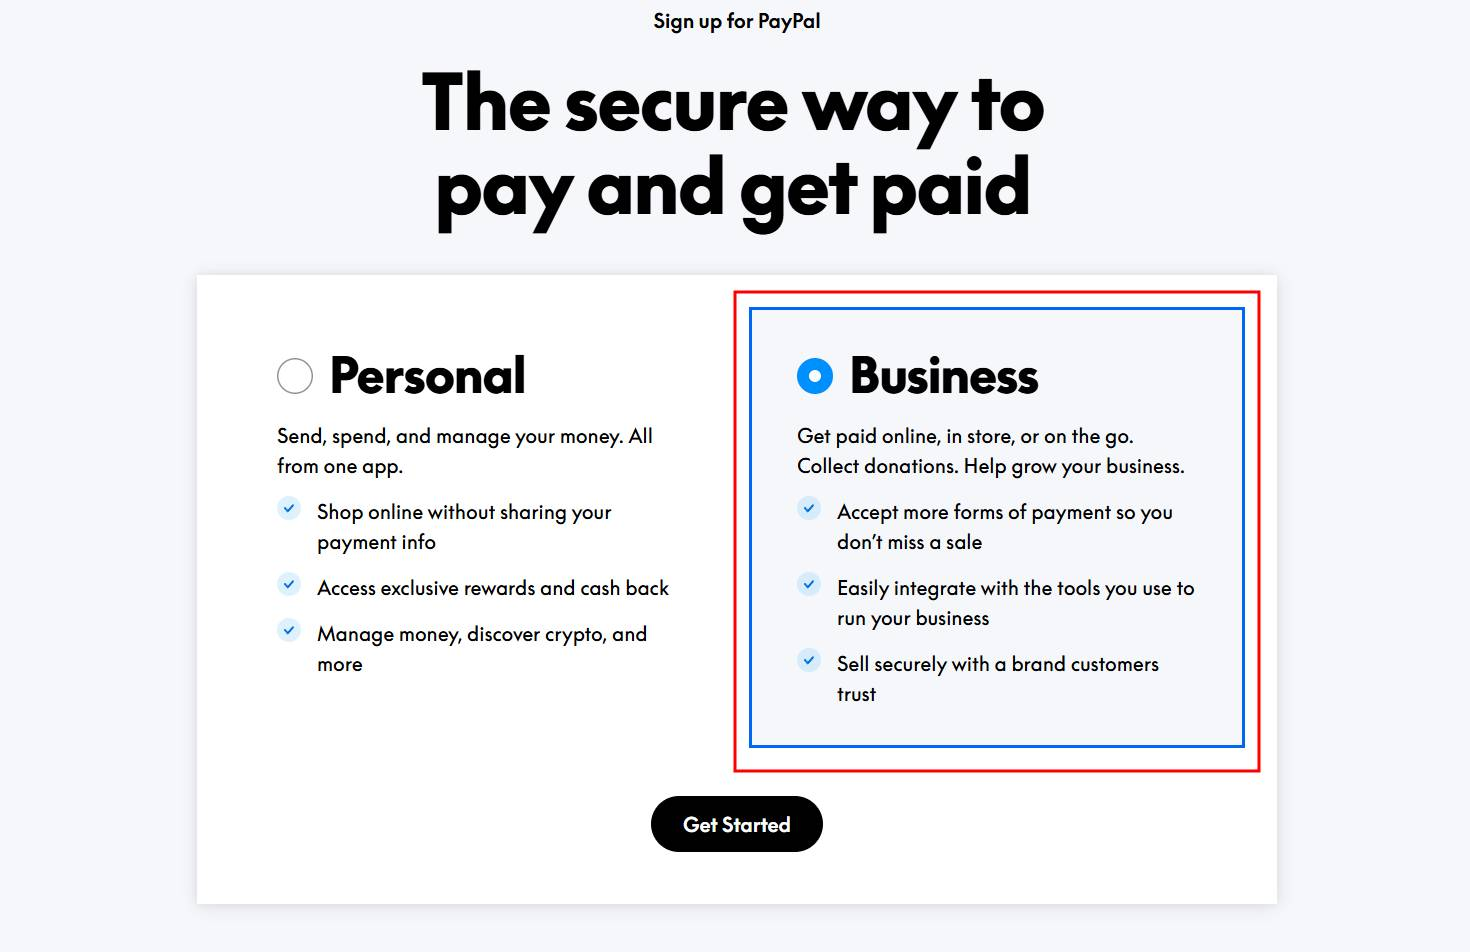
1.2. Complete the Registration Process
Follow PayPal's instructions and provide all required information to complete your account registration.
Make sure the information associated with your PayPal account is accurate and that your account is active before continuing with the eDirectory configuration.
Step 2: Create Your PayPal API Credentials
Once your PayPal Business account is active, you need to create an application in the PayPal Developer Dashboard. This application provides the Client ID and Client Secret required by eDirectory.
2.1. Open the PayPal Developer Dashboard
Log in to the PayPal Developer Dashboard using your PayPal Business account.
2.2. Open Apps & Credentials
From the PayPal Developer Dashboard:
- Click Apps & Credentials.
- Click Create App.
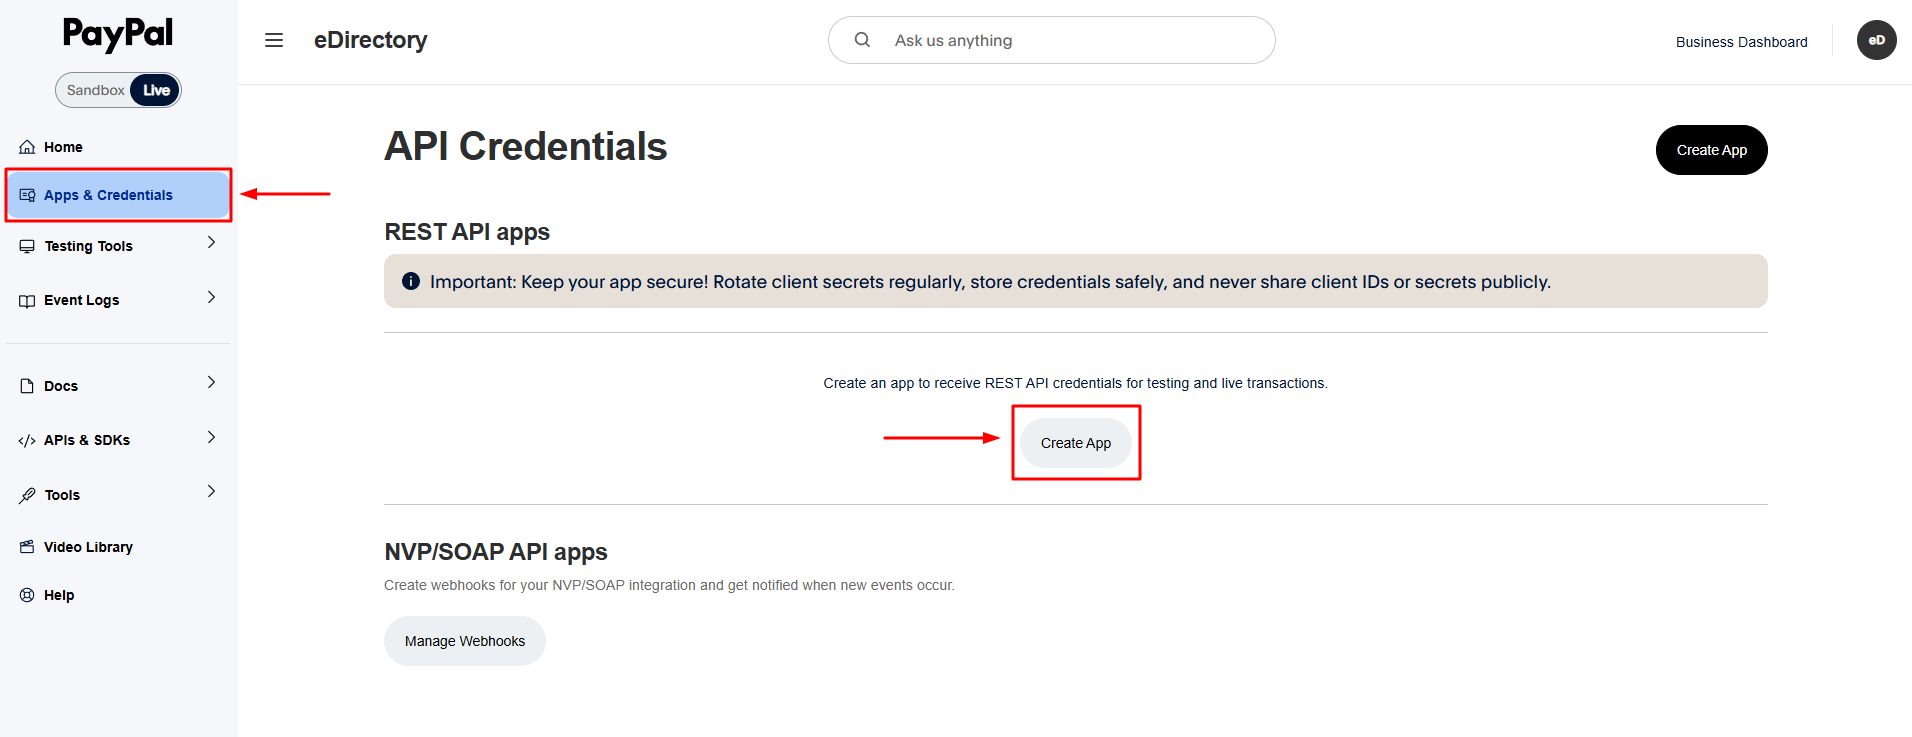
2.3. Create the PayPal App
Under App Name, enter a descriptive name for your application.
For example:
- eDirectory Website
- My Directory Website
- Website Payments
Select the option 'Merchant' as the type of app and select your Country/Region.
Then click Create App.

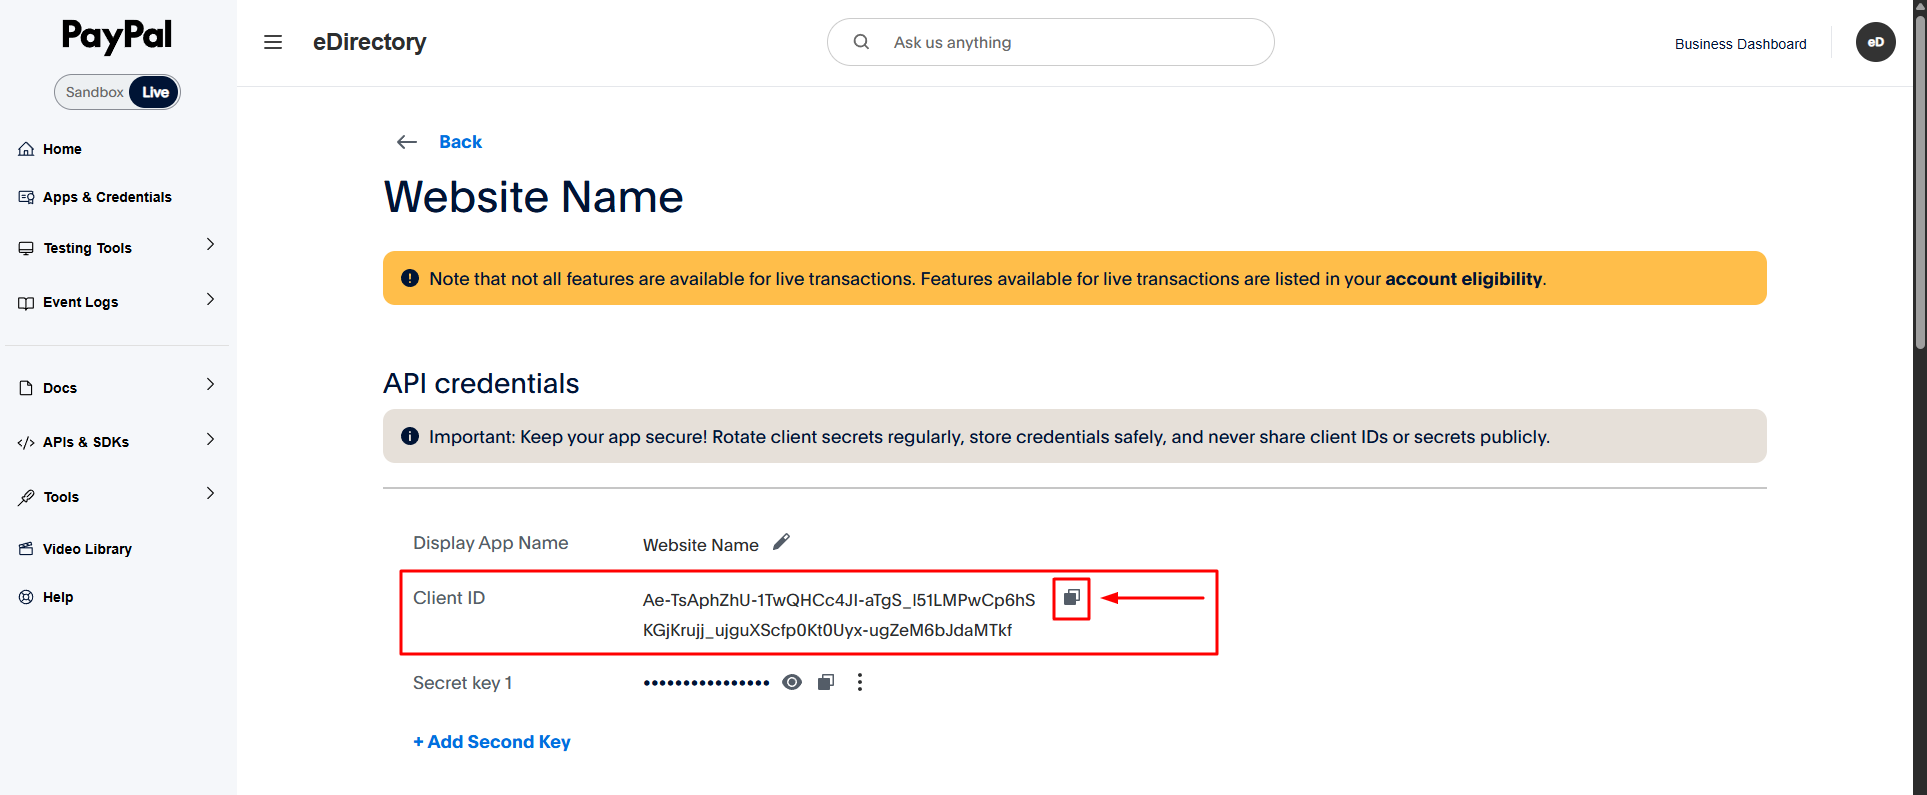
2.4. Copy the Client ID
After the application is created, PayPal will display the application's credentials.
Copy the Client ID.
2.5. Add the Client ID to eDirectory
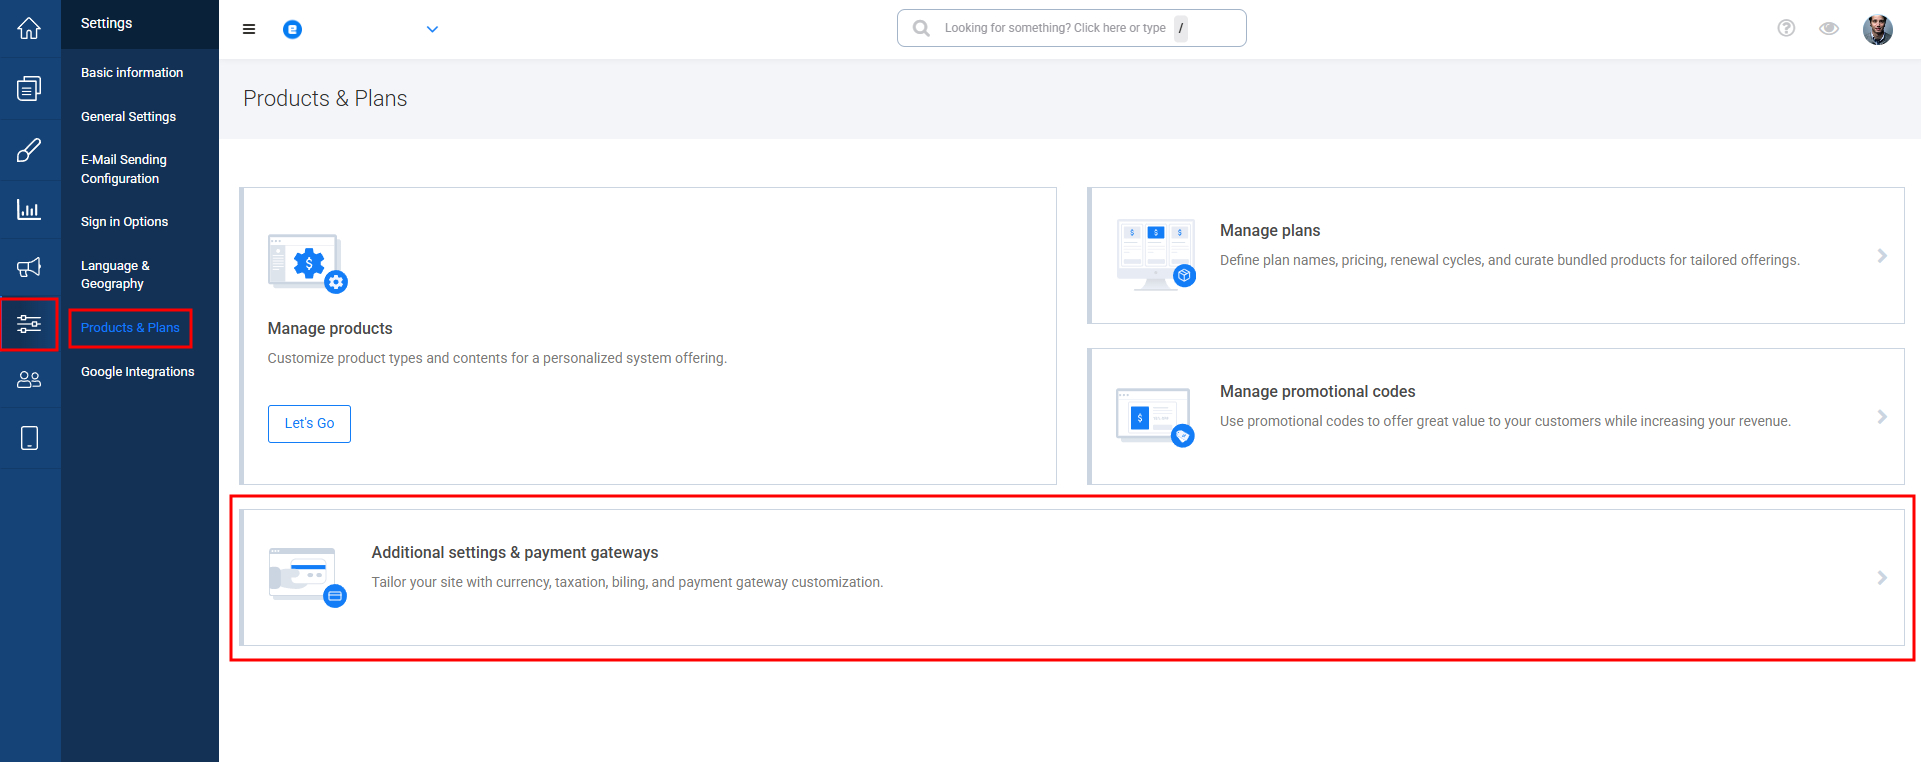
Return to your eDirectory Site Manager and navigate to Settings → Products & Plans → Additional settings & payment gateways
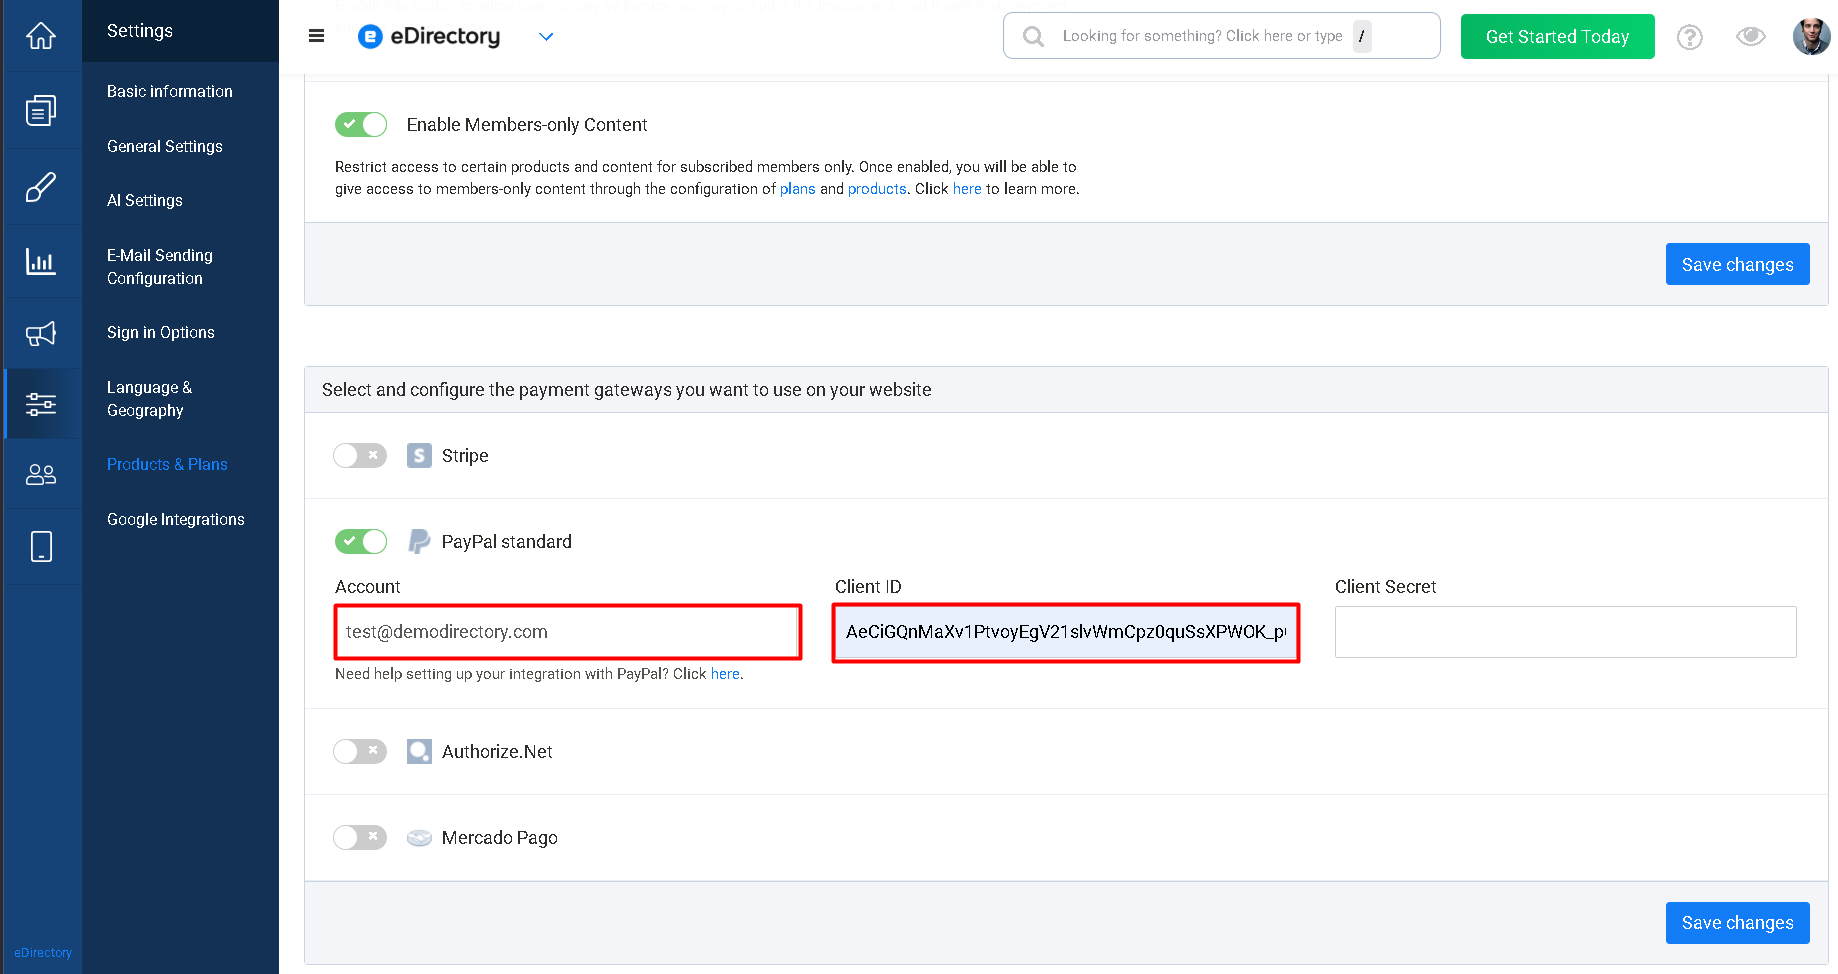
Locate the PayPal settings and enter the email address associated with your Paypal account and the Client ID you copied from PayPal into the Client ID field. Save changes.
2.6. Copy the Client Secret
Return to your PayPal Developer Dashboard and open the application you created. Copy the Secret Key.
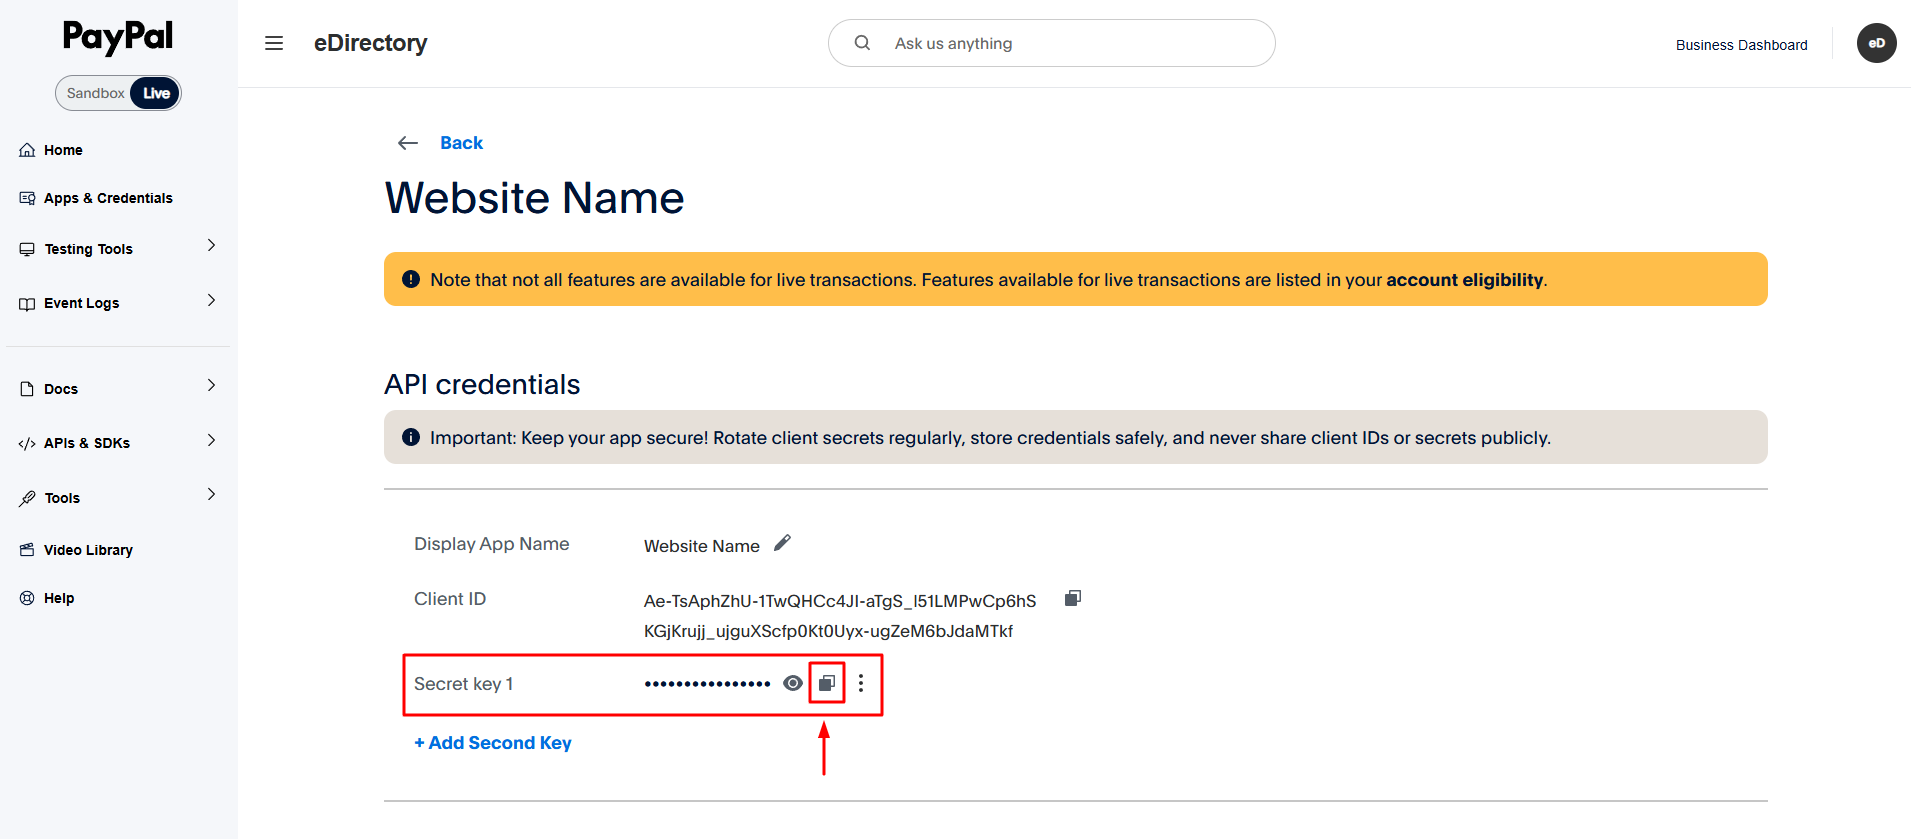
Important: Treat your Client Secret as sensitive information. Do not share it publicly.
2.7. Add the Client Secret to eDirectory
Return to Settings → Products & Plans → Additional settings & payment gateways, and paste the PayPal Secret Key into the Client Secret field next to the Client ID. Click Save Changes again.
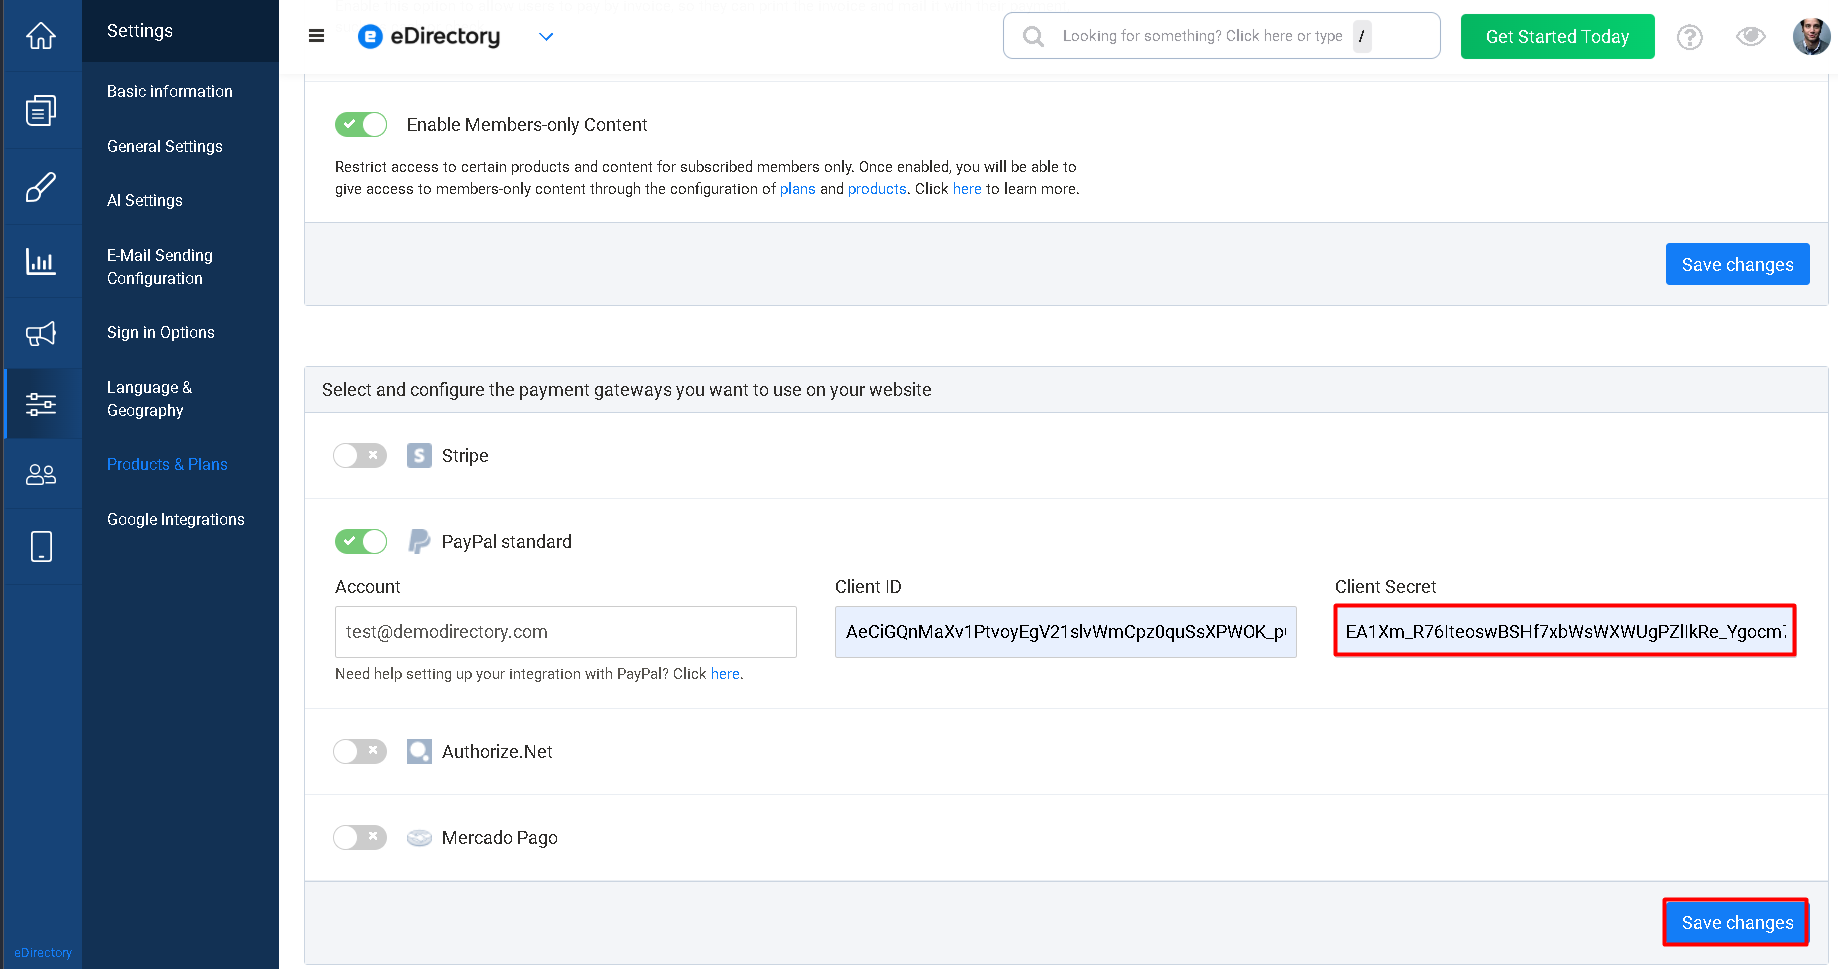
Note: If you do not see the Client ID and Client Secret fields in your eDirectory payment gateway settings, your eDirectory version does not support these fields. This is expected, and no additional configuration is required. PayPal will continue to work using only the email address associated with your PayPal account.
The Client ID and Client Secret are used to enable additional PayPal functionality, such as allowing customers to cancel their subscriptions directly from their dashboard on your eDirectory website. If these fields are not available in your version, PayPal payments will still work normally using the associated PayPal account email address.
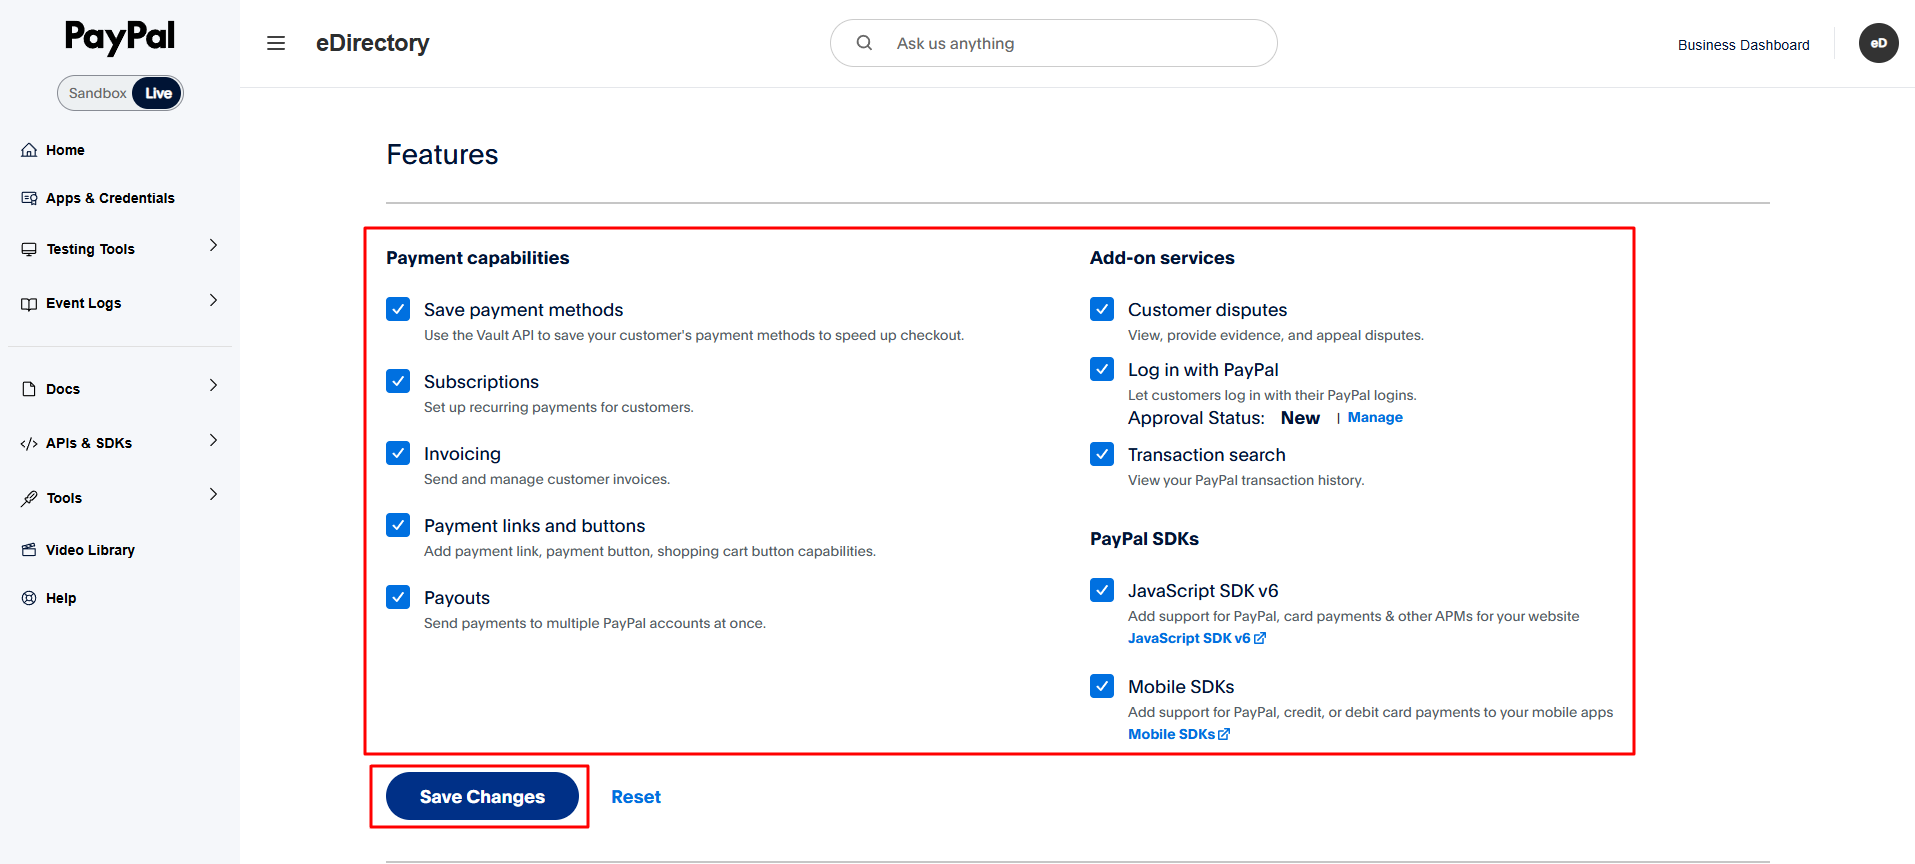
2.8. Enable the Required PayPal Features
- Return to the same PayPal application page where you copied the Client ID and Secret Key.
- Scroll down until you find the Features section.
- Enable all available feature options and click Save Changes.
Step 3: Configure the PayPal IPN
PayPal's Instant Payment Notification (IPN) allows PayPal to send transaction updates to your eDirectory website.
This configuration is required so that eDirectory can receive PayPal transaction notifications and process payments and subscriptions correctly.
3.1. Log in to PayPal
Go to the PayPal website and log in to your account.
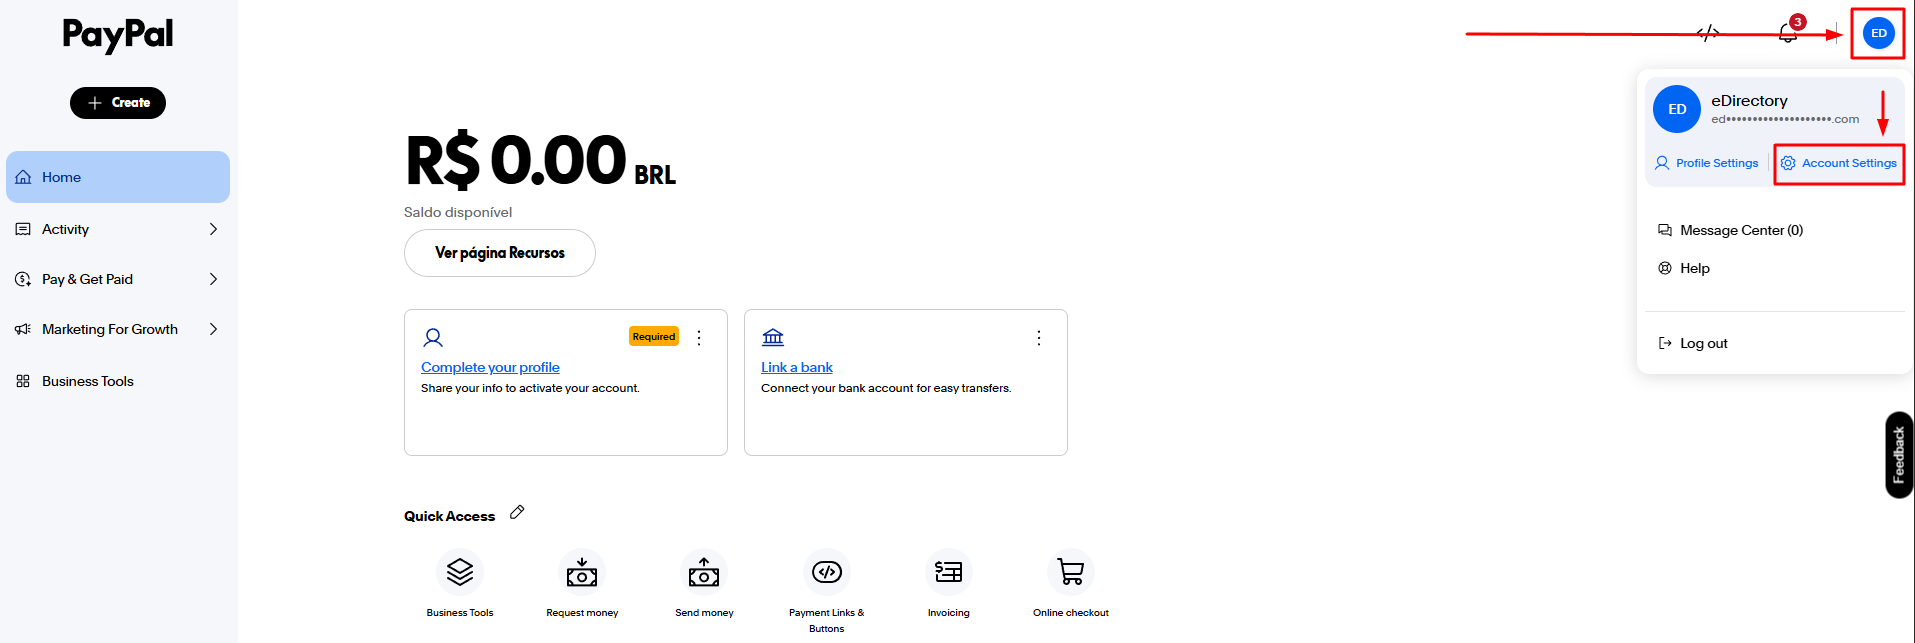
3.2. Open Account Settings
Click the account icon in the top-right corner of your PayPal dashboard and select Account Settings.
3.3. Open Instant Payment Notifications
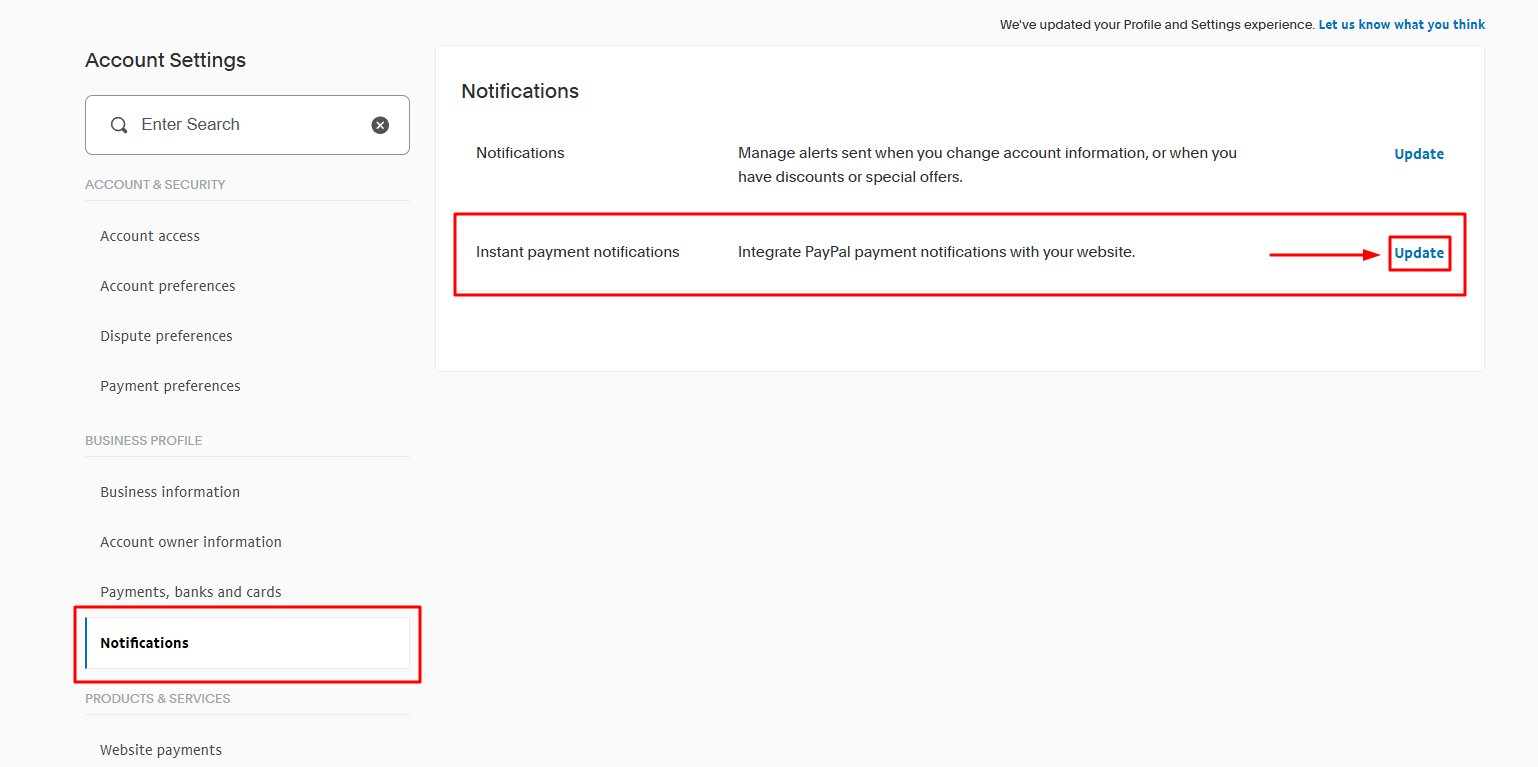
- Navigate to Notifications → Instant Payment Notifications
- Click Update.
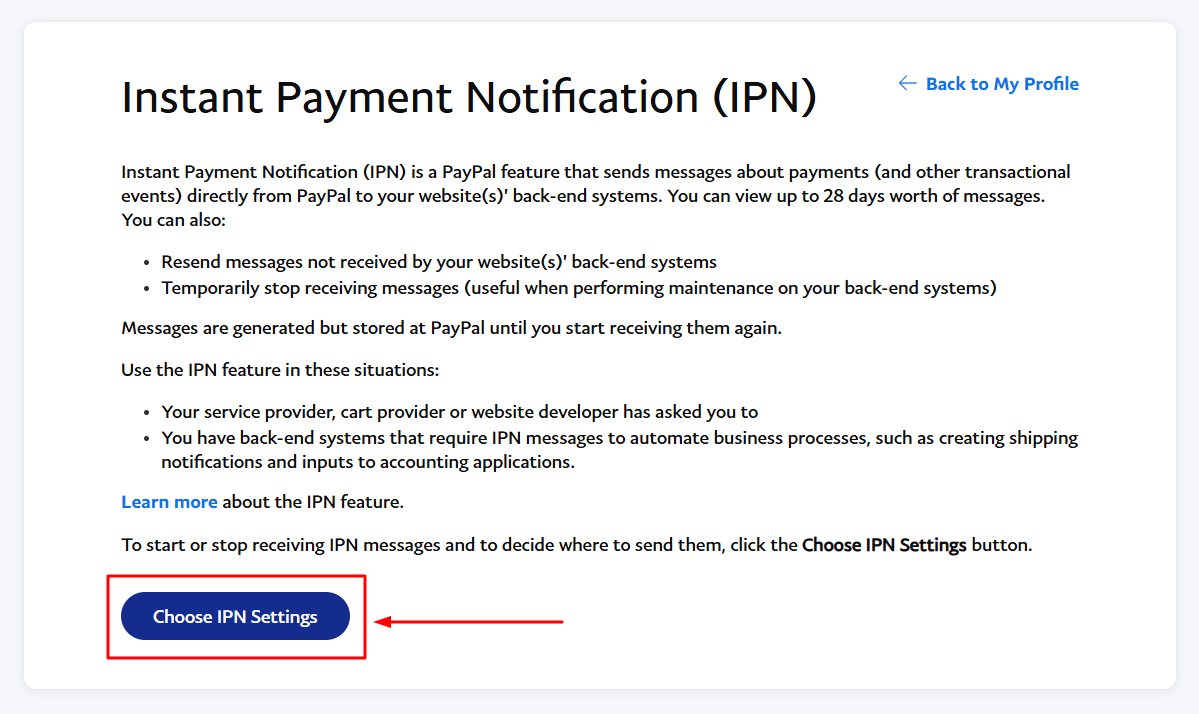
3.4. Open the IPN Settings
- Click Choose IPN Settings.
3.5. Enter the Notification URL
Enter the following URL:
https://yourdomain.com/sponsors/billing/receipt.php
Replace yourdomain.com with your actual website domain.
For example:
https://www.example.com/sponsors/billing/receipt.php
3.6. Enable IPN Messages
- Select Receive IPN messages (Enabled)

3.7. Save the Changes
- Save your IPN configuration.
Important: This step is required to ensure that PayPal sends transaction updates to your eDirectory website correctly.
Step 4: Verify the PayPal Integration
After completing the PayPal configuration, we recommend performing a test purchase to confirm that everything is working correctly.
Perform a Test Purchase
- Visit your website as a visitor.
- Navigate to the List with Us page.
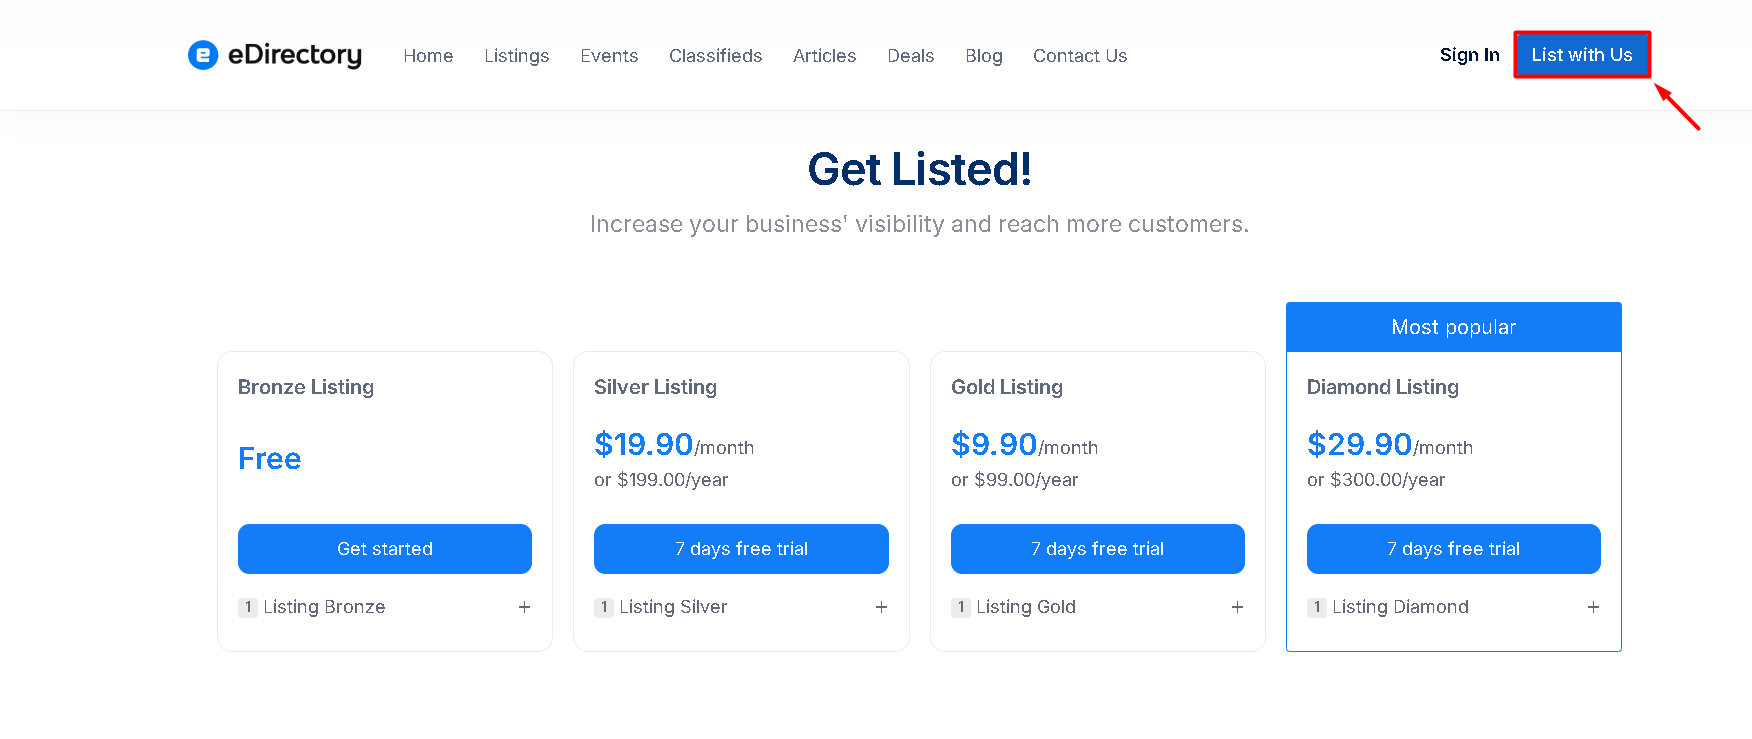
- Purchase one of your subscription plans using PayPal.
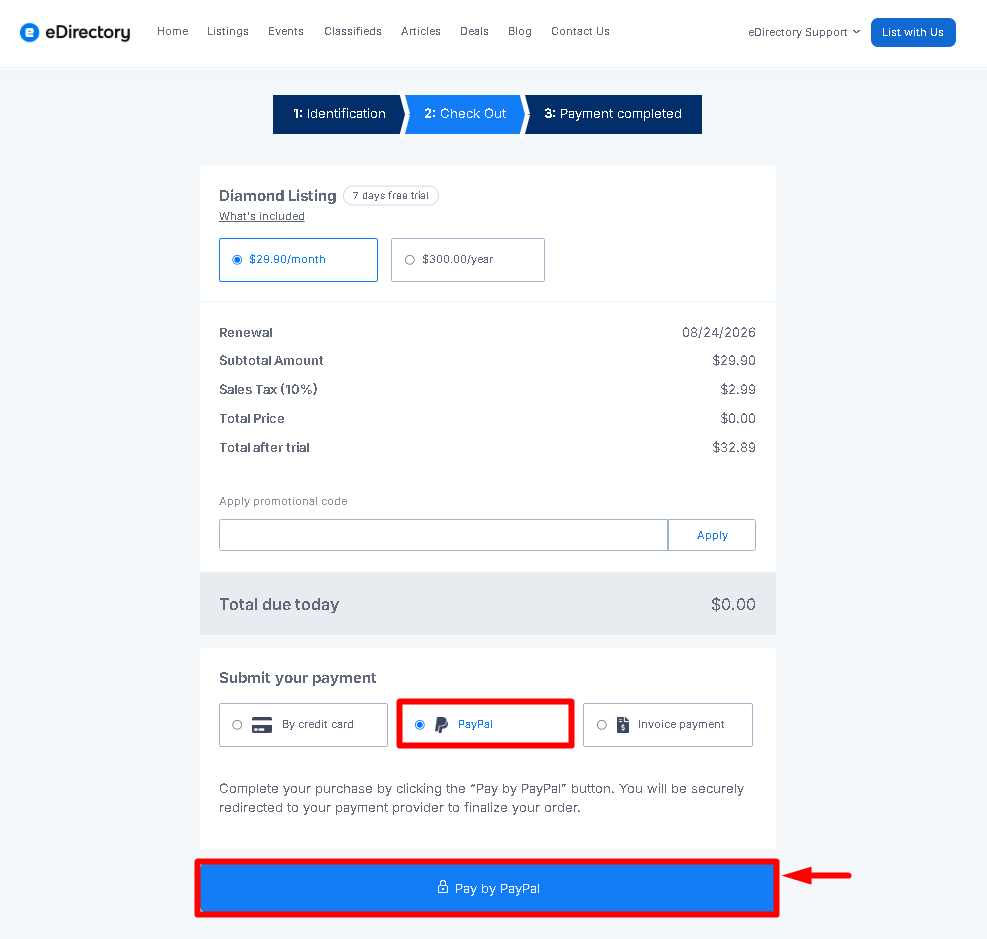
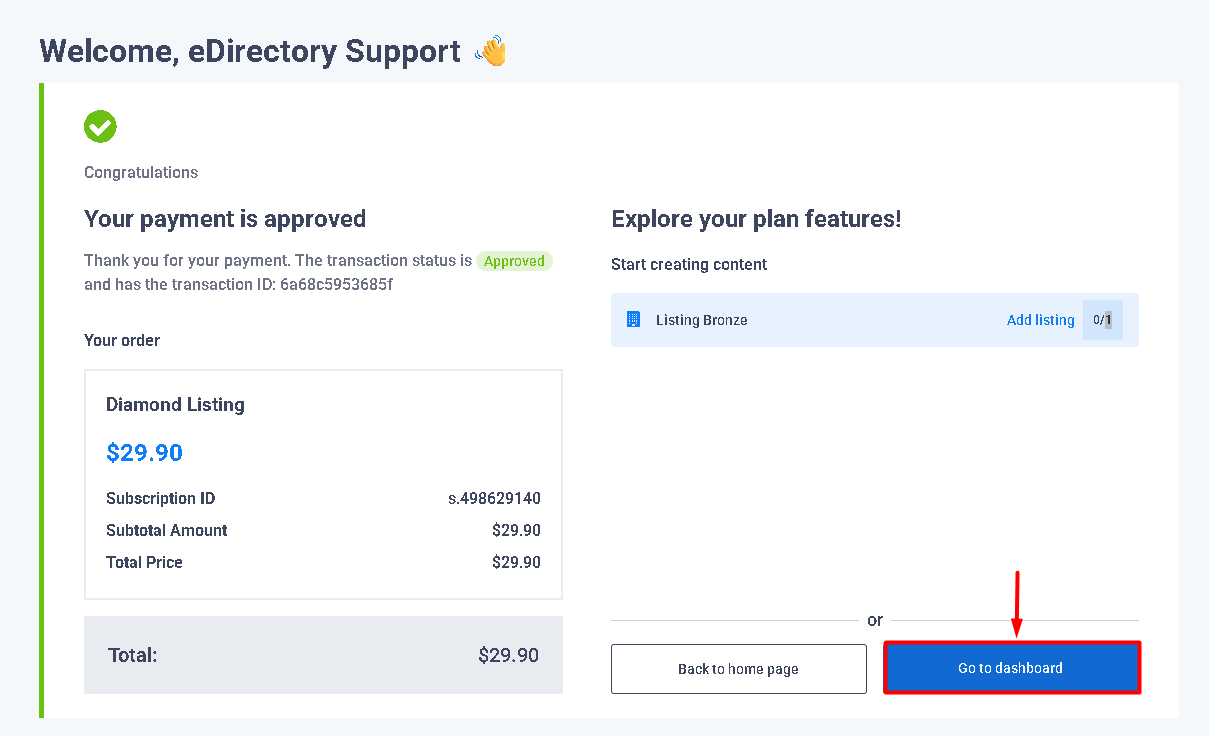
- Complete the checkout process.
Verify the Results
After completing the payment, verify that:
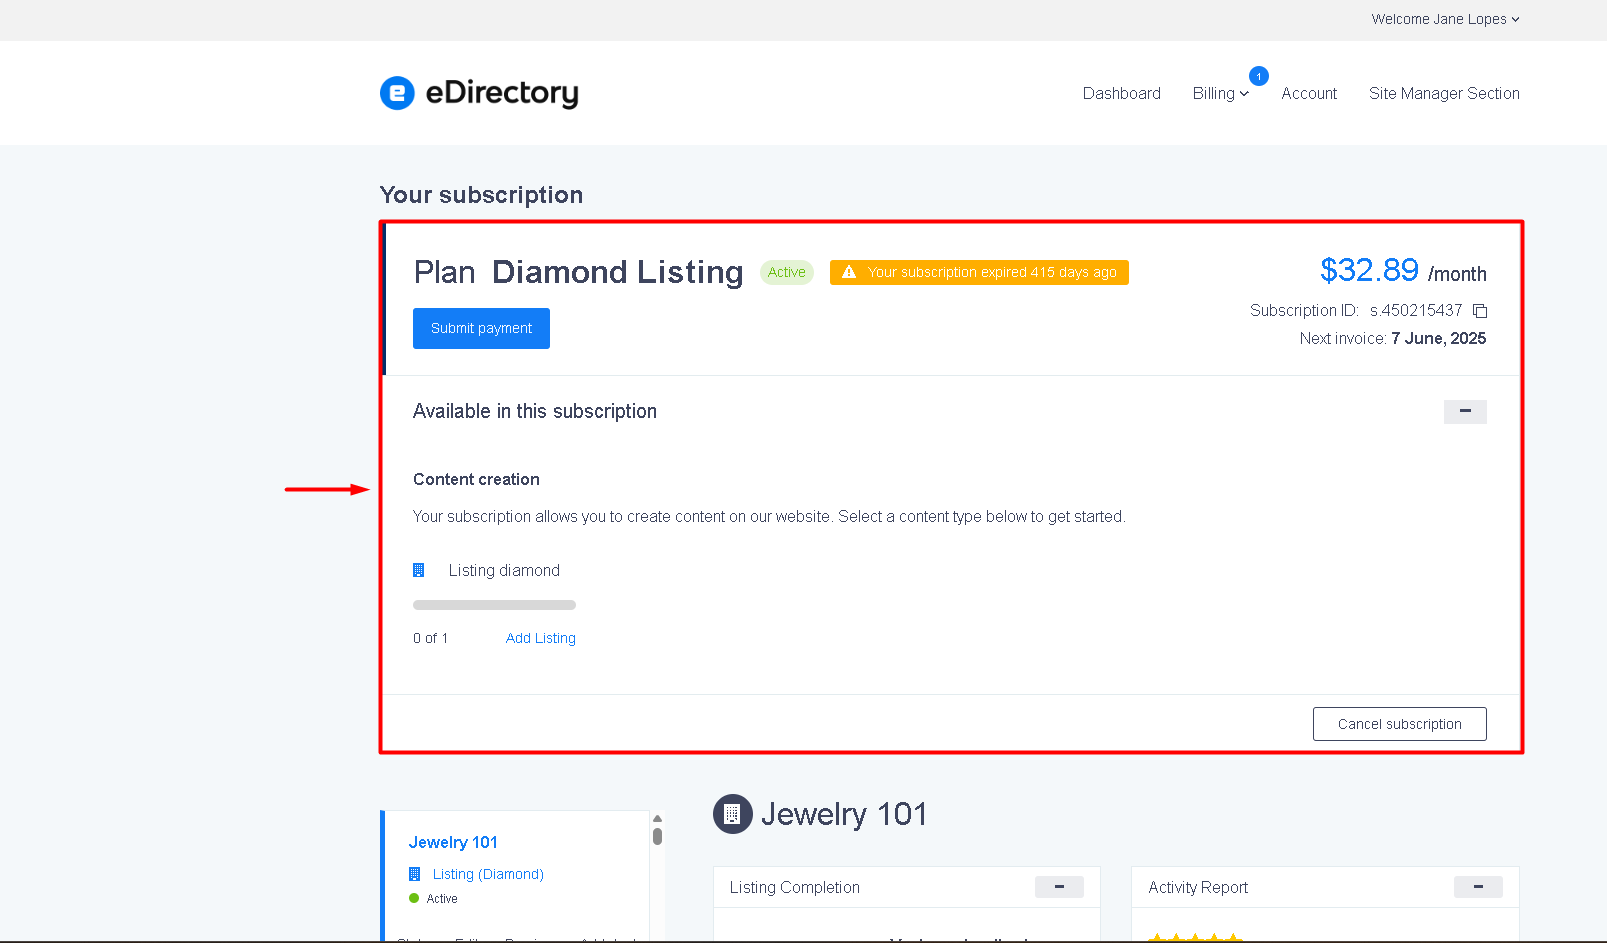
- The subscription has been created under the sponsor's account.
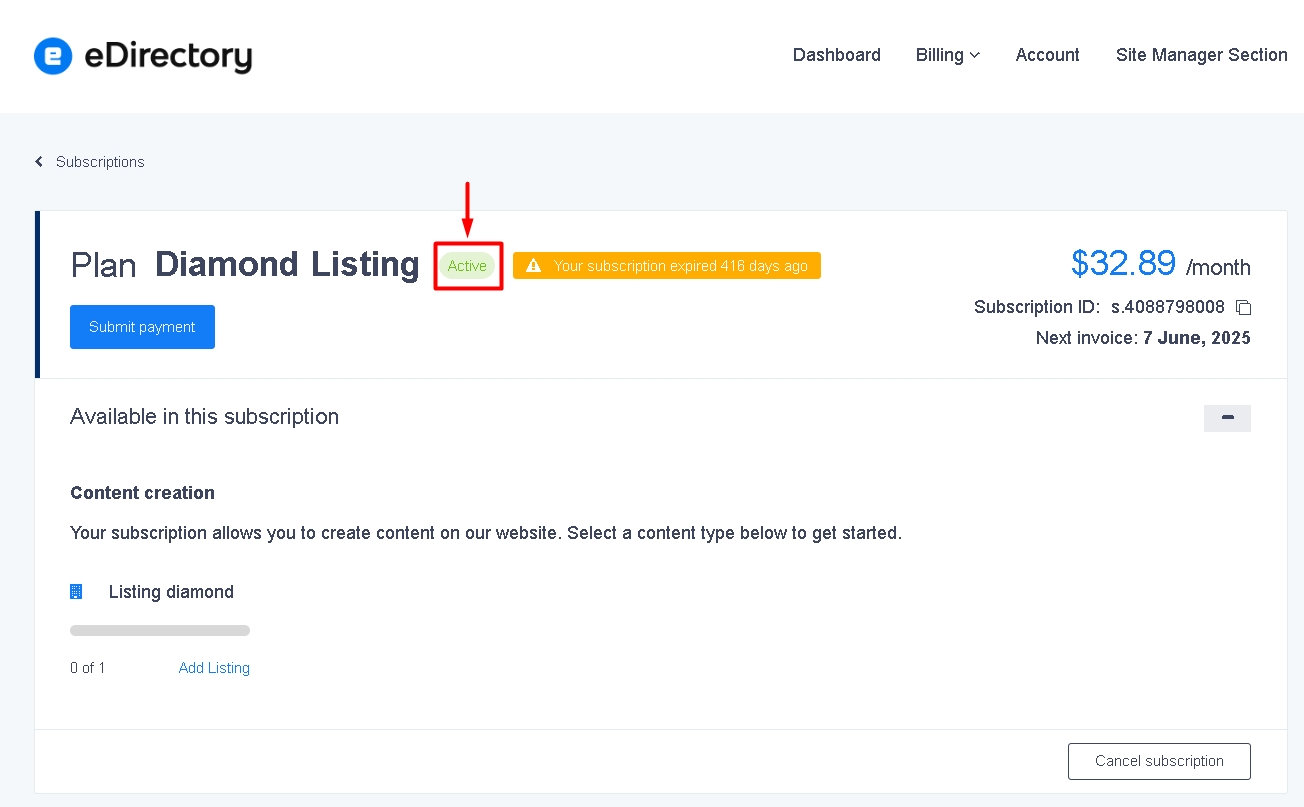
- The subscription status is Active.
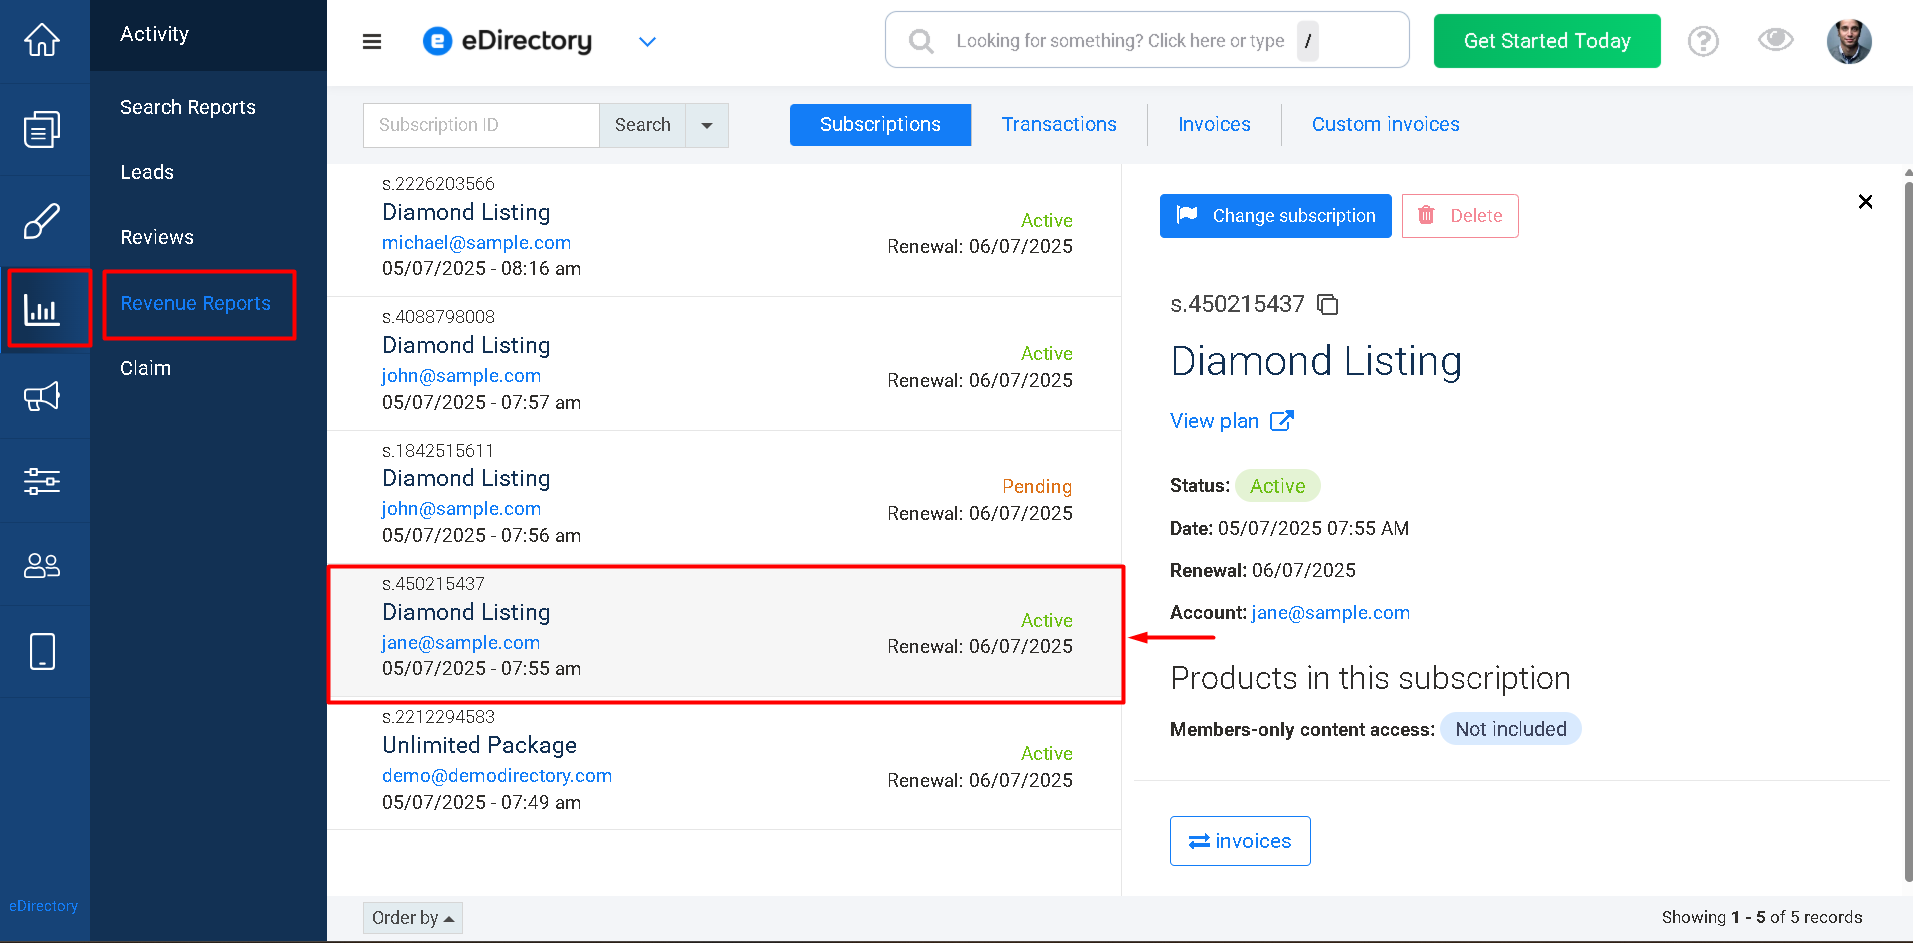
- The transaction appears under Activity → Revenue Reports in your eDirectory Site Manager.
- The payment appears in your PayPal account.
If these items are successful, your PayPal integration has been configured correctly.
Step 5: Make Sure PayPal Is in Live Mode
For your eDirectory website to process real payments, your PayPal application must use the Live environment.
PayPal provides different environments for applications:
- Sandbox — Used for testing.
- Live — Used to process real customer payments.
5.1. Open Apps & Credentials
Go to the PayPal Developer Dashboard and log in with your PayPal Business account.
From the left-hand menu, select Apps & Credentials.
5.2. Select Live
Locate the environment setting and make sure Live is selected.
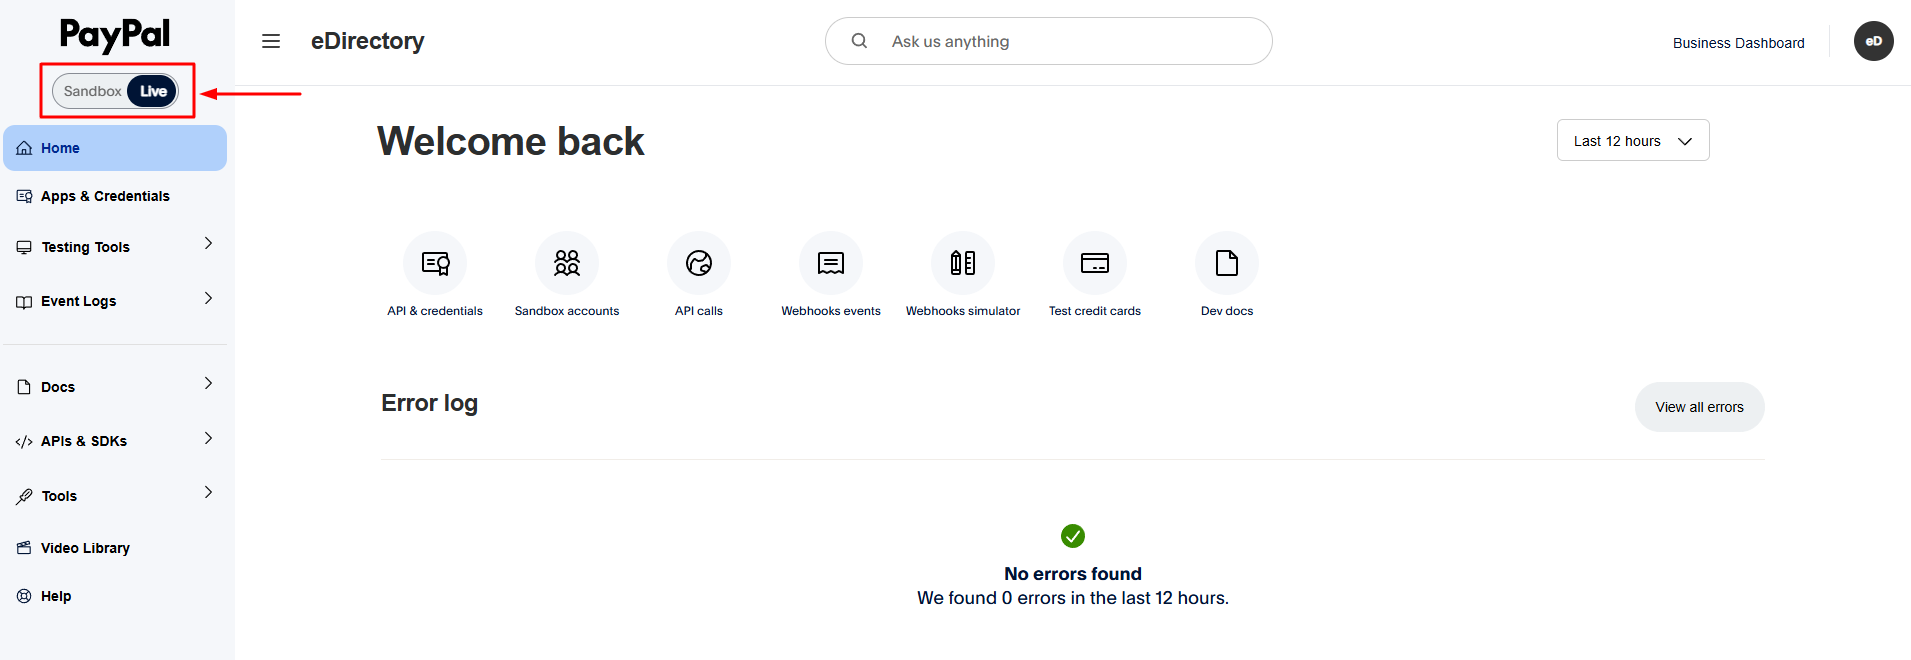
Important: Your eDirectory website must use the Live environment to process real payments.
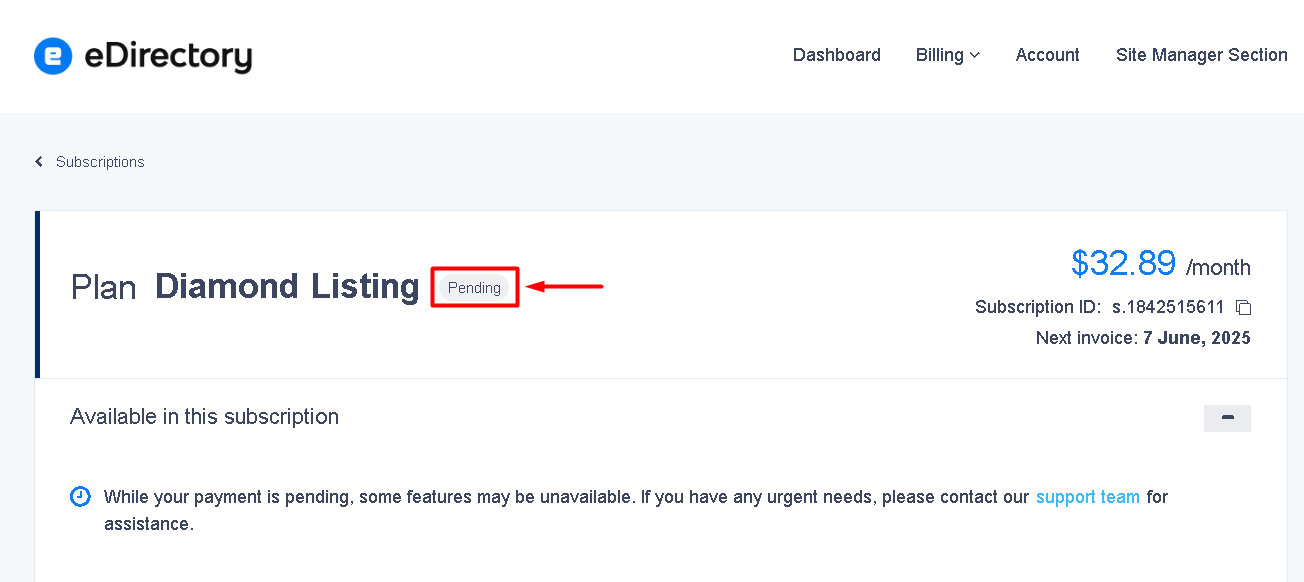
My Subscription Was Created as "Pending"
If your test subscription is created successfully but its status is Pending instead of Active, your website's approval settings are requiring manual approval.
To have subscriptions activated automatically after a successful payment, navigate to Settings → General Settings → Approval Requirements
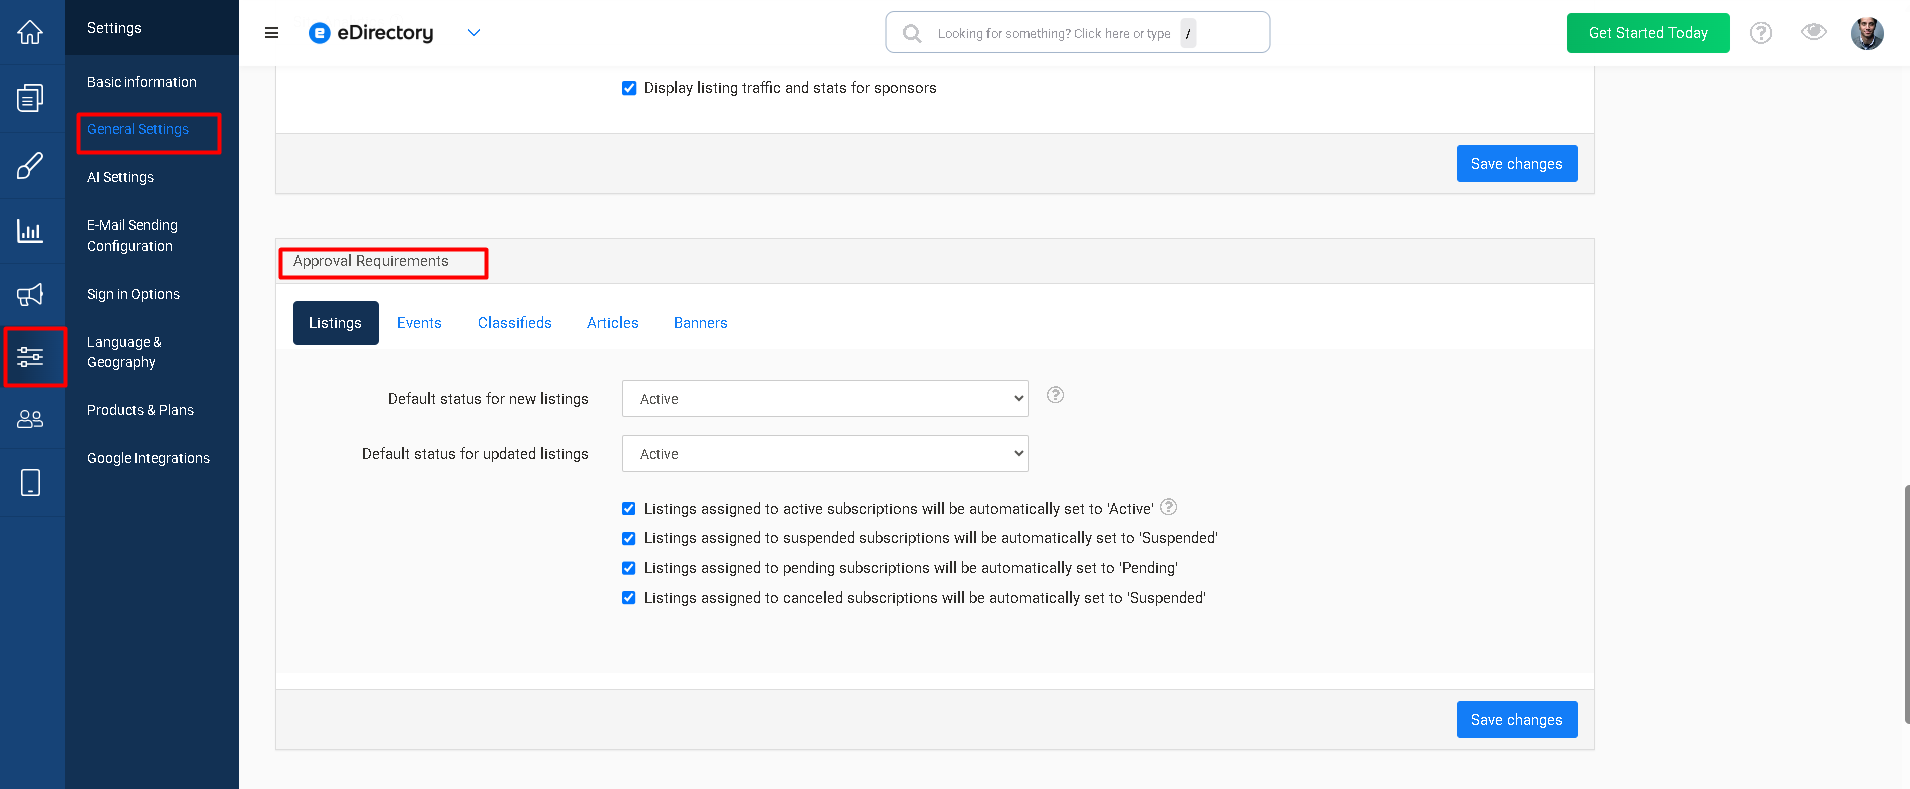
Configure the following options:
Default Status
Set both of these options to Active:
- Default status for new listings
- Default status for updated listings
Synchronize Listing Status with Subscription Status
Make sure all of the following options are enabled:
- ✅ Listings assigned to active subscriptions will be automatically set to Active
- ✅ Listings assigned to suspended subscriptions will be automatically set to Suspended
- ✅ Listings assigned to pending subscriptions will be automatically set to Pending
- ✅ Listings assigned to canceled subscriptions will be automatically set to Suspended
These options ensure that whenever a subscription changes status, the listings associated with that subscription automatically receive the same status.
Automatic Subscription Renewals
If you intend to offer recurring subscription payments, ensure the "Auto Bill" option is enabled. Navigate to Settings → Products & Plans → Additional settings & payment gateways and activate the "Enable Auto Bill" toggle.
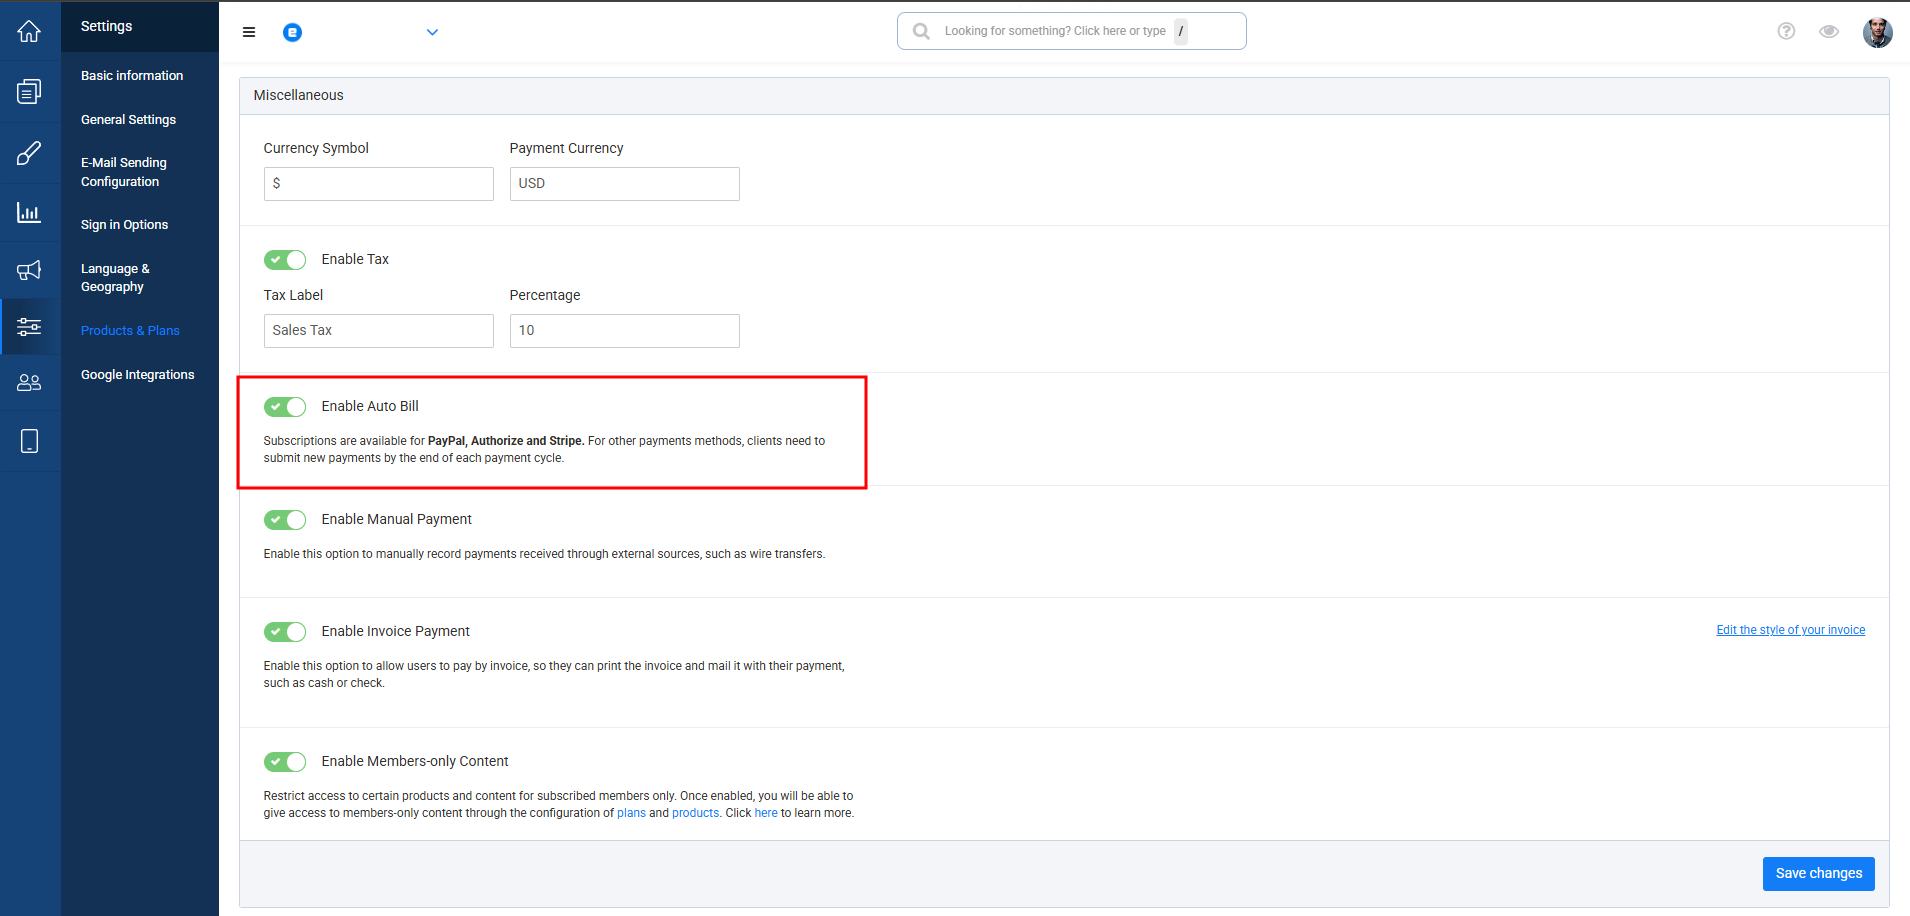
Note: For renewals to activate subscriptions correctly, the IPN configured in Step 3 must also be working properly, as it is responsible for notifying your eDirectory website whenever Paypal successfully processes a payment.
After completing the Paypal configuration, it is recommended to perform a test purchase to ensure everything is working correctly.
Troubleshooting
The PayPal payment is not being processed.
If customers are unable to complete a PayPal payment, verify the following:
- PayPal is enabled under Settings → Products & Plans → Additional settings & payment gateways.
- The PayPal account email address is correct.
- The Client ID entered in eDirectory matches the Client ID from your PayPal application.
- The Client Secret entered in eDirectory matches the Secret Key from your PayPal application.
- The PayPal application is configured for the Live environment.
- The PayPal account is active and configured as a Business account.
After checking the configuration, save the changes and perform another test purchase.
The payment was completed, but the subscription was not activated automatically.
If PayPal successfully processed the payment but the subscription was not activated automatically, verify that the PayPal IPN is configured correctly.
Check the following:
- Log in to your PayPal account.
- Go to Account Settings → Notifications → Instant Payment Notifications.
- Verify that IPN is enabled.
- Confirm that the Notification URL is exactly:
https://yourdomain.com/sponsors/billing/receipt.php - Replace yourdomain.com with your actual eDirectory domain.
- Save the IPN configuration.
- Perform another test purchase.
The IPN configuration is responsible for sending PayPal transaction notifications back to your eDirectory website.
The PayPal application is in Sandbox mode.
If your PayPal application is configured for Sandbox, it will not process real payments on your live website.
To resolve this:
- Log in to the PayPal Developer Dashboard.
- Go to Apps & Credentials.
- Select the Live environment.
- Make sure your eDirectory configuration is using the credentials associated with the Live environment.
- Save the changes in eDirectory.
- Test the payment again.
Conclusion
Congratulations! PayPal is now configured as a payment gateway on your eDirectory website.
By completing the PayPal Business account setup, API credential configuration, eDirectory payment gateway settings, and IPN configuration, your website is ready to process PayPal payments and receive transaction notifications automatically.
Before going live, always perform a test purchase and confirm that the payment, subscription status, and transaction information are correctly recorded in eDirectory.