How to Configure Login with Apple
Introduction
This guide outlines the essential steps to configure Apple Sign-in for your application. By integrating Apple's secure and user-friendly authentication method, you can streamline the login process for your users, allowing them to access your app seamlessly using their existing Apple ID.
Before proceeding, ensure you have already created a Client ID during the app-building process and have your App ID set up within your Apple Developer account.
This process involves generating a Service ID, configuring a Redirect URL, creating a Sign in with Apple key, and finally, configuring these credentials within your website's Site Manager. Follow these steps carefully to enable Apple Sign-in for your app.
Note: If you have not yet started the iOS App Building process, it is important to follow the steps outlined in our article prior to initiating the Apple Login process. You can refer to the following link for more information: iOS App Building and Submission
Generating Service ID and Configuring Redirect URL
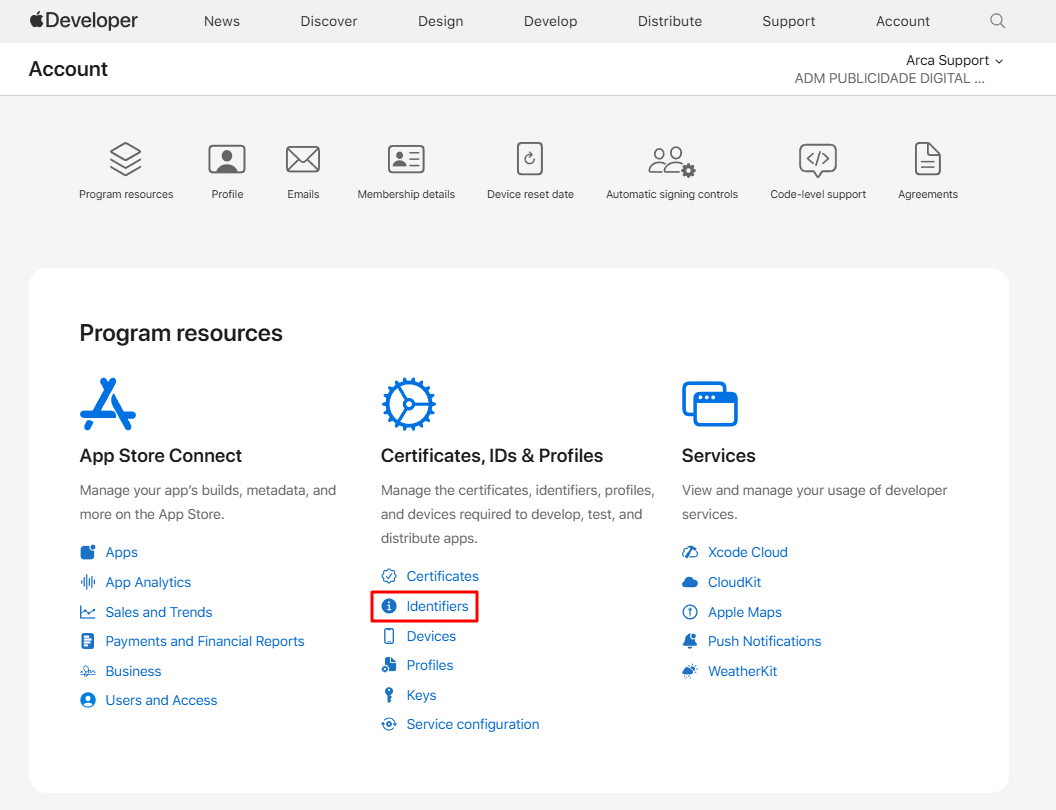
- Navigate to Identifiers: Go to your Apple Developer account and click on "Identifiers." Then, click the "+" (Add) button.

- Select Service IDs: Choose "Service IDs" as the identifier type and click "Continue."

- Create Service ID:
- Enter a descriptive "Description" for your Service ID.
- For the "Identifier," use your app's Bundle ID obtained from your App Builder (typically starting with
com.arcasolutions.builder...) and append.loginto the end. For example:com.arcasolutions.builder123456789.login. - Click "Continue."

- Register Service ID: Review the details of your Service ID and click "Register."

-
After registering, click back on the newly created Service ID in the list. You should now be able to configure its Sign In with Apple settings. Enter your app's App ID and your domain and subdomain information.
Important Domain Formatting: The domain you enter must not include the protocol (
https://) or a trailing slash (/). Including these will result in an "Invalid domain" error.Return URL: The designated Return URL for Apple Sign-in should be: https://YourDomain.com/sponsors/appleauth.php (replace YourDomain.com with your actual domain name).
Click "Continue" and then "Save" the Service ID configuration.


Generating Sign in with Apple Key:
- Navigate to Keys: Go back to the main screen of your Apple Developer account. Select "Keys" and click the "+" (Add) button.

- Configure Sign in with Apple Key: Select the "Sign in with Apple" service and click "Configure."

- Associate Key with App ID: Choose your App ID from the available options and click "Save."

- Download Private Key and Note Key ID: You can now view your "Key ID". Click the "Download" button to download your private key file (typically a
.p8file). Make sure to securely save both the Key ID and the downloaded private key file, as you will need them in the subsequent steps.

Retrieving Team ID
- Locate Membership Details: Go back to the Apple Developer account home page and scroll down until you see the "Membership Details".
- Copy Team ID: Locate and copy your "Team ID."

Configuring Sign-in Options in Your Site Manager
- Go to your website's Site Manager (admin panel) and navigate to the "Sign In options" section. Fill out the following fields using the information you gathered in the previous steps:
- 11.1- Team ID: Enter the "Team ID" you copied in Steps 9 and 10.
- 11.2- Key ID and Private key: Enter the "Key ID" and upload the private key file (.p8) you downloaded in Step 8.
- 11.3- Client ID: Use your app's Bundle ID (the same one you used to create the Service ID, for example:
com.arcasolutions.builder123456789). Ensure you include.loginat the end of the Bundle ID.


Conclusion
By following these detailed steps, you have successfully configured Apple Sign-in for your application. This will provide your users with a secure and convenient way to authenticate using their Apple IDs, enhancing their overall experience. Remember to keep your private key file secure and refer back to this guide if you need to review the configuration settings. Should you encounter any questions or require further assistance during this process, please do not hesitate to contact our support team at support@edirectory.com.