
How to Activate Google Nearby Results API
Introduction
This guide provides a comprehensive, step-by-step process for configuring the Google Nearby Results API on your eDirectory website.
The Nearby Results feature allows visitors to search for listings based on their current geographic location, displaying businesses that are closest to them. To use this feature, you'll need to create a Server API Key in your Google Cloud project and configure it within your eDirectory Site Manager.
Important: The Google Nearby Results API Key is different from the Google Maps API Key used to display maps. Although both can belong to the same Google Cloud project, they require different security restrictions and are configured separately.
Instructions for Google Nearby Results API Integration
Step 1: Create a Project in the Google Cloud Platform Console
Note: If you have already created a Google Cloud project while configuring Google Maps, you may use the same project and skip to Step 2 Enable the Required APIs.
1.1. Ensure you are logged into your Google Account and navigate to the Google Cloud Platform API Console.
1.2. Click Select a project at the top and choose New project.
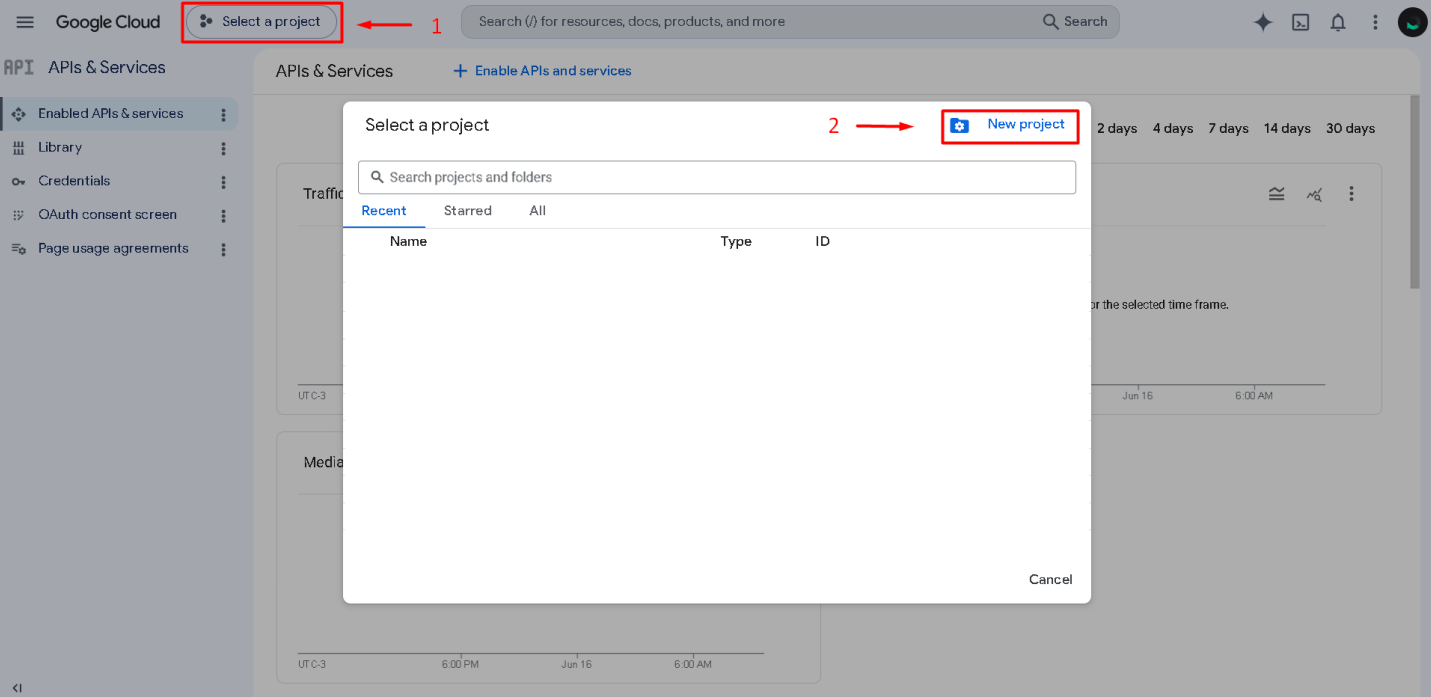
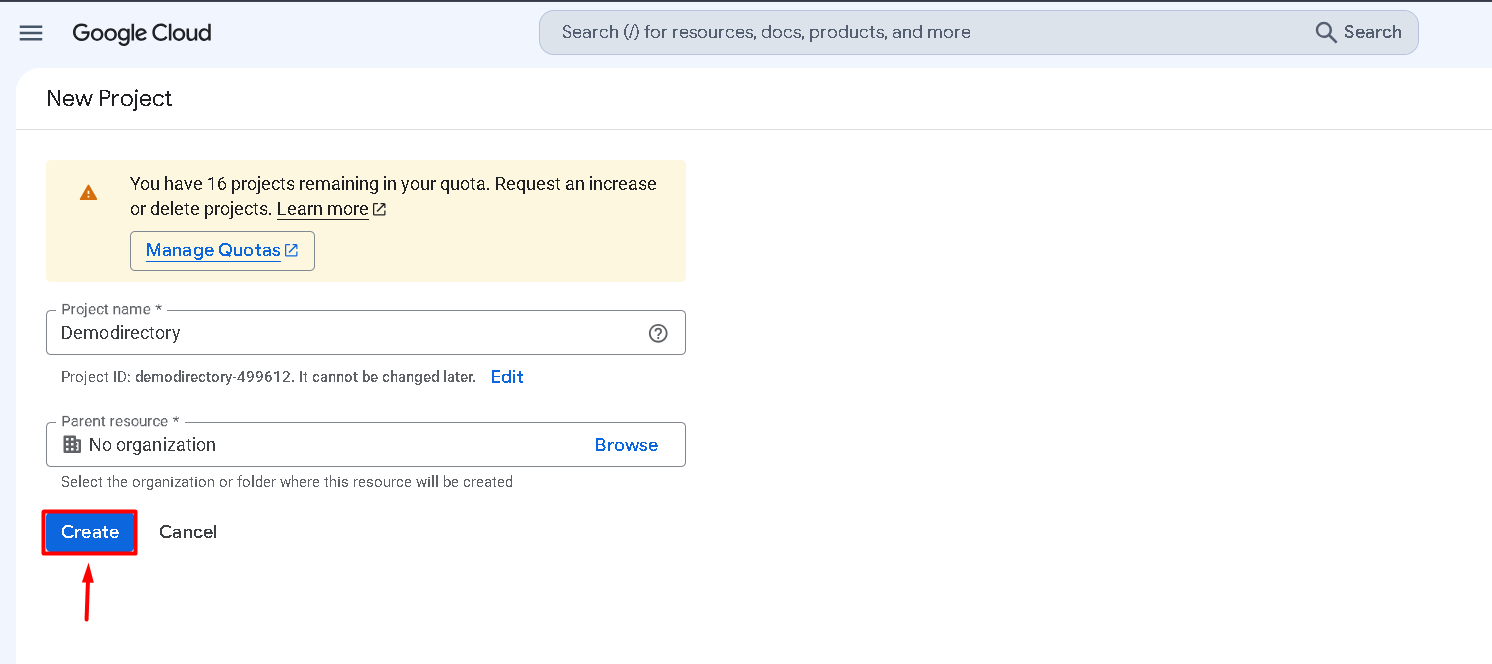
1.3. Fill in the following project information:
- Project name: Enter a descriptive name (for example, your website name).
- Organization: If applicable, select your organization.
- Click Create.
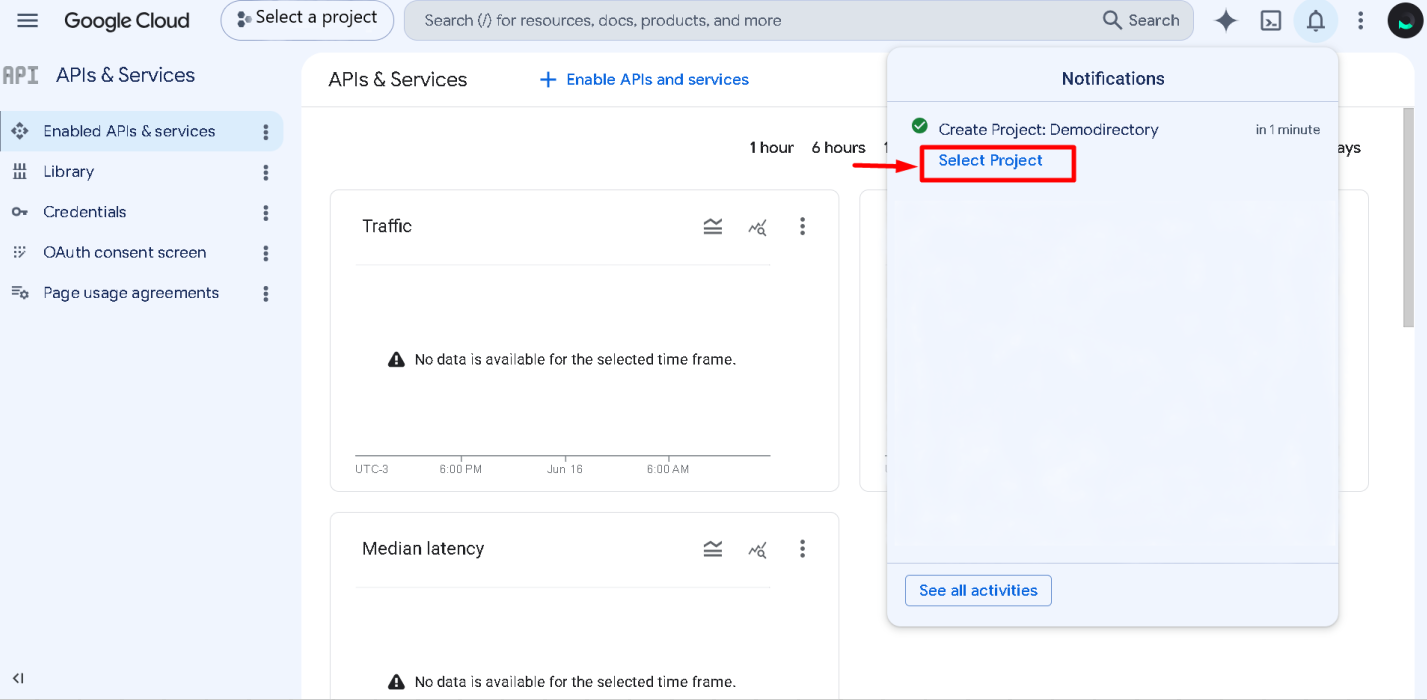
1.4. Select your newly created project.
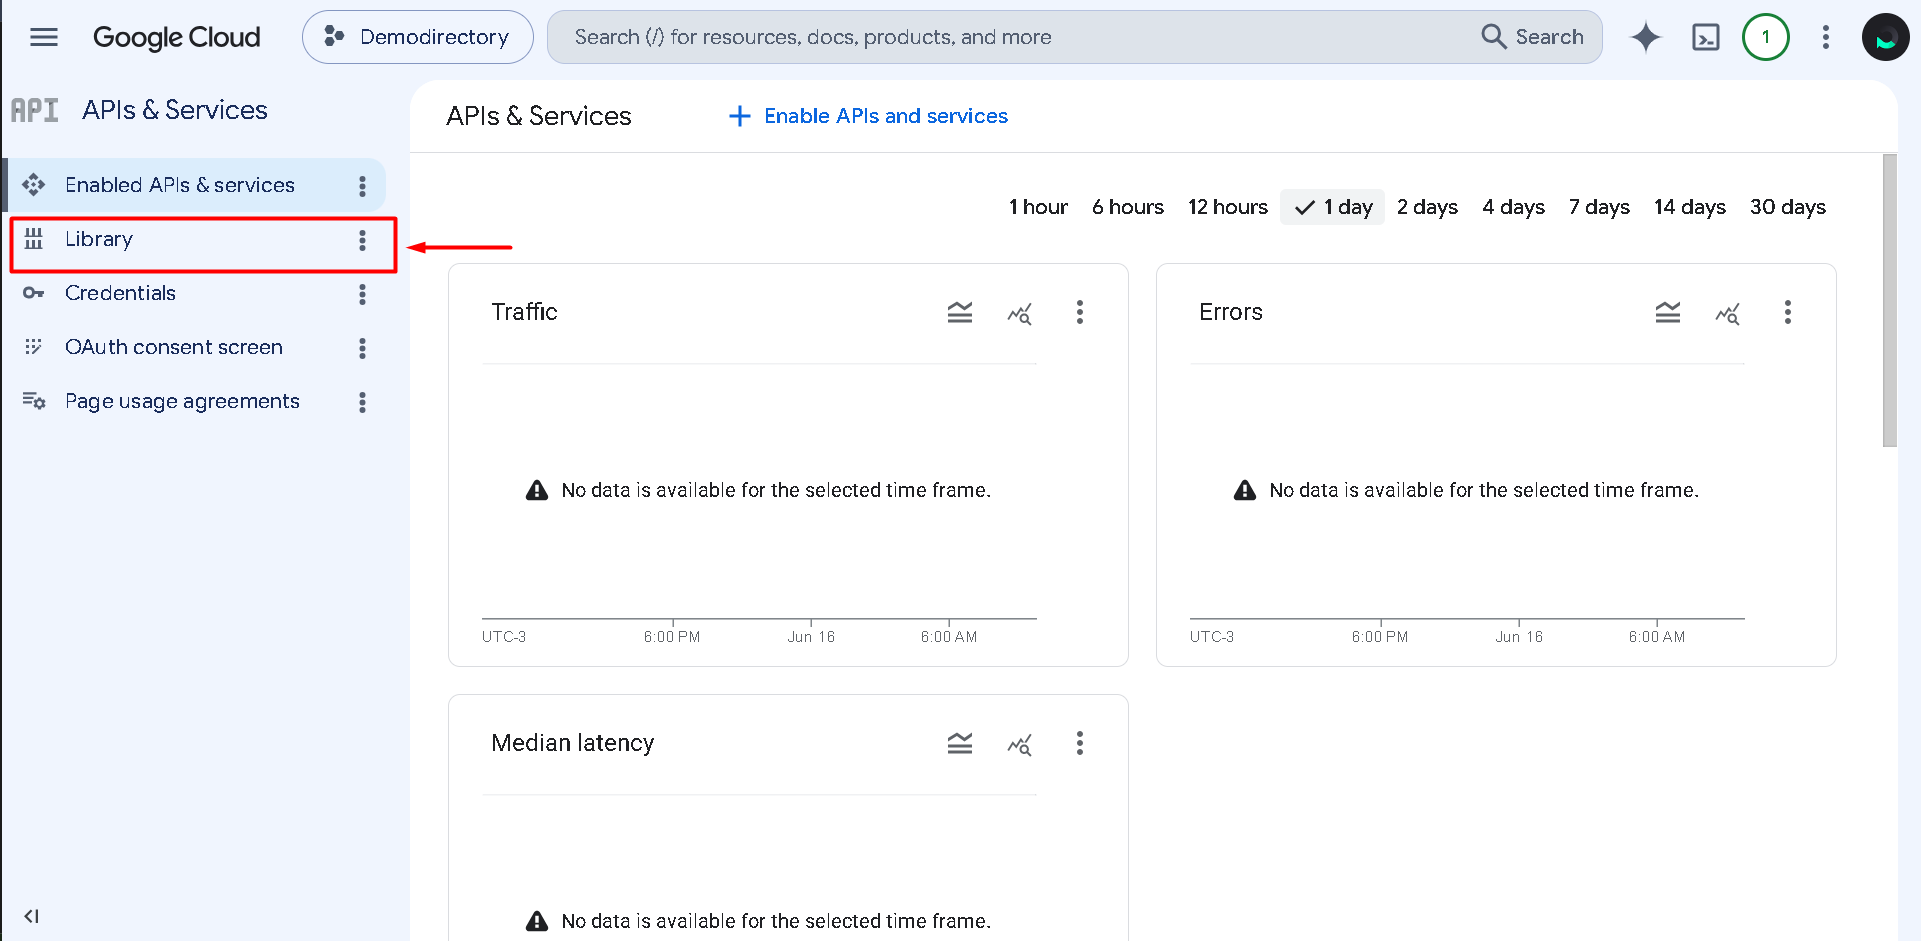
Step 2: Enable the Required APIs
2.1. Click Library.
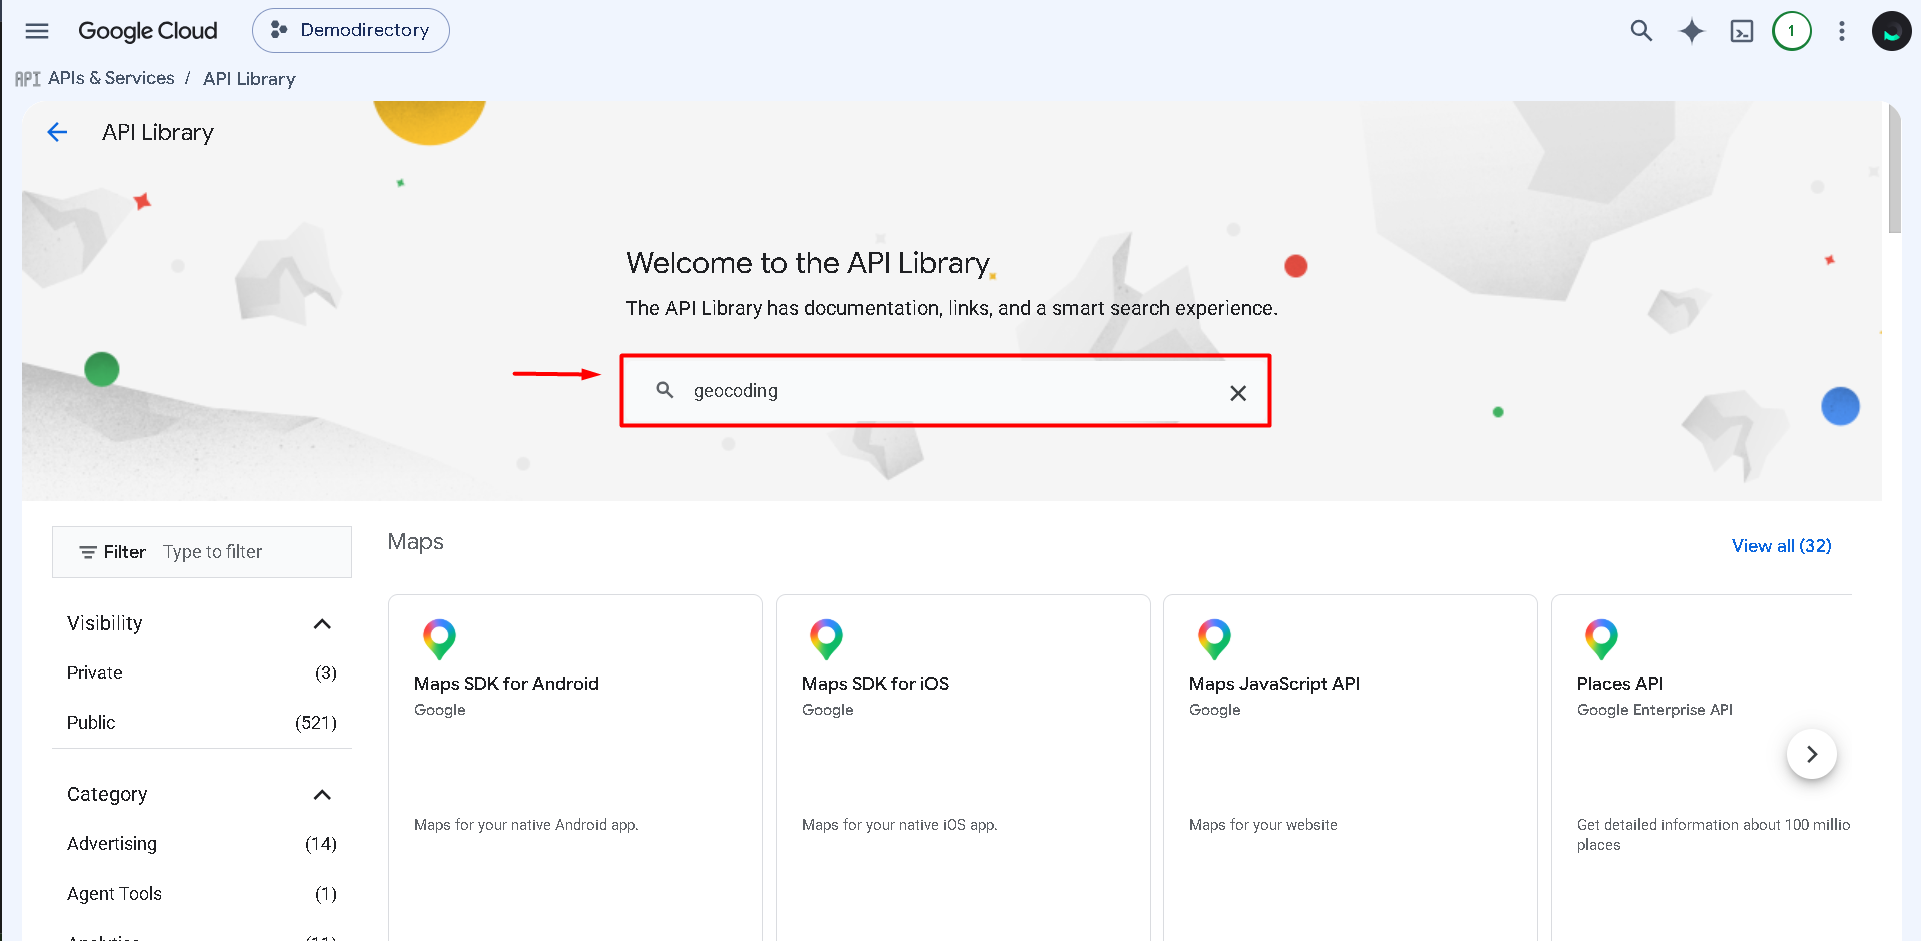
2.2. Search for "geocoding"
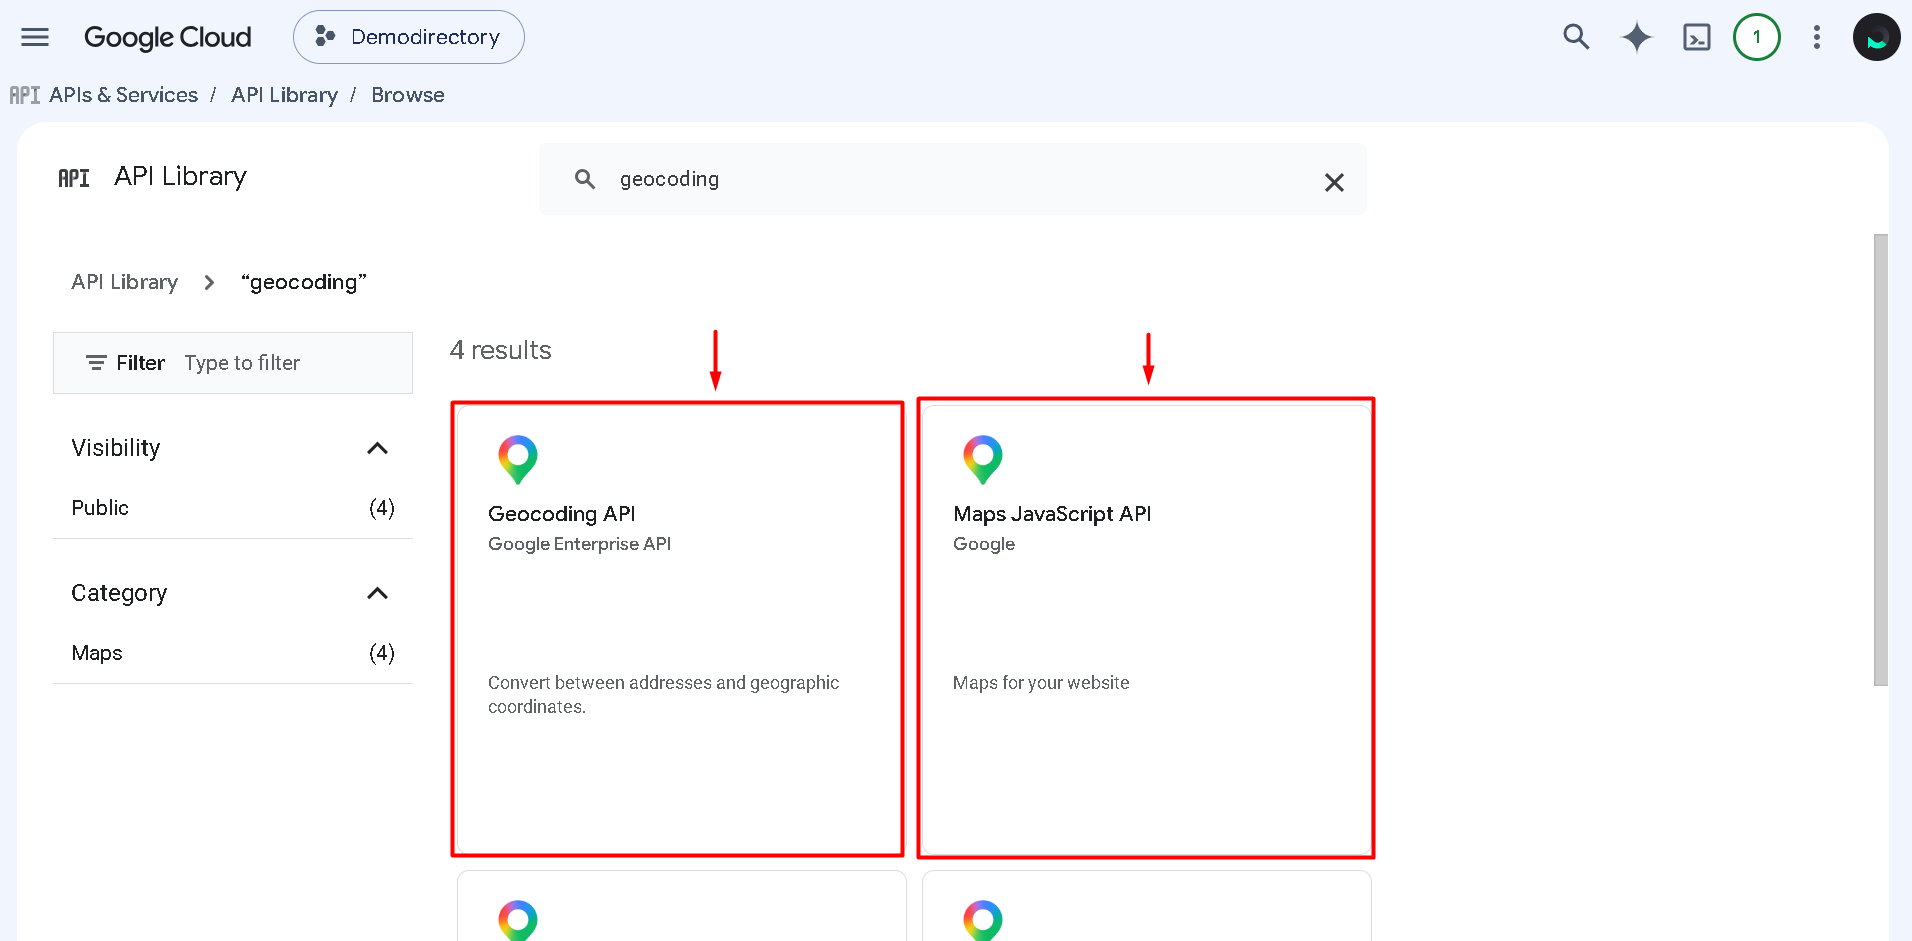
2.3. Click on both "Geocoding API" and "Maps JavaScript API" individually.
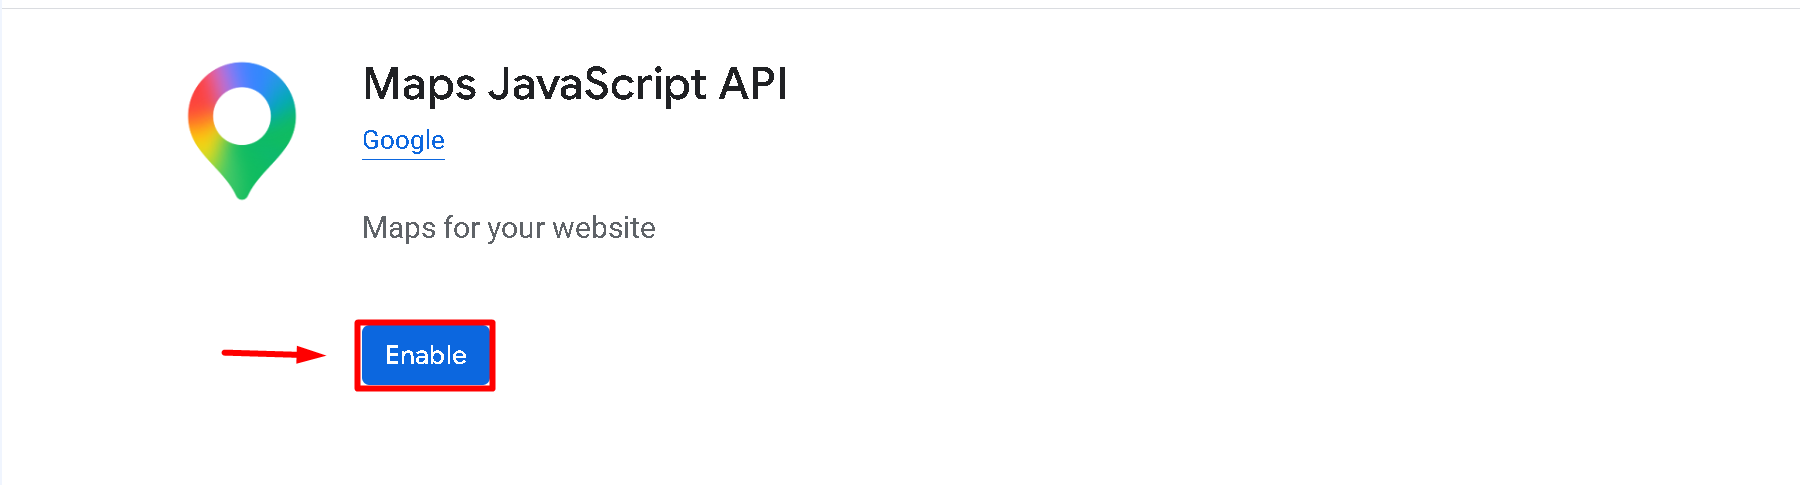
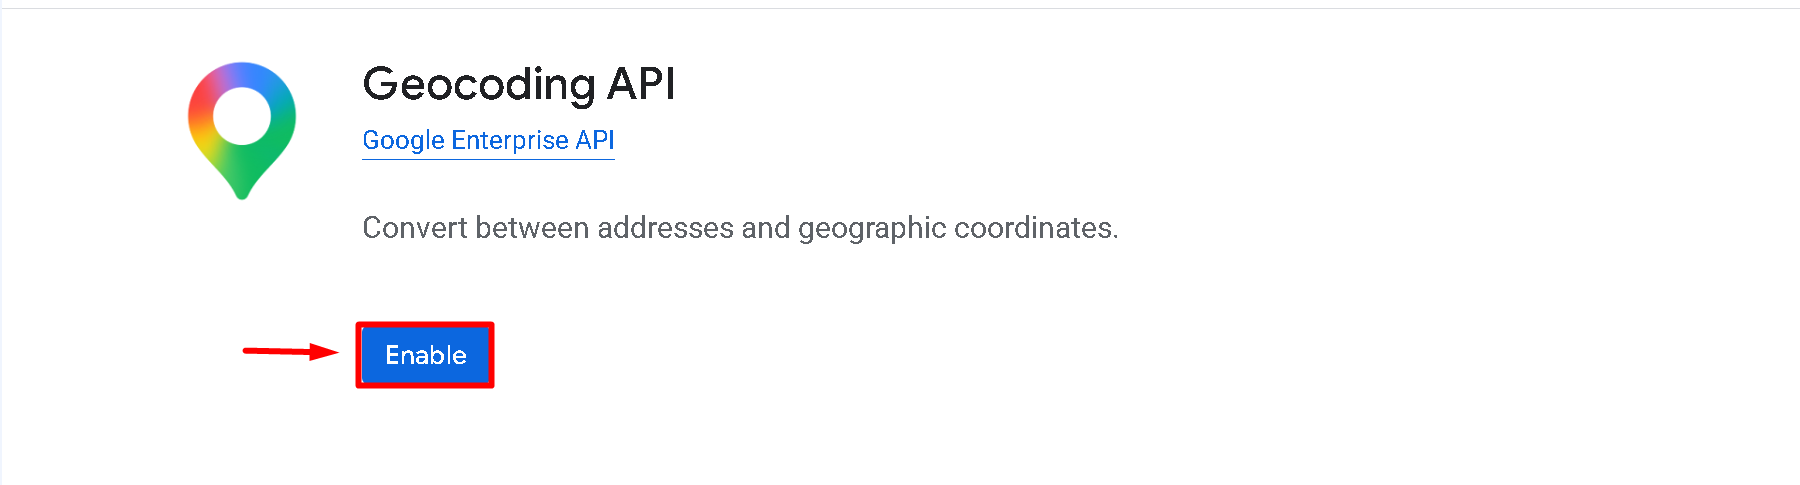
2.4. Click Enable on both APIs.
Important: Probably, after clicking on "Enable", Google will request you to link your project to a billing account. This is a necessary step in order to display the maps on your eDirectory website. Please, configure your billing after enabling the abovementioned APIs.
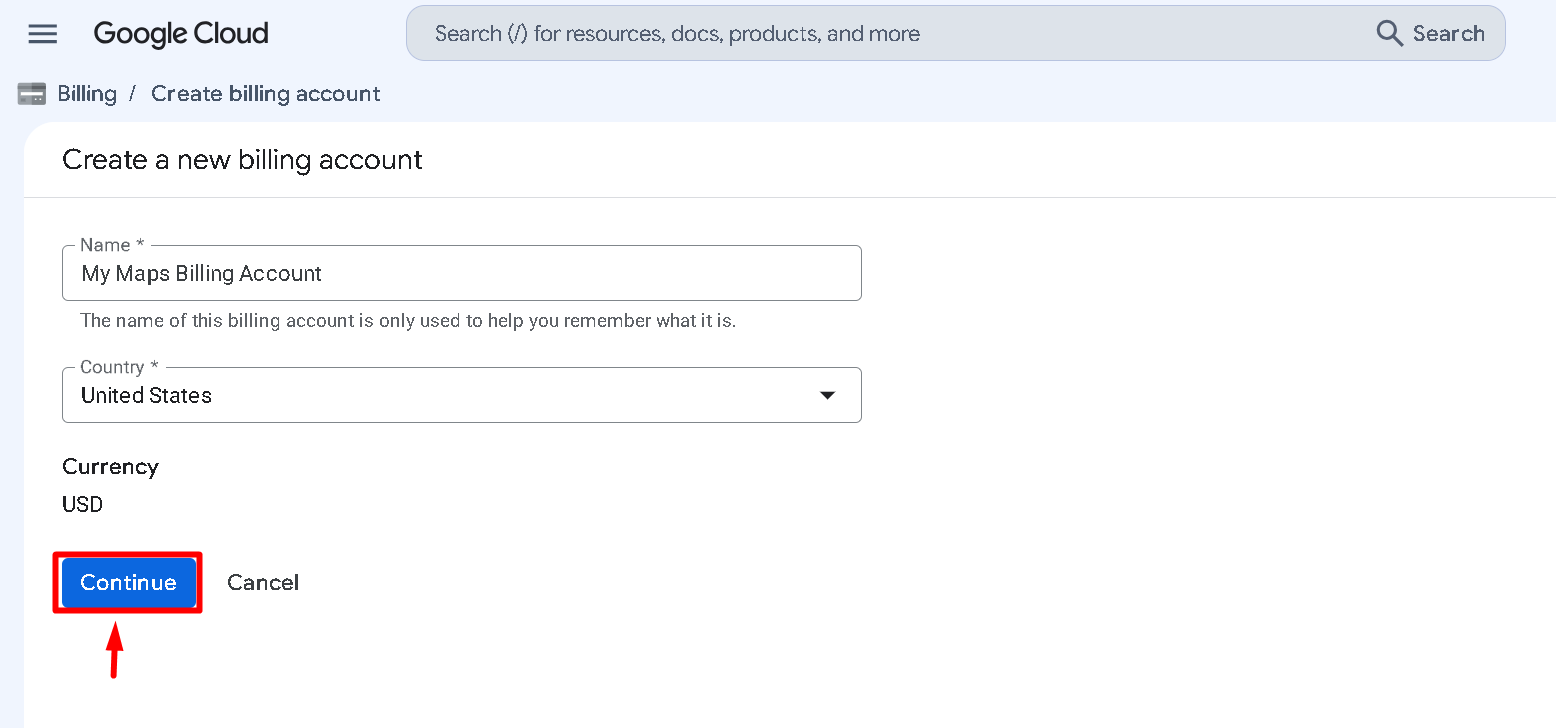
Follow the onscreen instructions to link a billing account to your Google Maps project. Please, note that this step is essential to display the map on the site. Google will not allow the display of the maps on the site unless a billing account is configured, since they charge to use their API.
Check this Google article to learn more on how they charge for their API: Google Maps Platform Billing
Step 3: Create the Google Nearby Results Server API Key
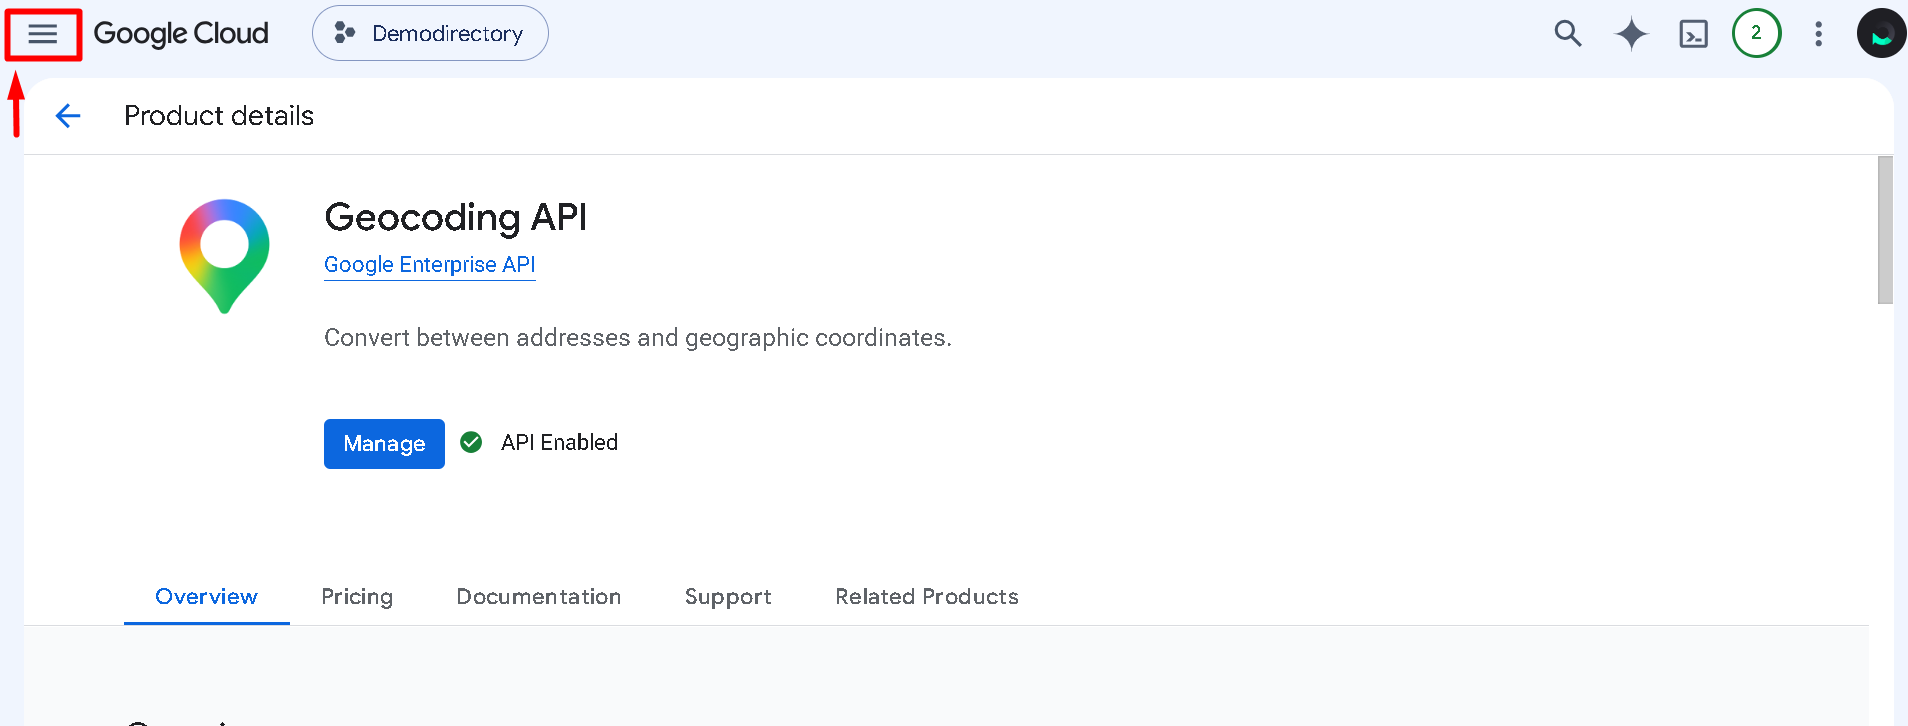
3.1. Click the menu button.
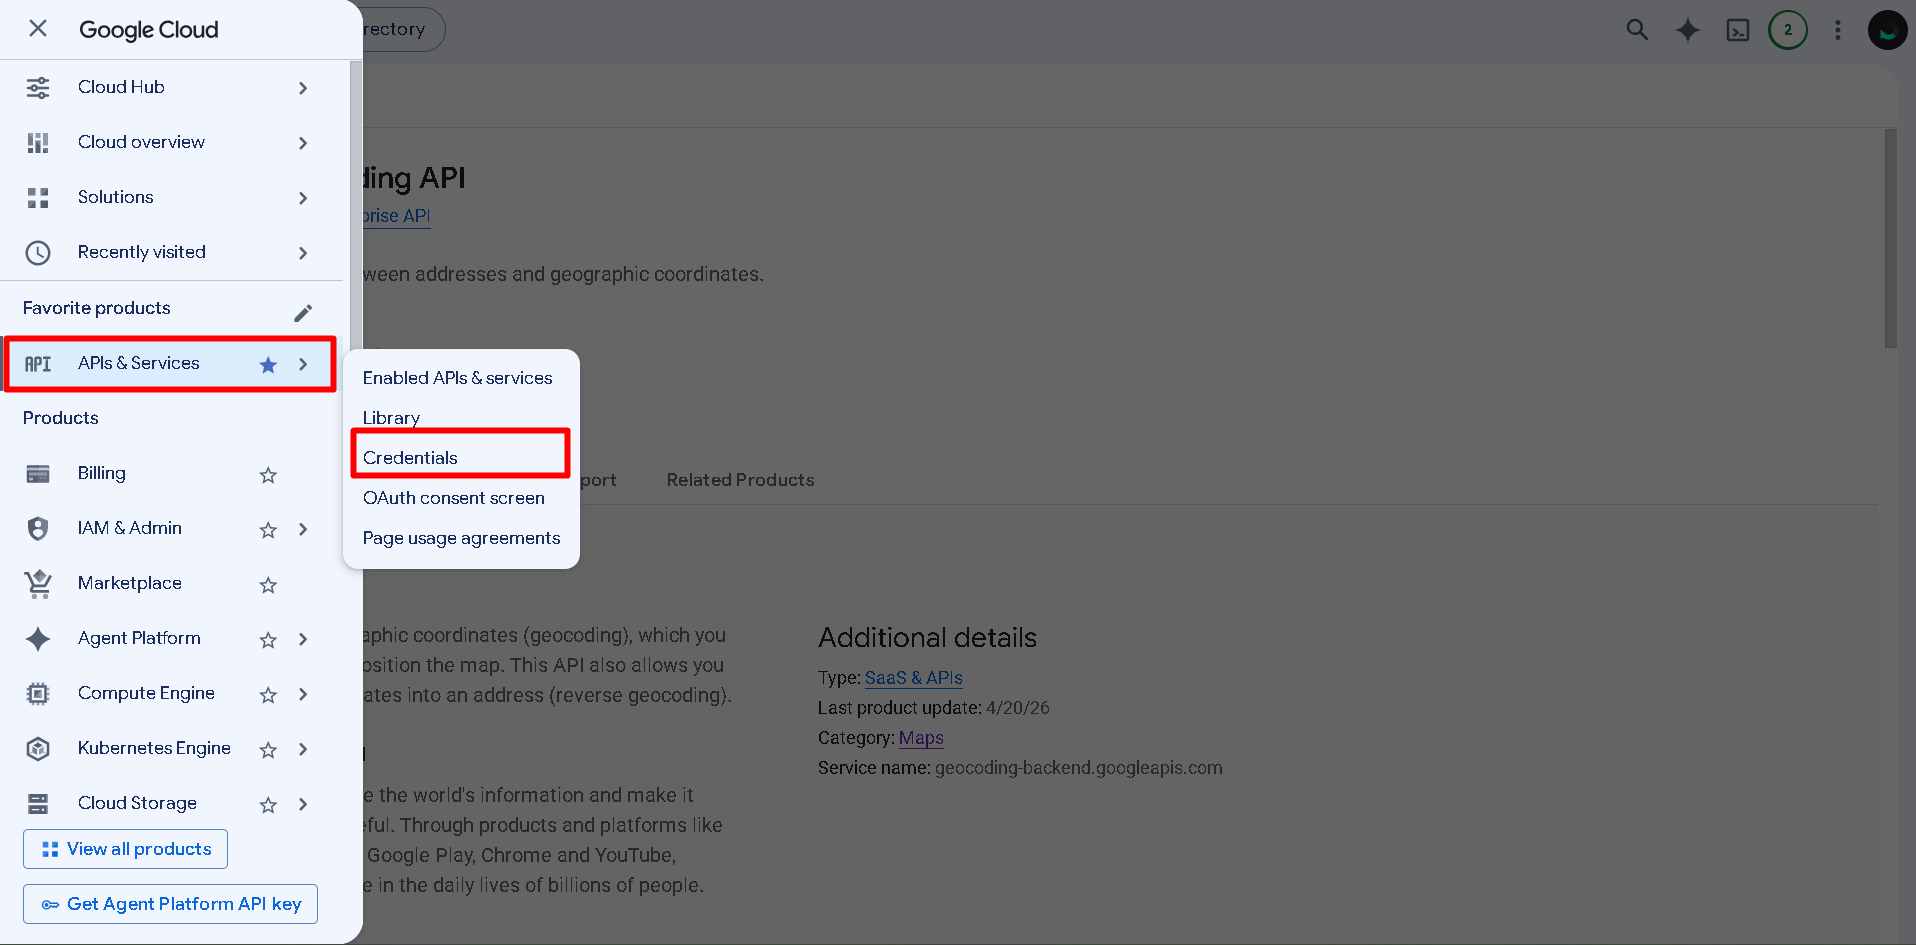
3.2. Navigate to "APIs & Services," and select "Crendencials"
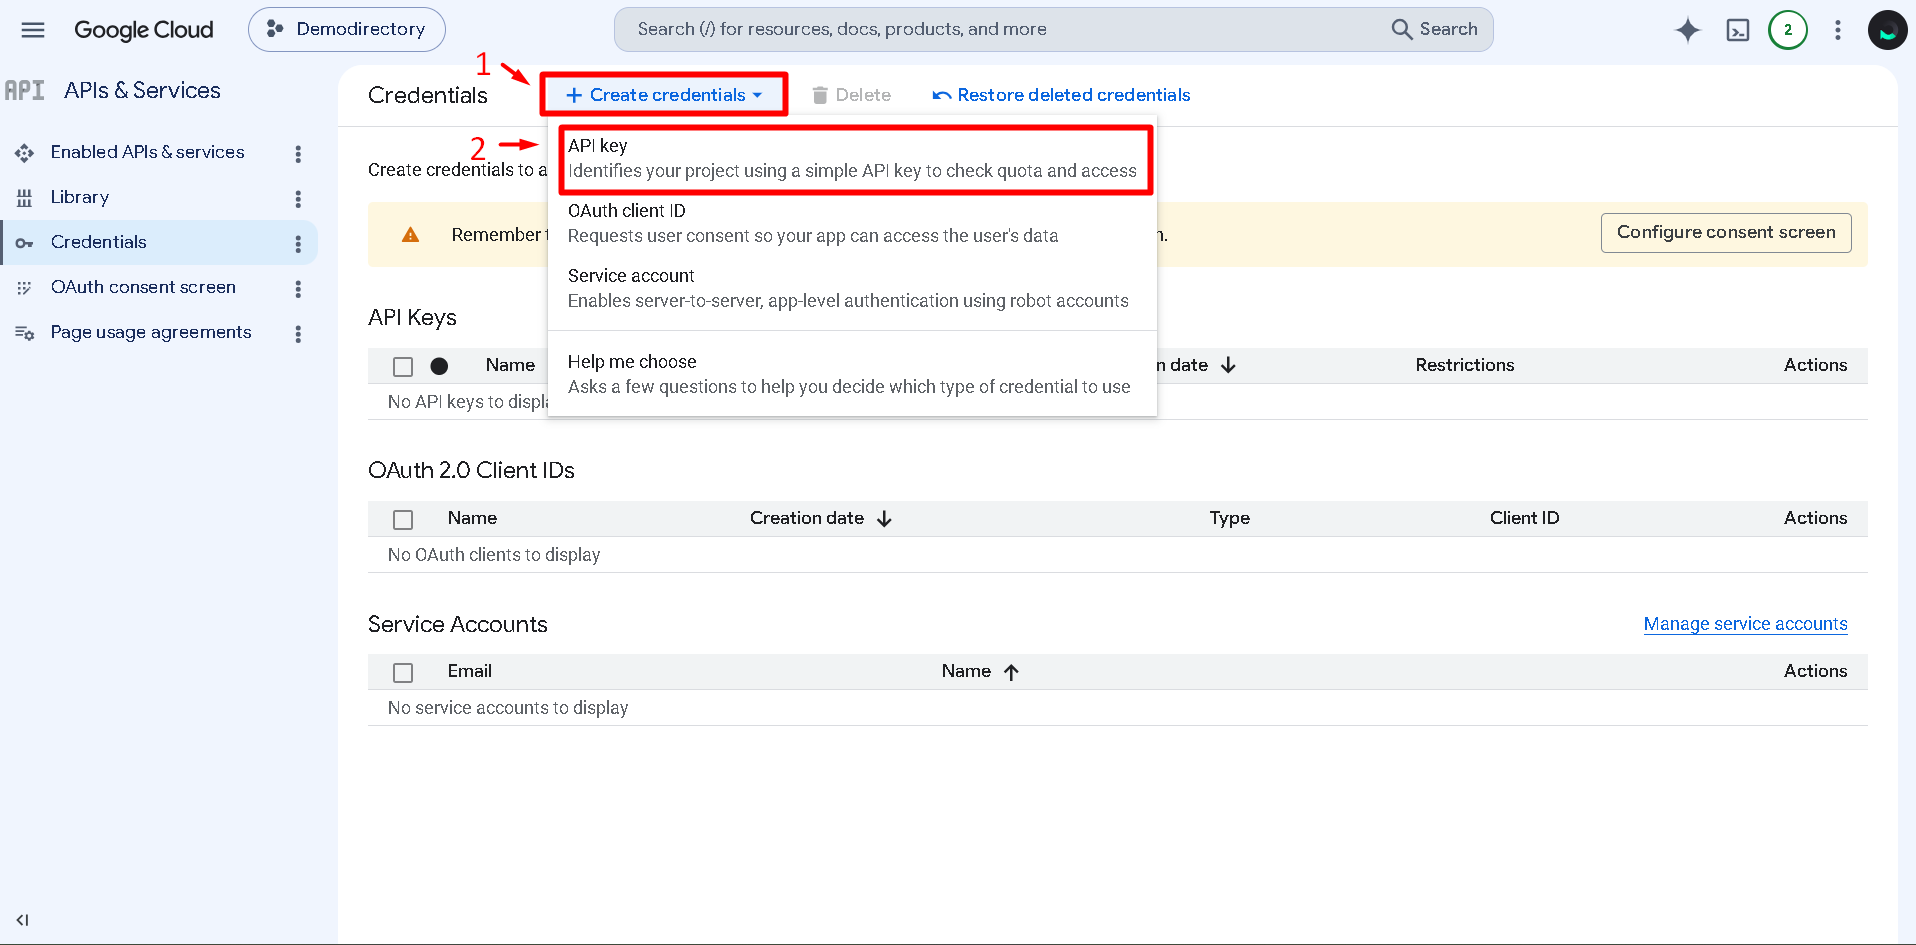
3.3. Click "+ Create credentials" and select "API key."
3.4. In the right-side panel, set the API key name to "Nearby Results", then open the "Select API restrictions" dropdown.
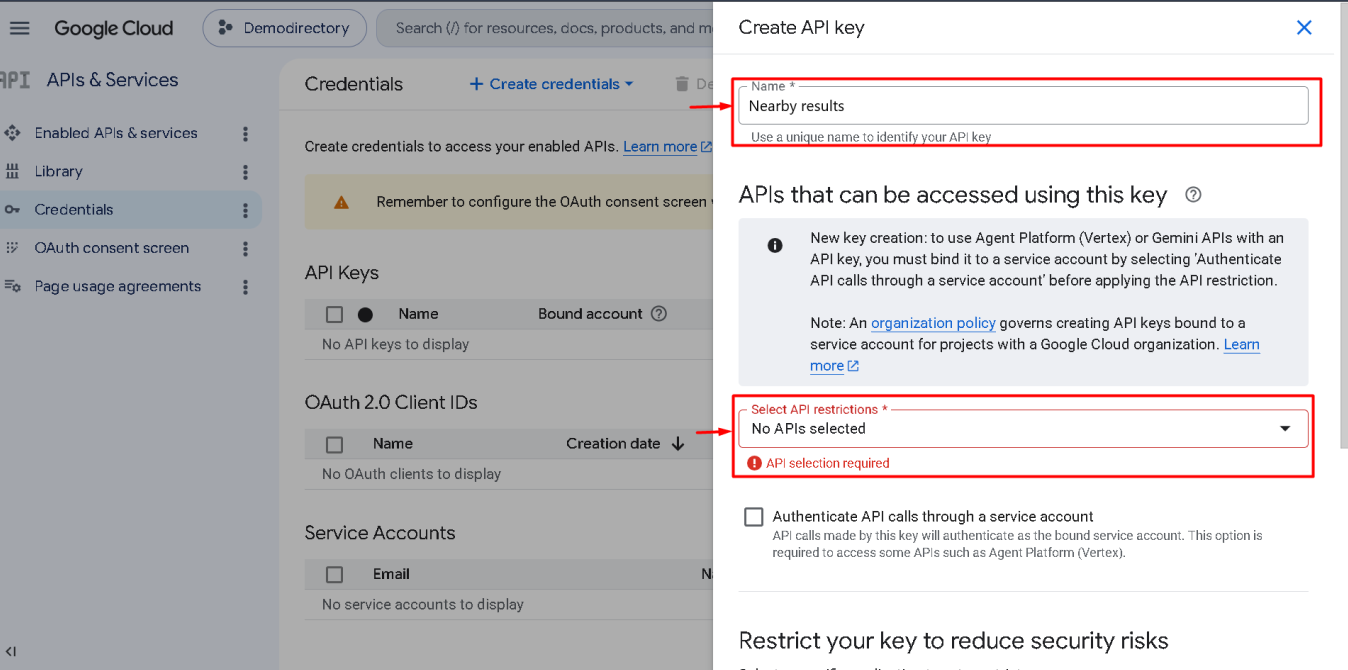
3.5. Select the two APIs you enabled in Step 2.4: Maps JavaScript API and Geocoding API
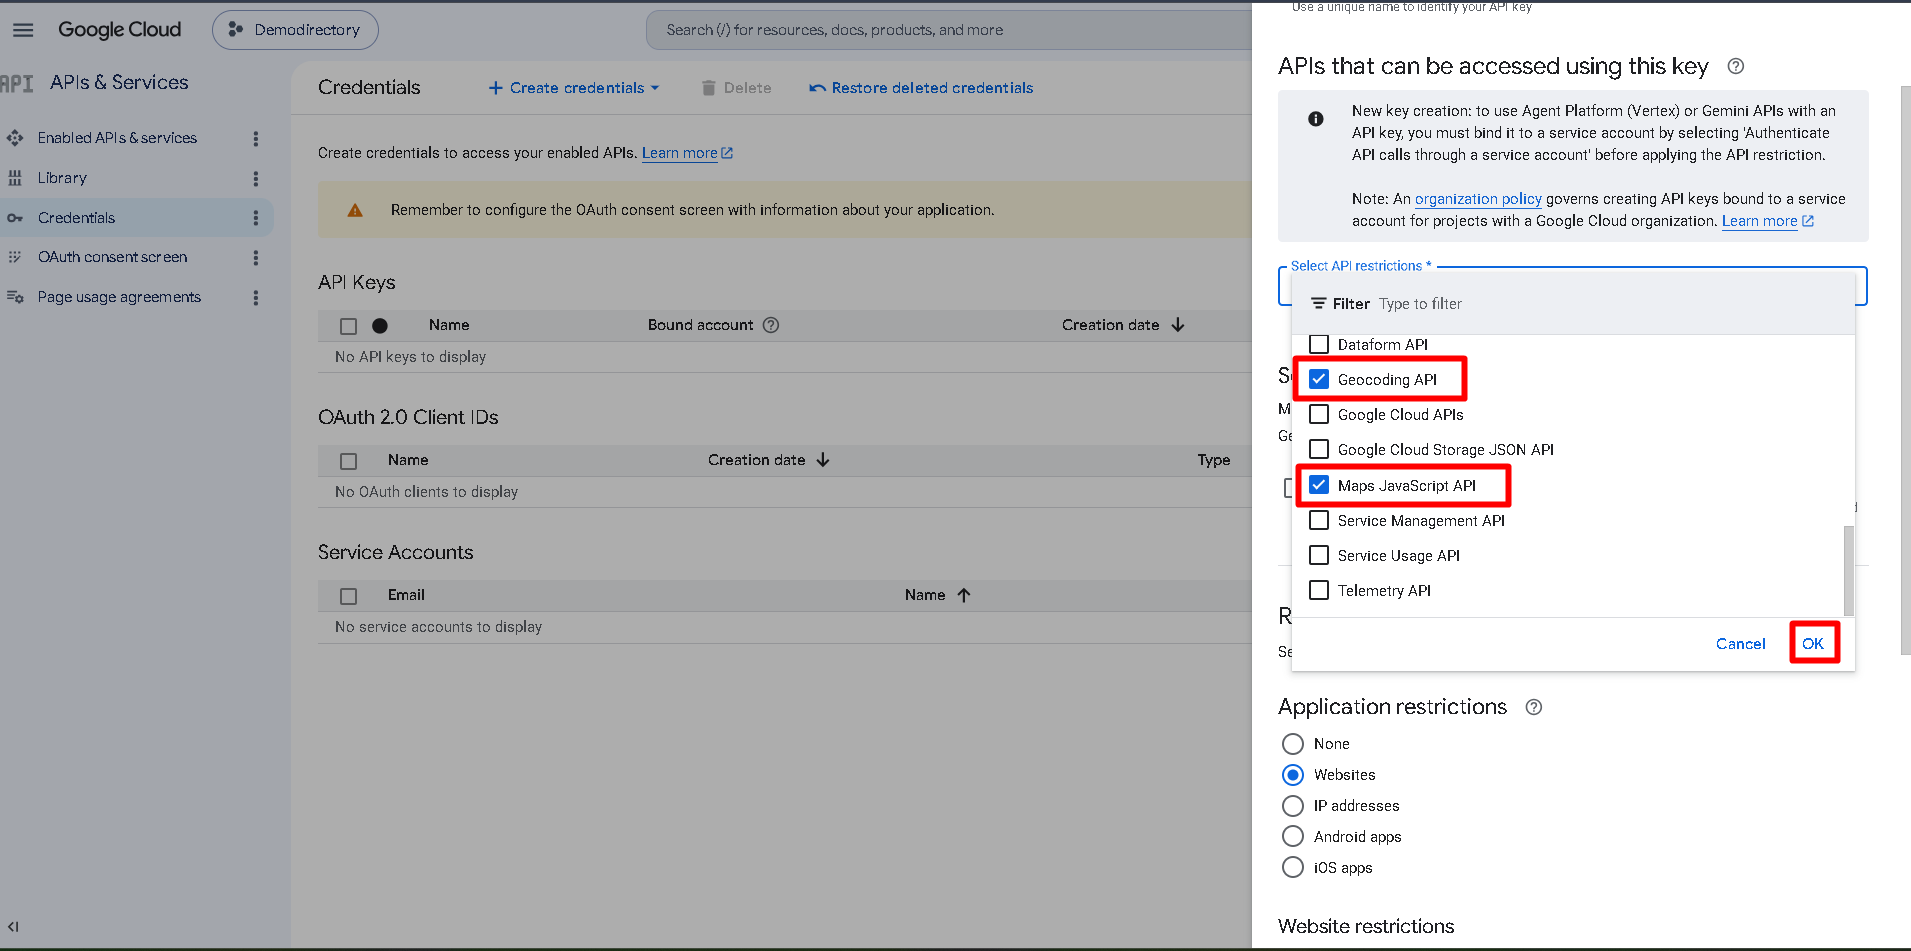
Note: If you do not see these APIs in the list, please go back to step 2.4 and ensure they are enabled. Once enabled, they will appear in this list.
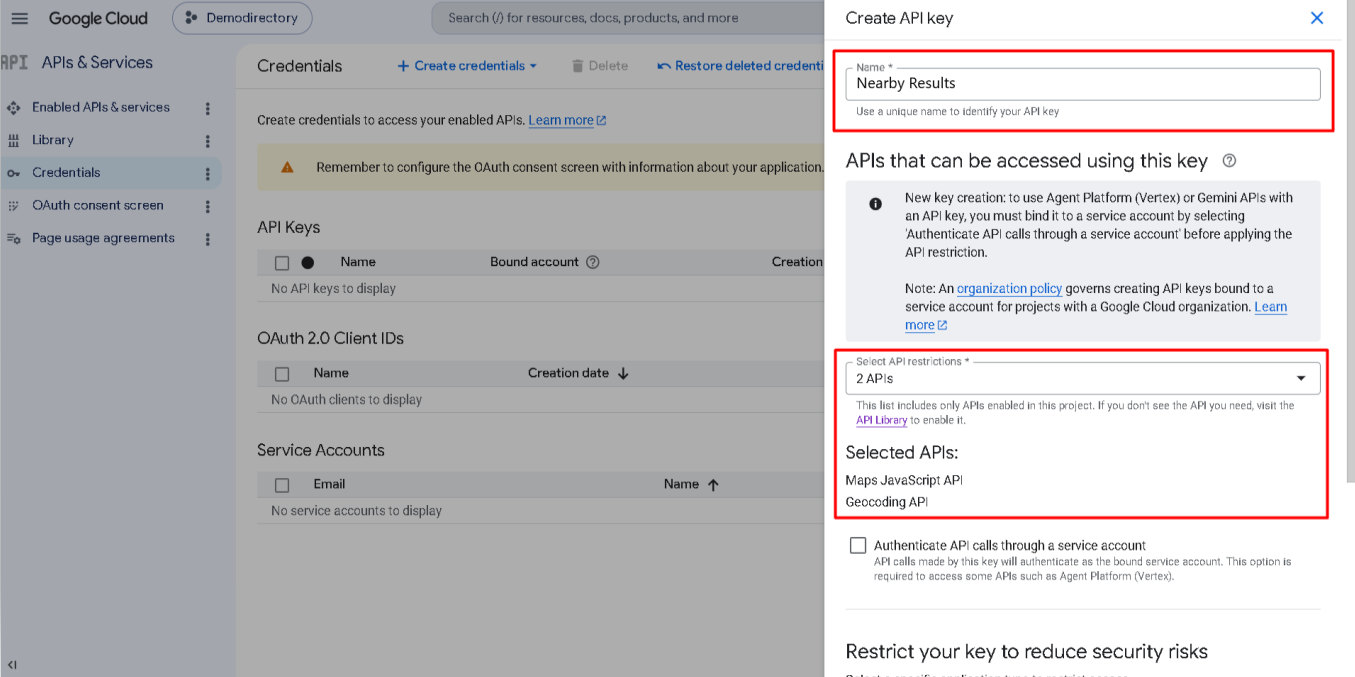
3.6. After entering a name and selecting the APIs in the right-side panel, scroll down to the "Application restrictions" section, select "IP addresses", and click "Add".
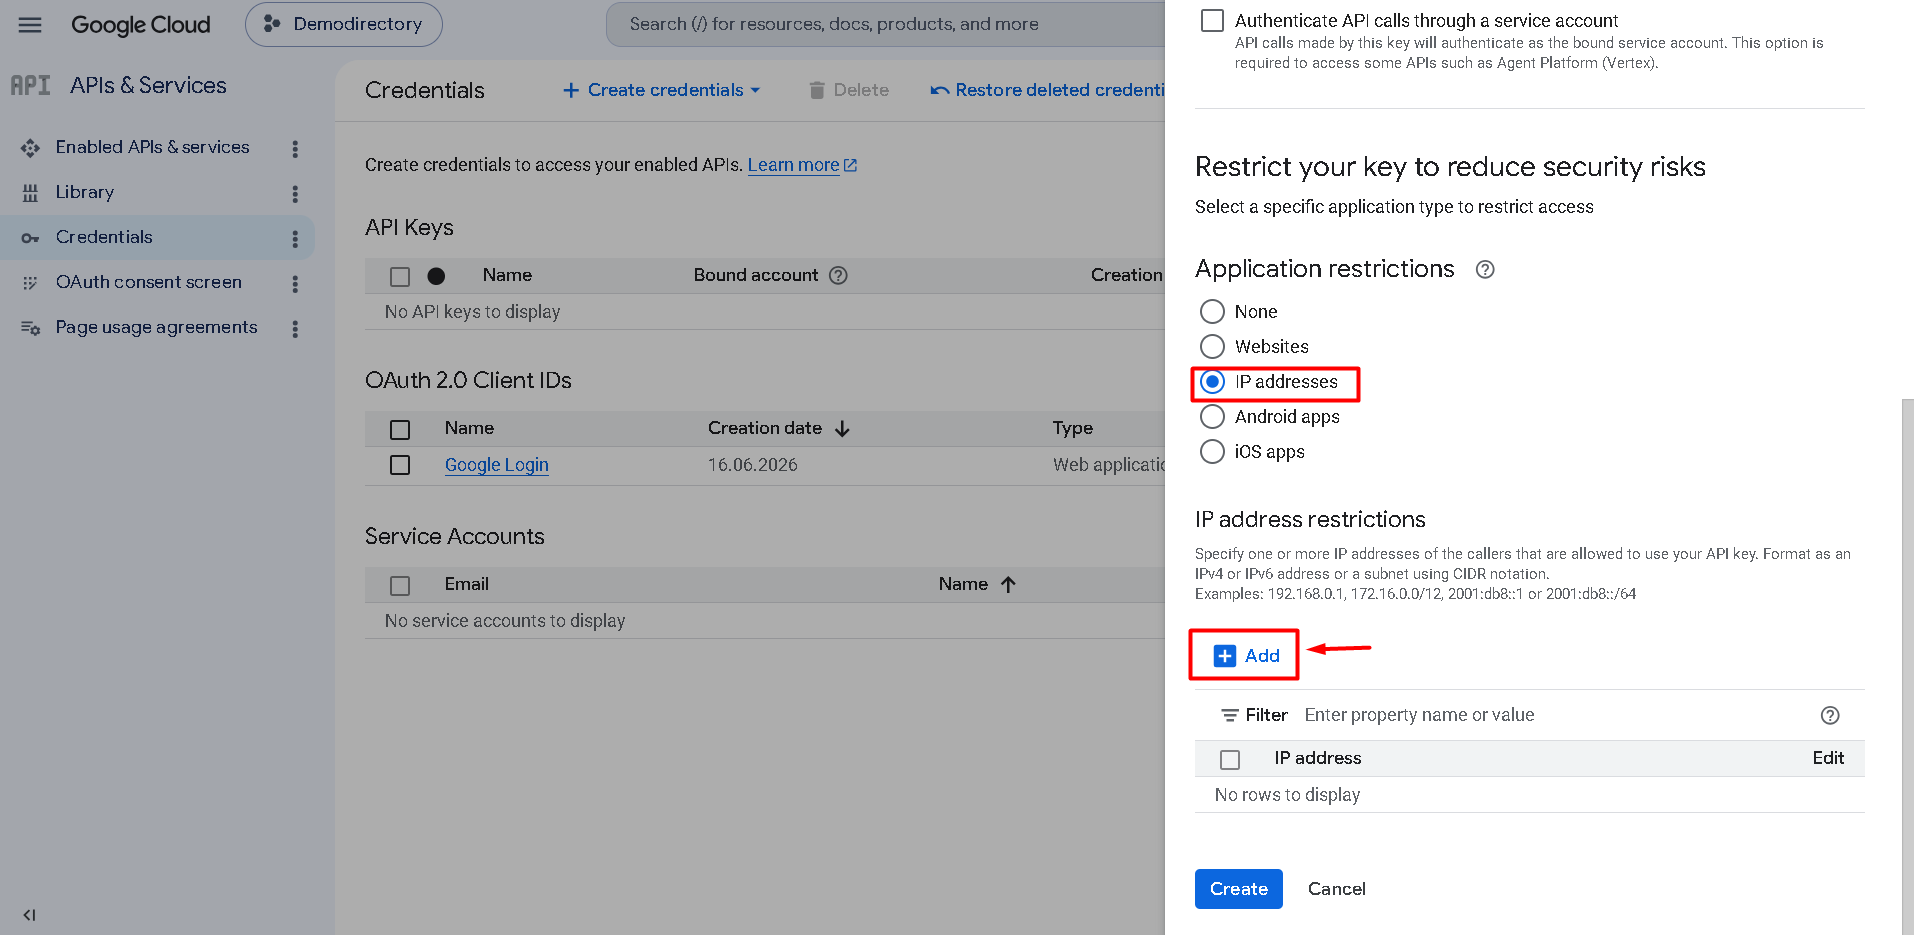
3.7. Add your server IP address and click "Create"
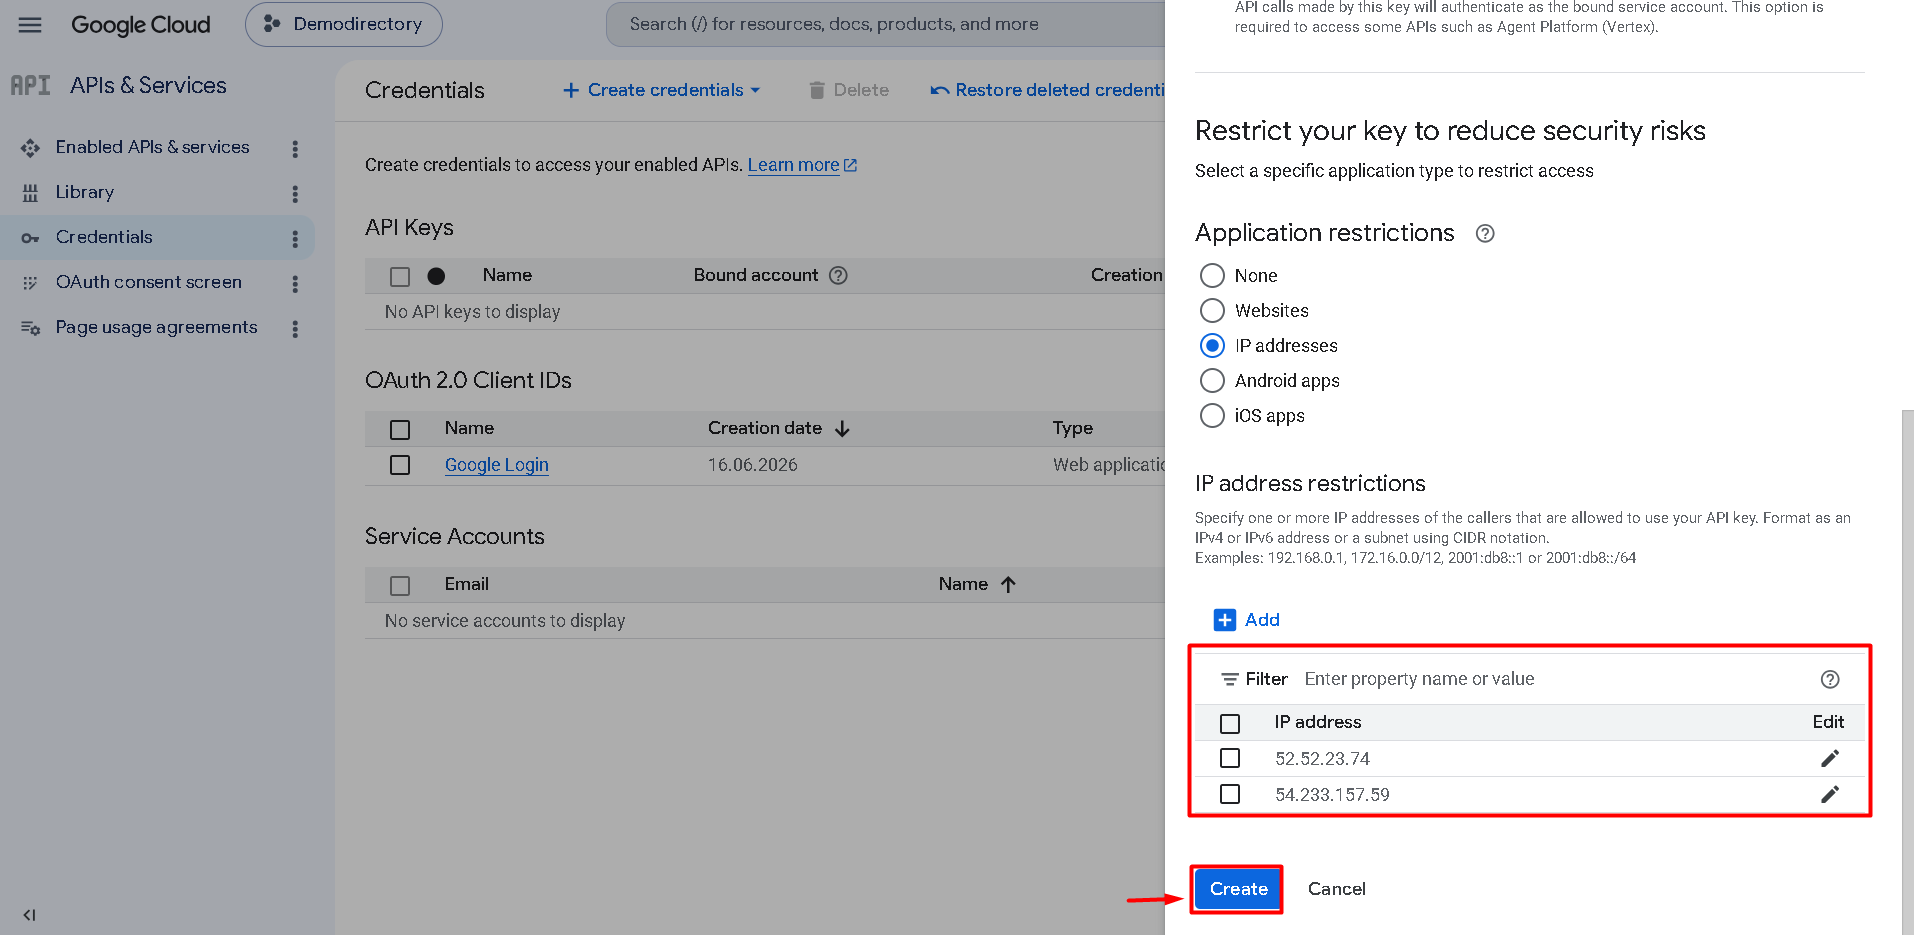
Important Note for Shared Hosting Users: If your website is hosted on one of our shared servers, please insert the following IP addresses exactly as listed:
- 52.52.23.74
- 54.233.157.59
Important Note for Self-Hosted or Dedicated Server Users: If your website is self-hosted or on a dedicated server and you are unsure of your server's IP address(es), please contact our support team at support@edirectory.com for assistance in identifying the correct IP addresses to add here.
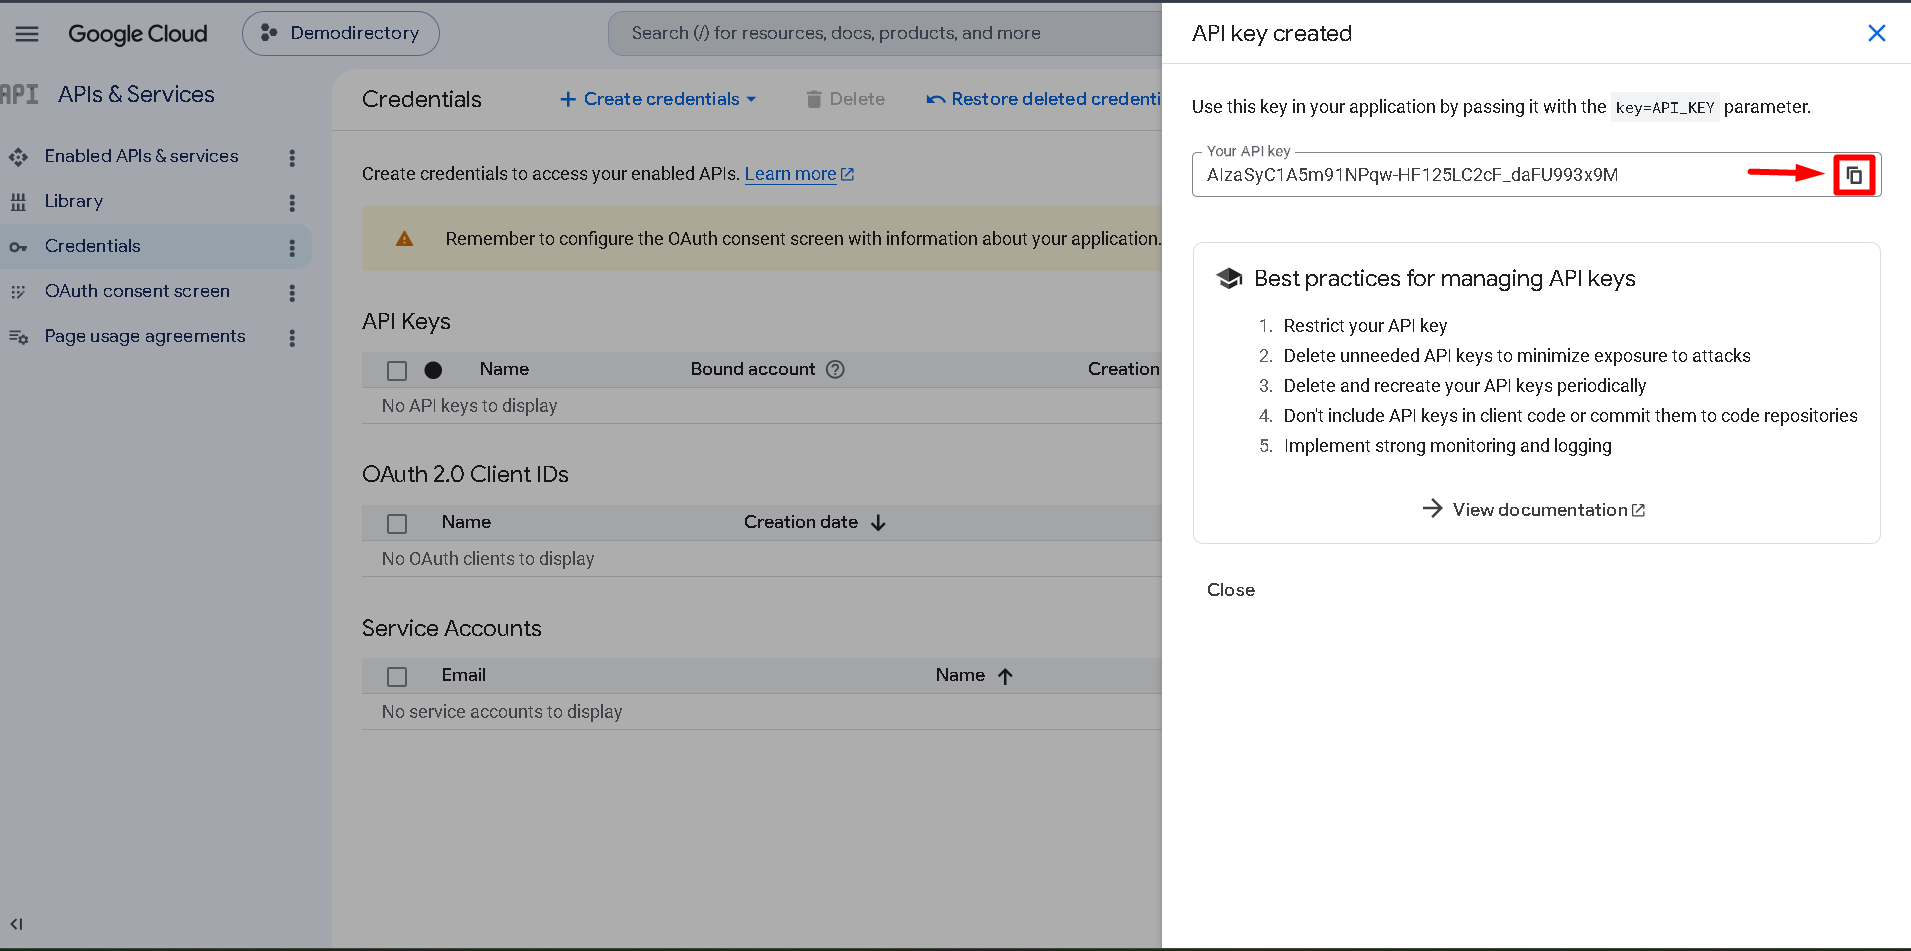
3.8. After selecting "Create", the API key will be displayed. Click the copy icon next to the key to copy it to your clipboard.
Step 4: Integrate the Nearby Results API into eDirectory
4.1. In your Site Manager navigate to Settings → Language & Geography → Visitor Location Detection & Nearby Results
4.2. Enable the features:
- Visitor Location Detection.
- Nearby Results.
4.3. Paste your newly created Server API Key into the Google API Key (Server Key) field.
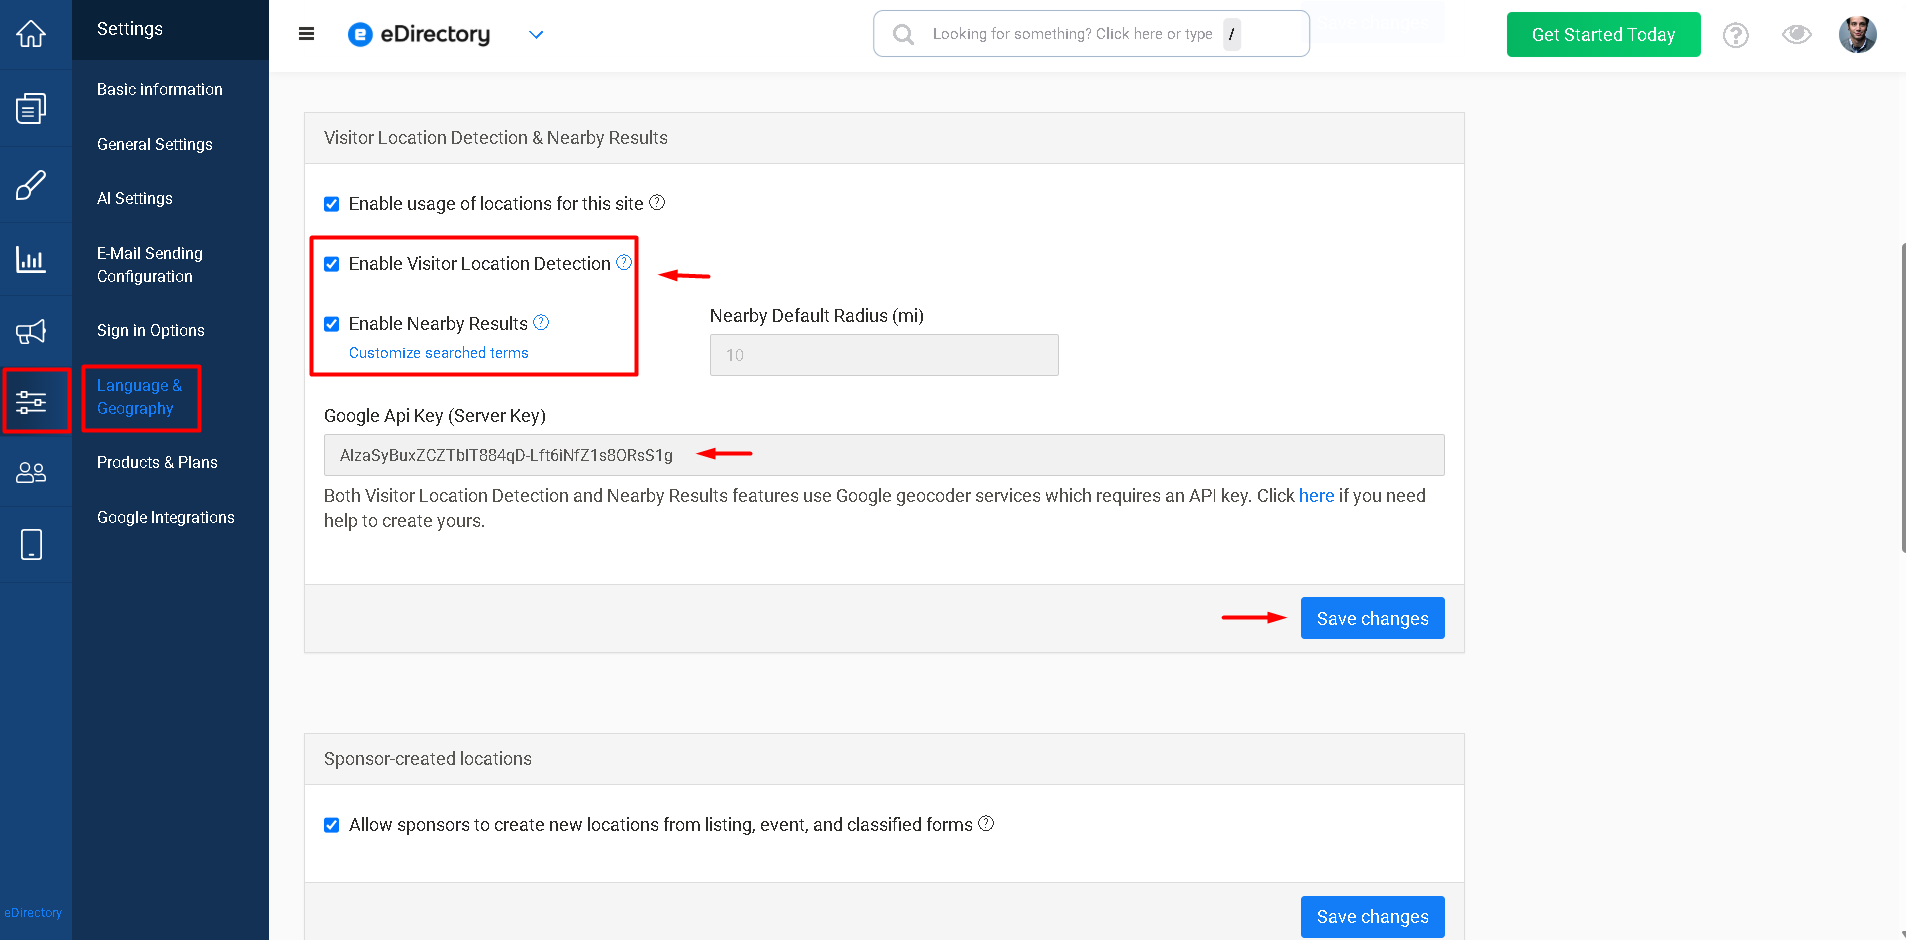
4.4. Click Save Changes.
Link Your Project to a Billing Account
Nearby Results requires Google Maps Platform billing to be enabled.
If billing has not yet been configured for your Google Cloud project, please follow the instructions in:
How to enable Billing for Google Maps and Nearby Results
Without billing enabled, Nearby Results will not function correctly.
What is the Difference Between the Google Maps API Key and the Nearby Results API Key?
Although both API keys can be created within the same Google Cloud project, they serve different purposes.
| Google Maps API | Nearby Results API |
|---|---|
| Used to display maps throughout the website. | Used to calculate nearby listings based on the visitor's location. |
| Website restrictions. | IP address restrictions. |
| Configured under Settings → Google Integrations → Google Maps. | Configured under Settings → Language & Geography → Visitor Location Detection & Nearby Results. |
Want to integrate Google Maps with your eDirectory site? Please refer to our guide: How to Activate Google Maps on eDirectory.
How Can I Verify That Nearby Results Is Working?
After configuring the Server API Key:
- Enable Visitor Location Detection & Nearby Results in the Site Manager.
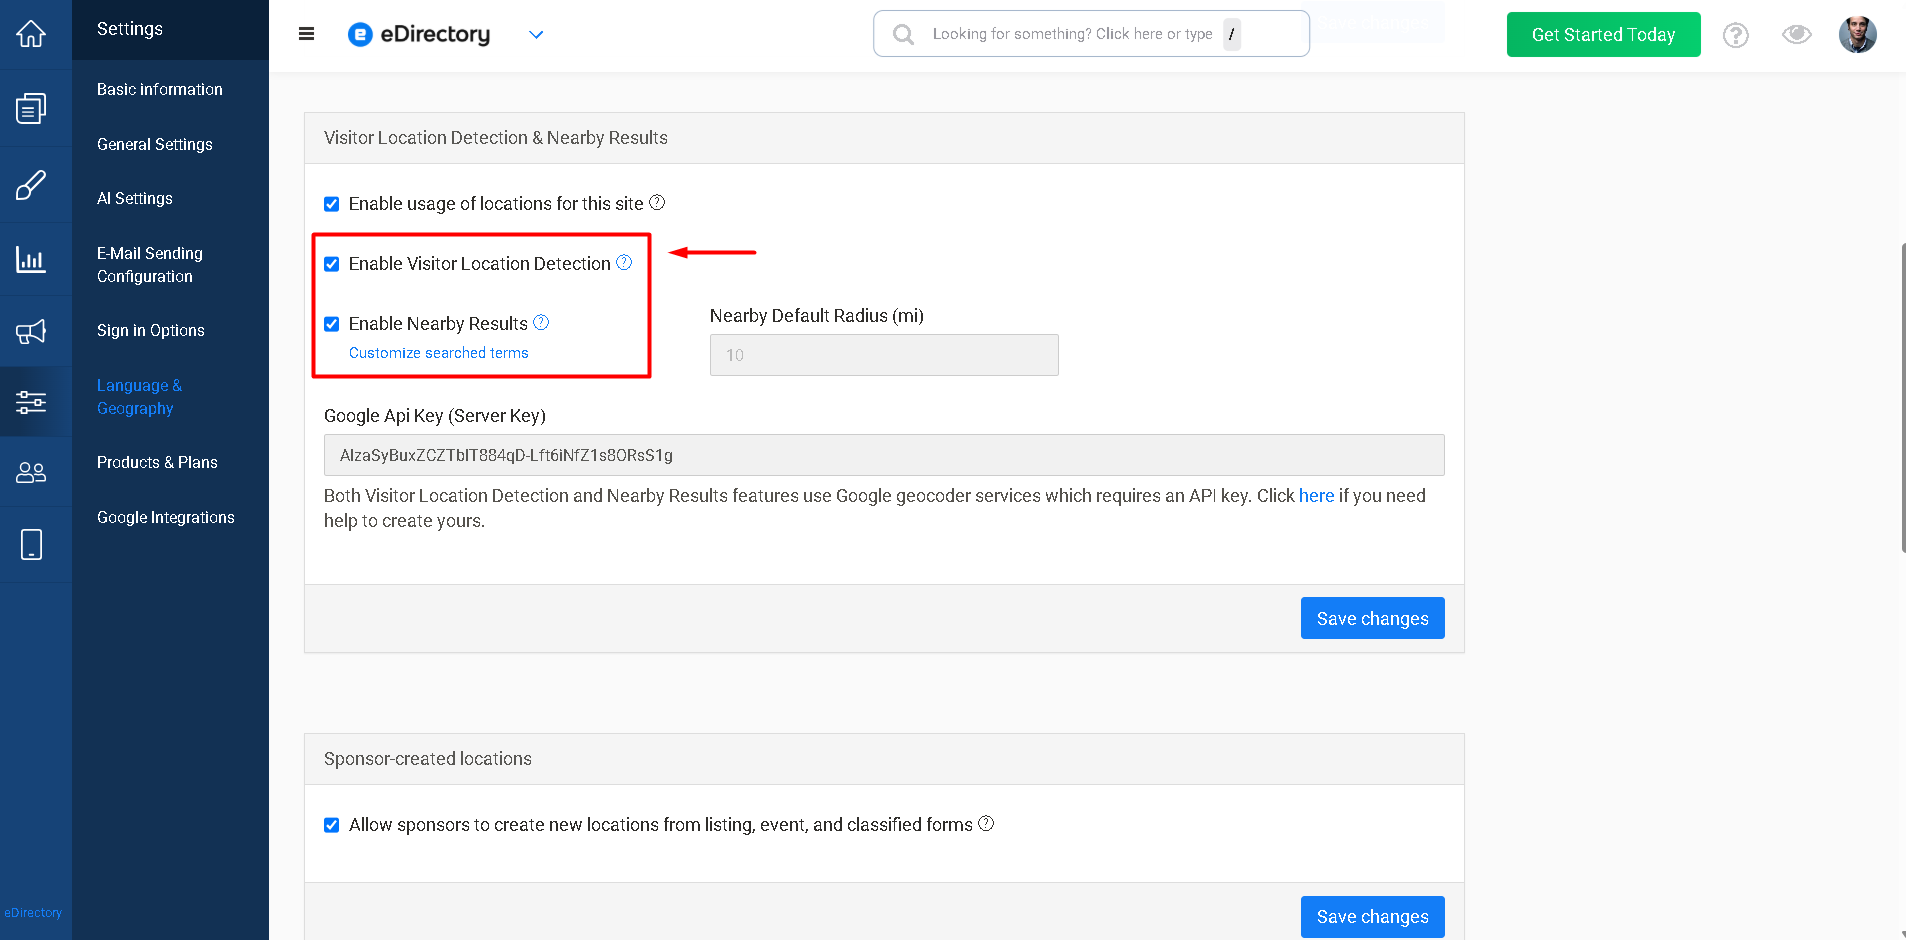
- Visit your website.
- Allow your browser to share your location when prompted.
- Perform a search for listings and change the filter to "Distance."

If configured correctly, search results will display listings ordered according to their proximity to your current location.
If the feature is not working:
- Verify that billing is enabled.
- Confirm the Server API Key uses IP address restrictions.
- Ensure the correct server IP addresses have been added.
- Verify the API key has been pasted into the correct field within the Site Manager.
Conclusion
Successfully configuring the Google Nearby Results API allows visitors to discover listings based on their current location, providing a more personalized search experience.
By creating a Server API Key with IP address restrictions, enabling the required Google APIs, configuring billing, and integrating the key into your Site Manager, you can fully enable this feature on your eDirectory website.
If you have any questions or need assistance during the setup process, please contact our support team at support@edirectory.com.