
HTML Editor for Event Description
Introduction
The HTML Editor for Event plugin allows event owners to create richer and more visually appealing event descriptions. Instead of being limited to a standard text field, event owners can use HTML editing tools to format their content and create more engaging event details.
With the HTML Editor, event owners can:
- Format text using bold, italic, and underline.
- Change text alignment.
- Choose different fonts and font sizes.
- Create bulleted and numbered lists.
- Add hyperlinks.
- Insert images.
- Organize event information using different formatting options.
- Create descriptions that better match the event's content and branding.
The HTML content created in the event form is also displayed on the public event detail page.
Note
The HTML Editor for Events requires a plugin to be installed on your eDirectory site. This plugin is a premium add-on and is sold separately.
If you do not see the HTML Editor for Events plugin in your Site Manager, please visit the HTML Editor for Events Plugin page for more information or contact your dedicated sales representative.
Before You Begin
Before using the HTML Editor for Events, make sure that:
- You have access to the eDirectory Site Manager Area.
- The HTML Editor for Event plugin is installed and active on your eDirectory site. If you are not sure how to check which plugins are installed on your site, see our guide: How to View Your Installed Plugins.
Step 1: Access the Event Management Area
1.1. Log in to the Site Manager
Log in to your eDirectory Site Manager.
1.2. Open Events
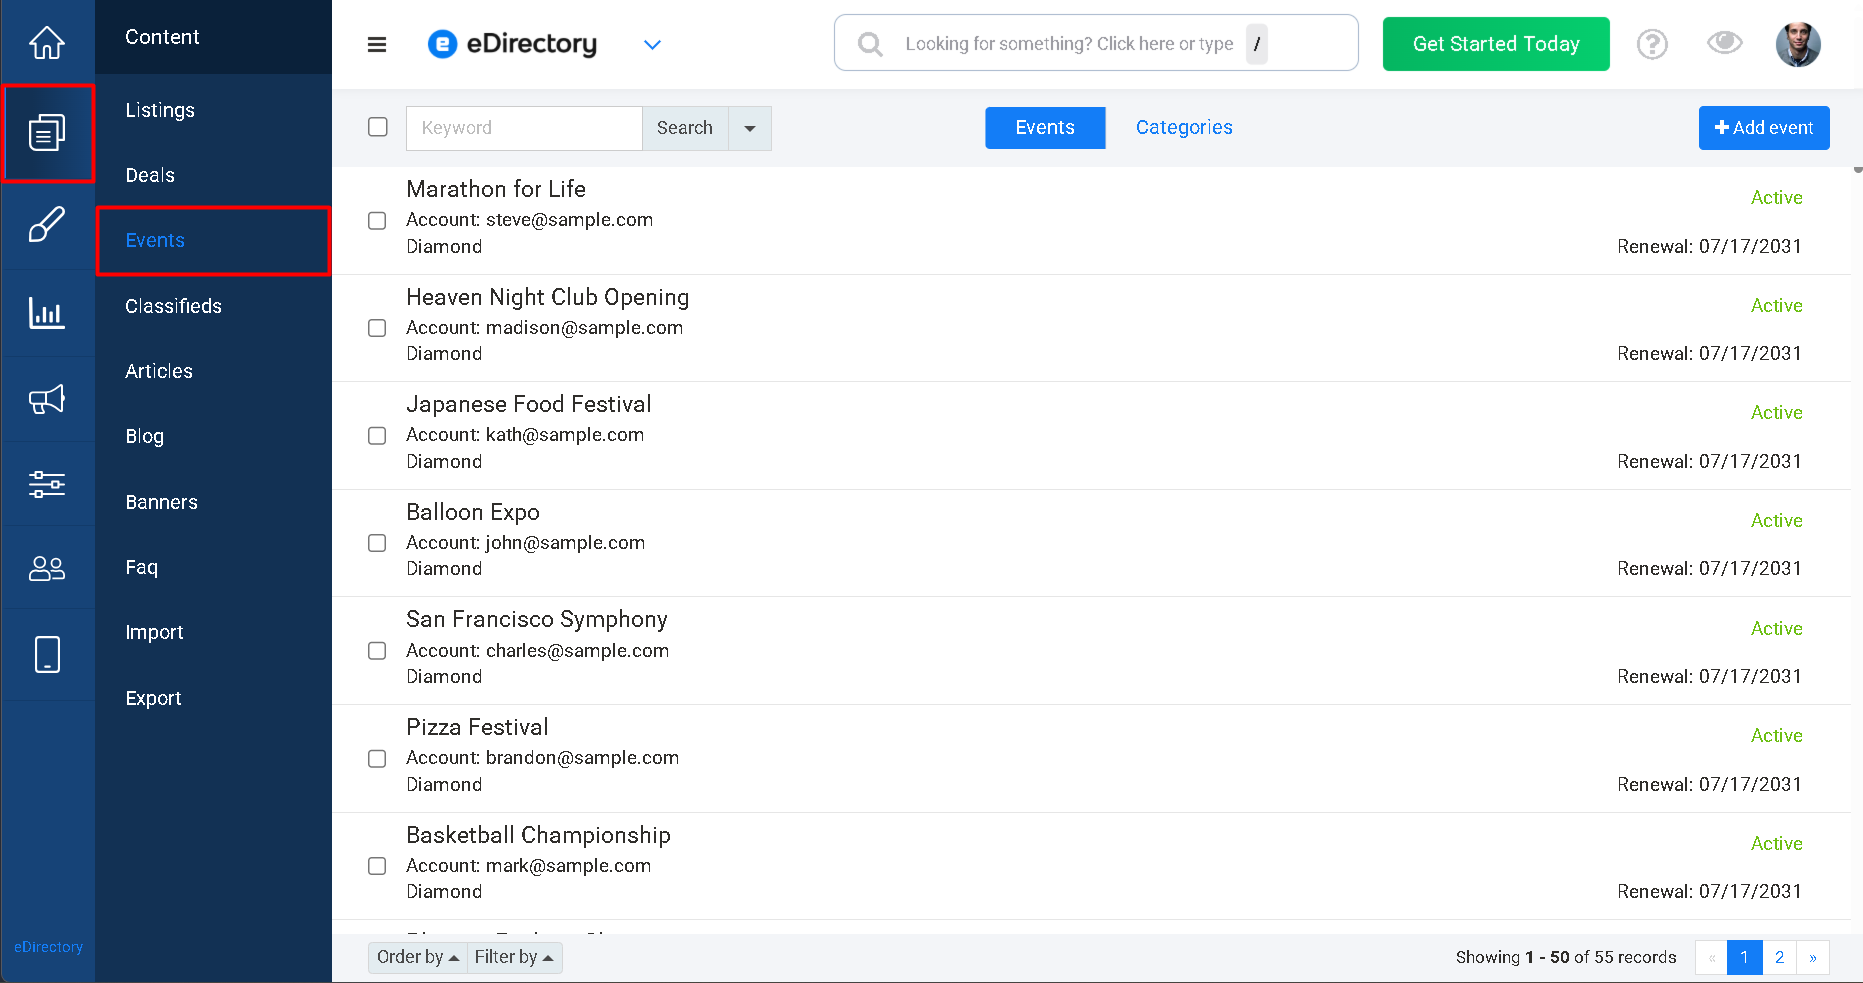
Navigate to Content > Events
This will open the event management area, where you can create and manage events.
1.3. Add or Edit an Event
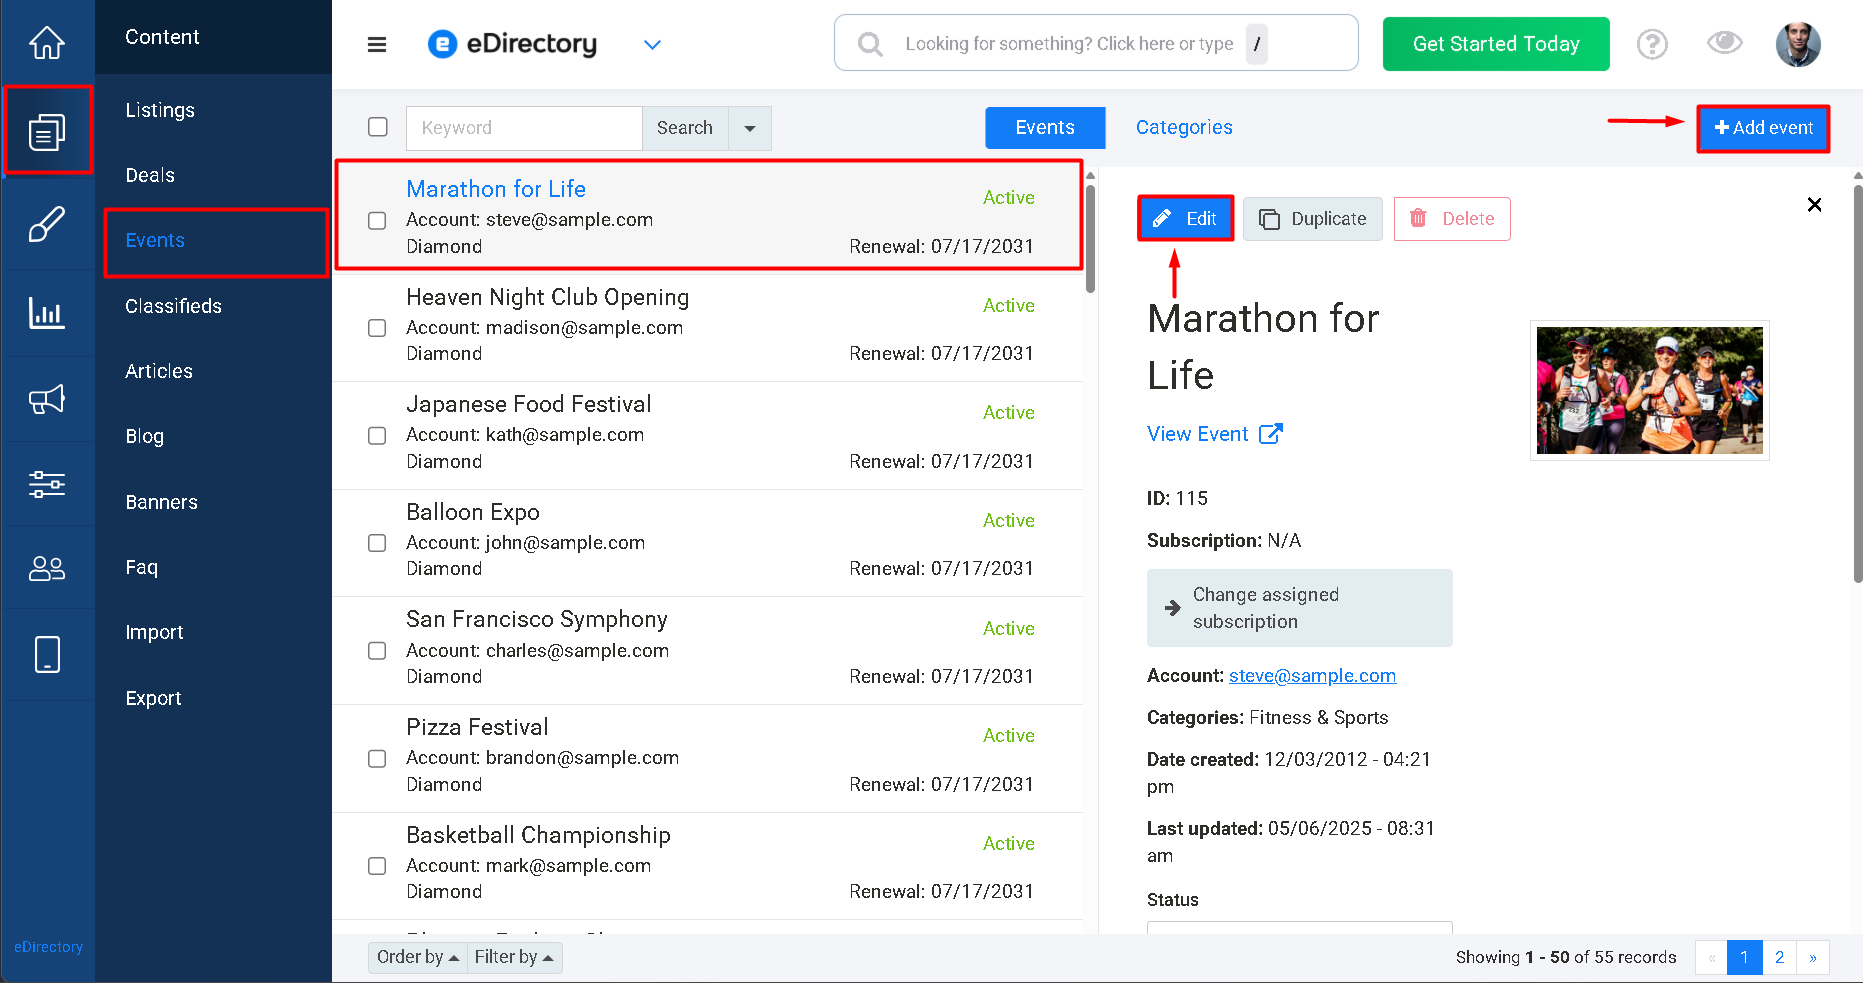
You can use the HTML Editor when creating a new event or editing an existing one.
To create a new event, click Add Event.
To edit an existing event, click the appropriate Edit option for the event.
Step 2: Access the HTML Editor
2.1. Locate the Description Field
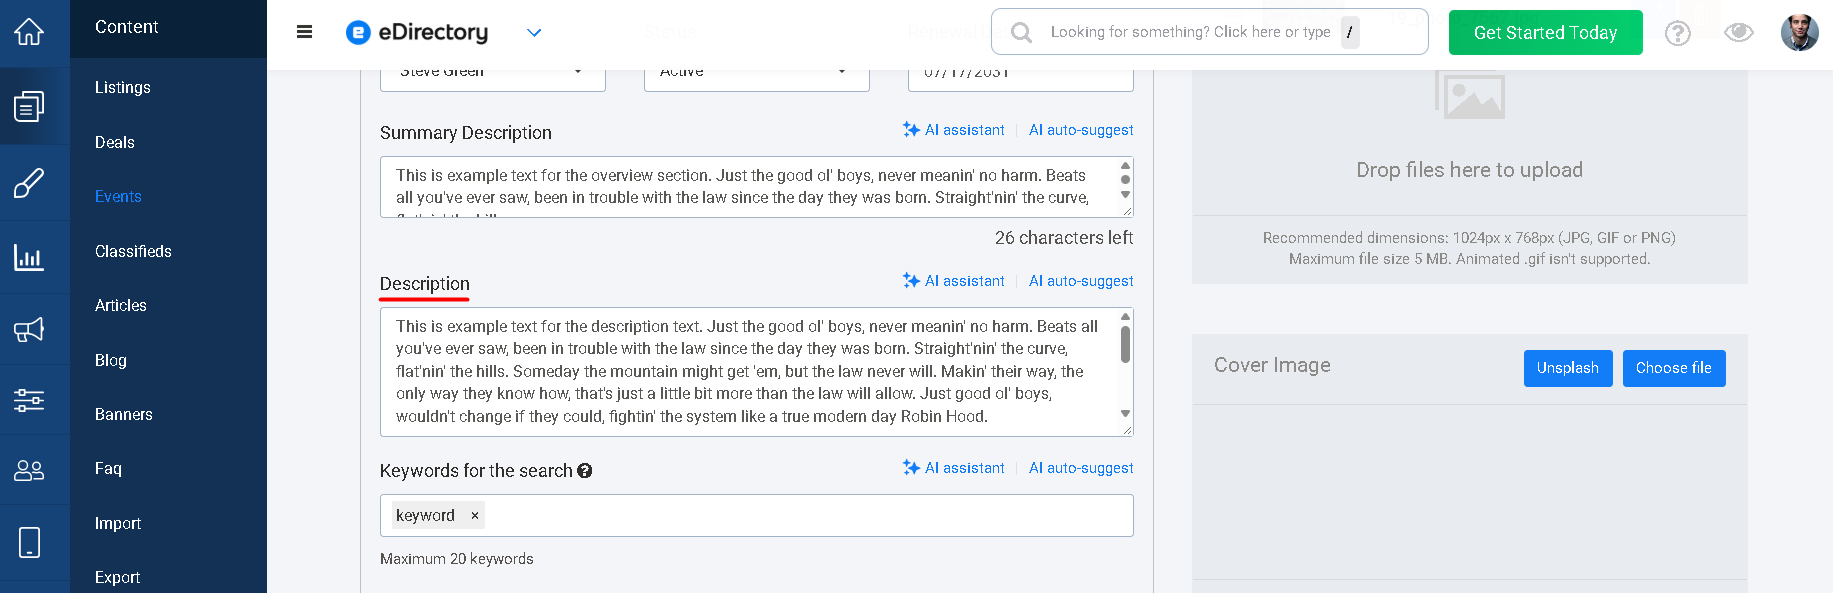
In the event creation or editing form, locate the Description field.
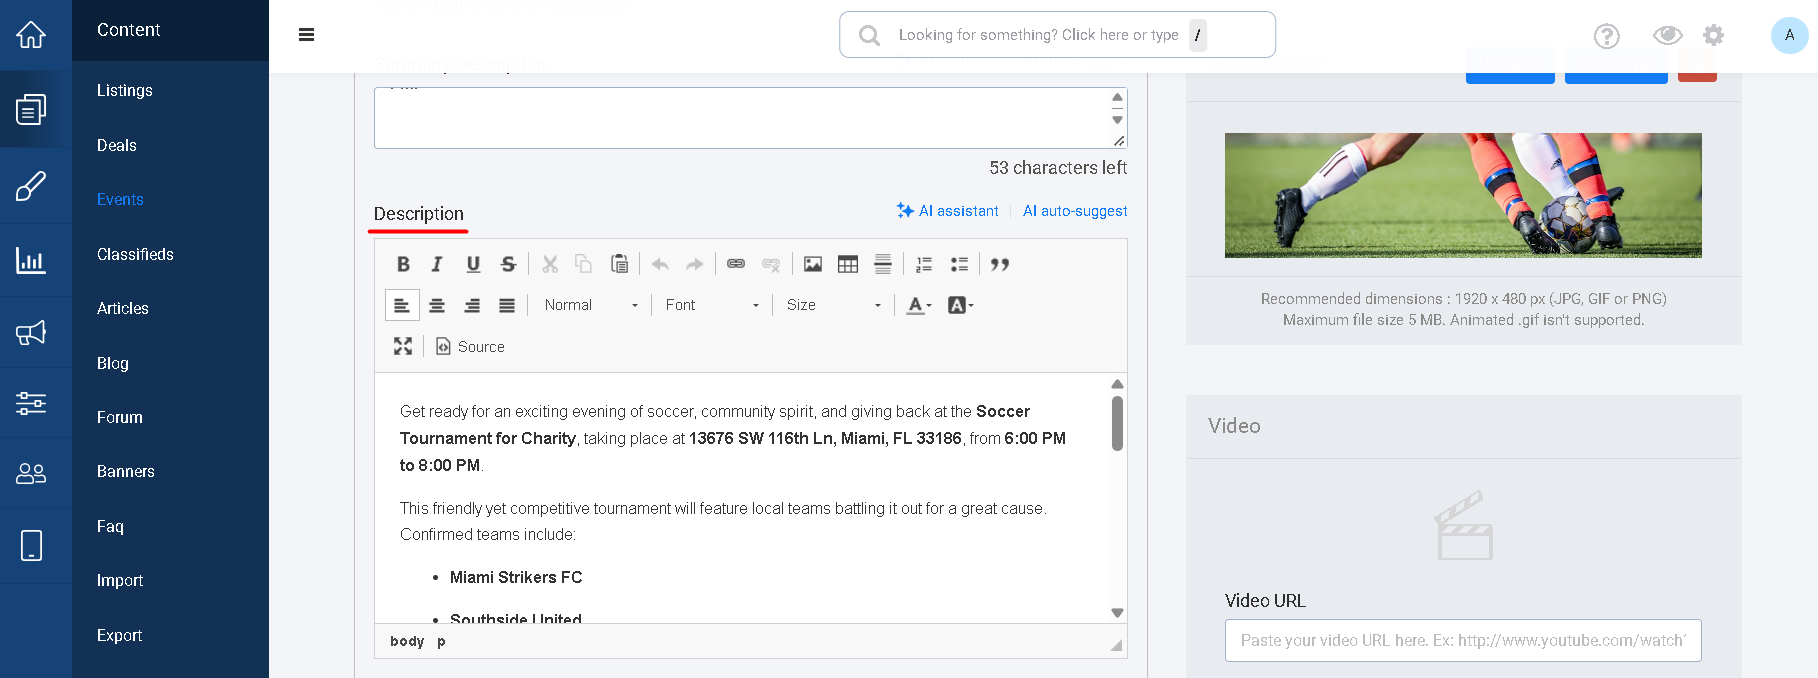
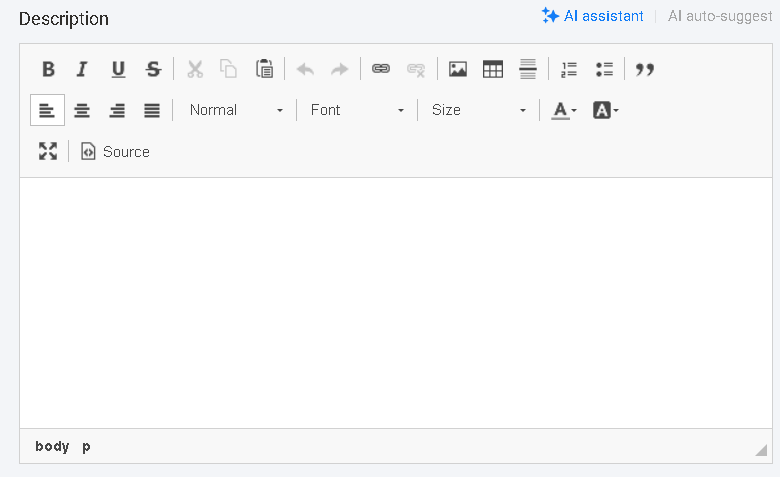
When the HTML Editor for Event plugin is installed and active, the standard description field will be replaced with the HTML Editor interface.
Plain description field with no HTML plugin installed:
Description field with the HTML Editor for Event Installed:
2.2. Use the HTML Editor
Click inside the editor to start adding or formatting your event description.
The available tools allow you to customize the appearance and organization of your content.
Step 3: Format Your Event Description
The HTML Editor provides several tools that event owners can use to customize the appearance and organization of their event descriptions.
You can type your content directly into the editor and use the available formatting tools to create a more visually appealing description.
3.1. Format Text
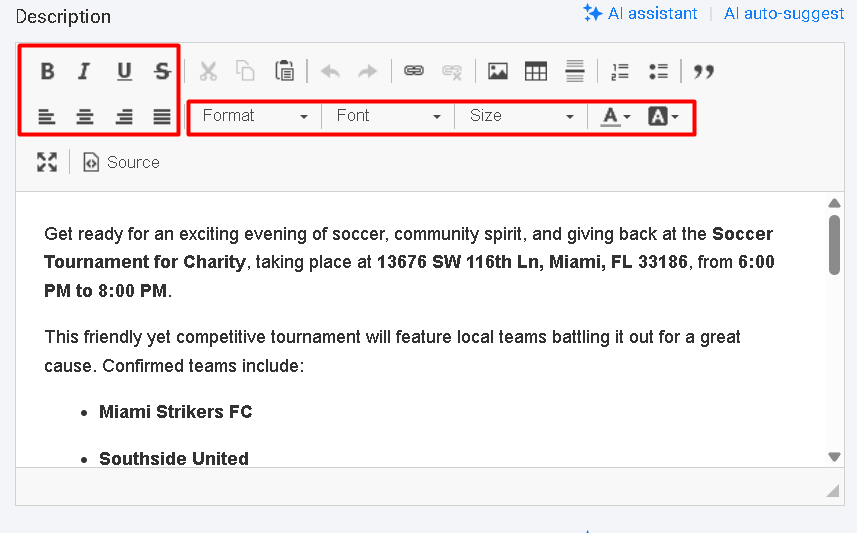
You can apply different formatting options to your text, including:
- Bold – Highlight important information.
- Italic – Add emphasis to specific words or phrases.
- Underline – Emphasize selected text.
Strikethrough– Indicate removed, outdated, or no longer applicable information.- Text alignment – Align text to the left, center, right, or use justify to distribute the text evenly across the available space.
- Font – Choose a different font for your text.
- Font size – Increase or decrease the size of selected text.
- Text color – Change the color of the text.
- Background color – Add a background color to selected text.
For example, an event owner could use bold text for important dates, a larger font for an event title, or a different text color to highlight registration information.
3.2. Format Titles and Headings
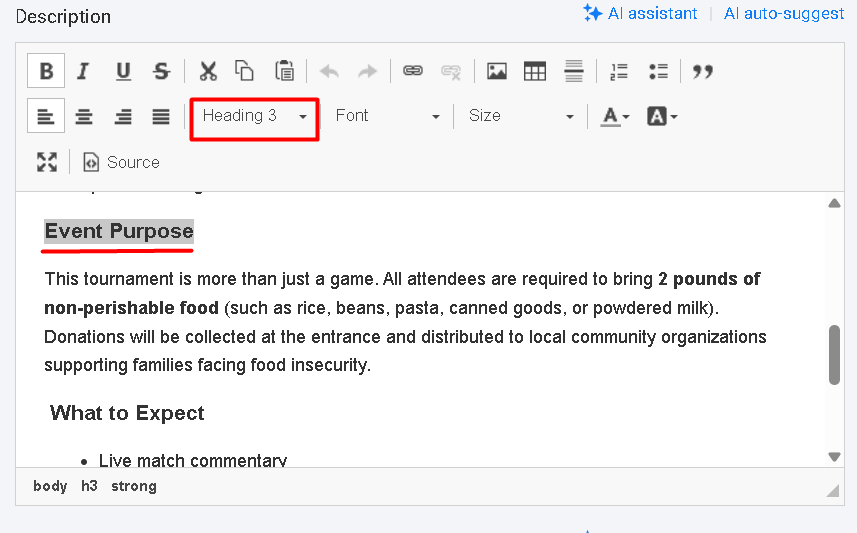
The HTML Editor allows you to apply different heading formats to your content, such as Heading 1, Heading 2, Heading 3, and other available heading levels.
Headings can help organize longer event descriptions into clear sections.
For example:
Heading 1: Annual Business Conference
Heading 2: Event Schedule
Heading 3: Registration Information
Using headings instead of simply making text larger can also help create a more consistent structure throughout the description.
3.3. Add Links
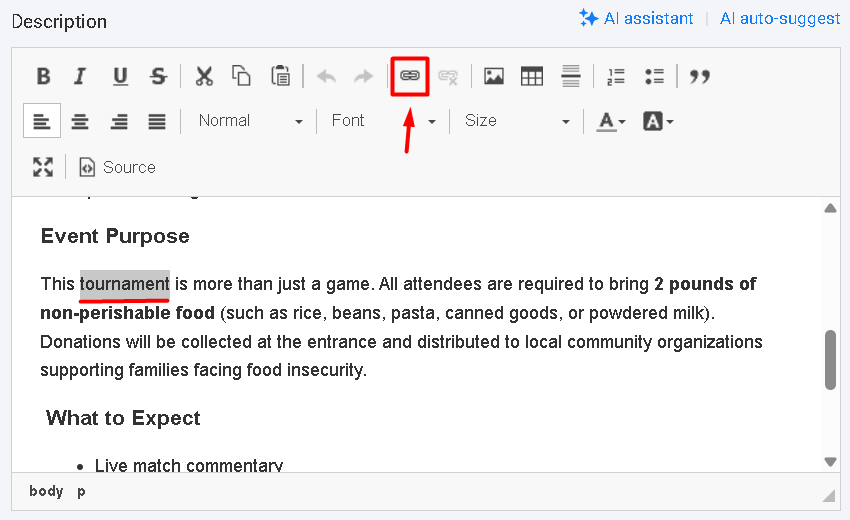
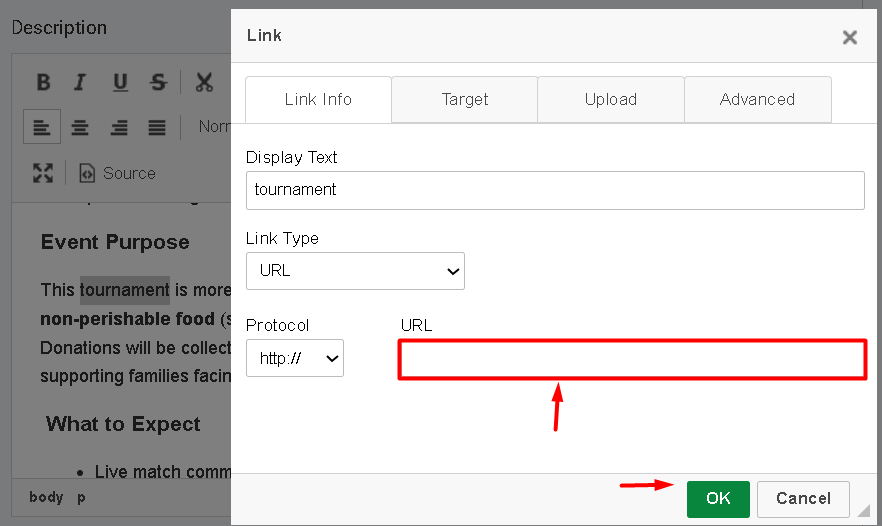
You can add hyperlinks to selected text in your event description.
To do this, select the text you want to turn into a link and use the link option in the HTML Editor.
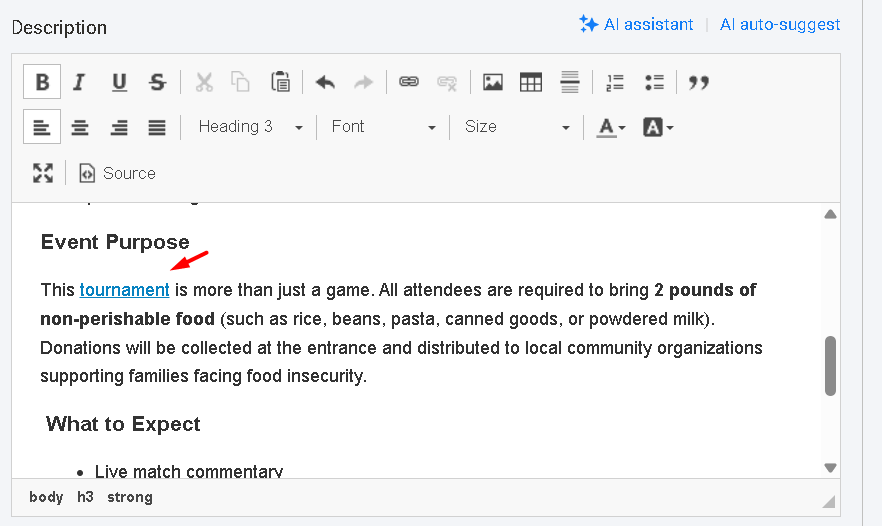
For example, you could select tournament and link it to an external registration page.
Select the desired text and click on the link icon.
Type the URL in the URL field and click OK.
The link will be displayed.
Links can be used for:
- Registration pages
- Speaker websites
- External event websites
- Additional information
3.4. Add Images
You can insert images directly into the event description.
Images can be used to showcase:
- Event venues
- Speakers
- Previous editions of the event
- Event schedules
- Promotional materials
- Event branding
Adding relevant images can make the description more engaging and provide visitors with additional information about the event.
- To add an image, click the image icon.
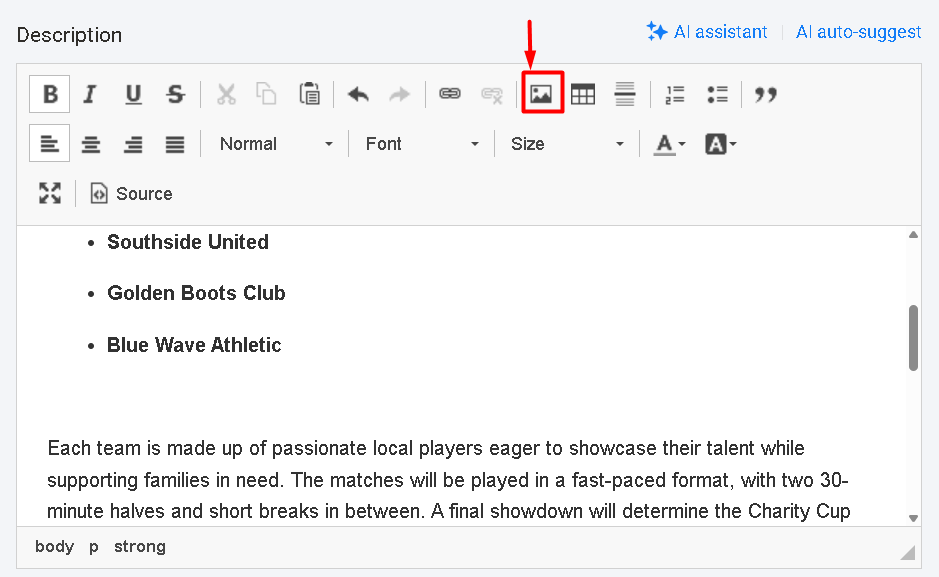
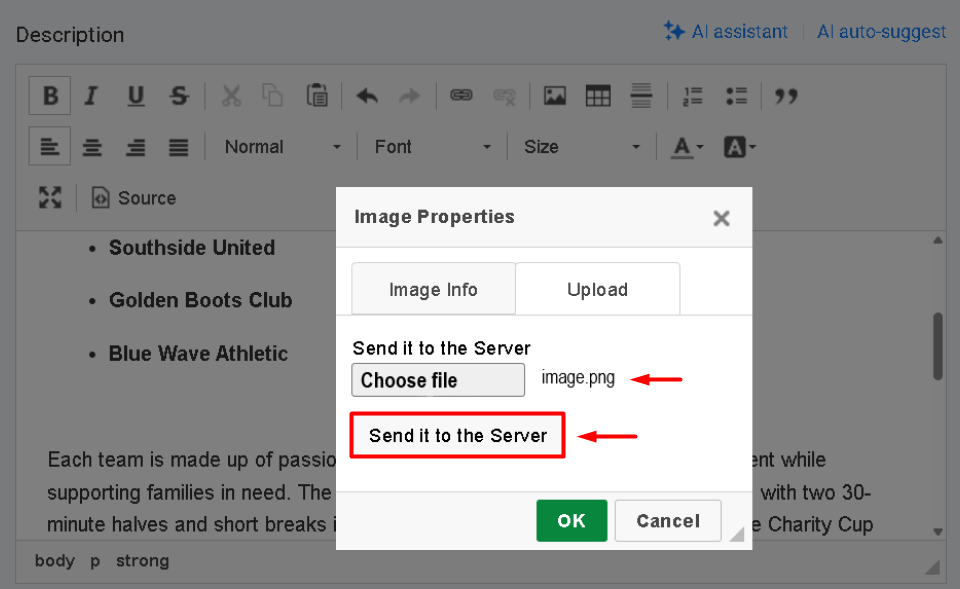
- Navigate to the Upload tab and click Choose file and select an image from your computer.
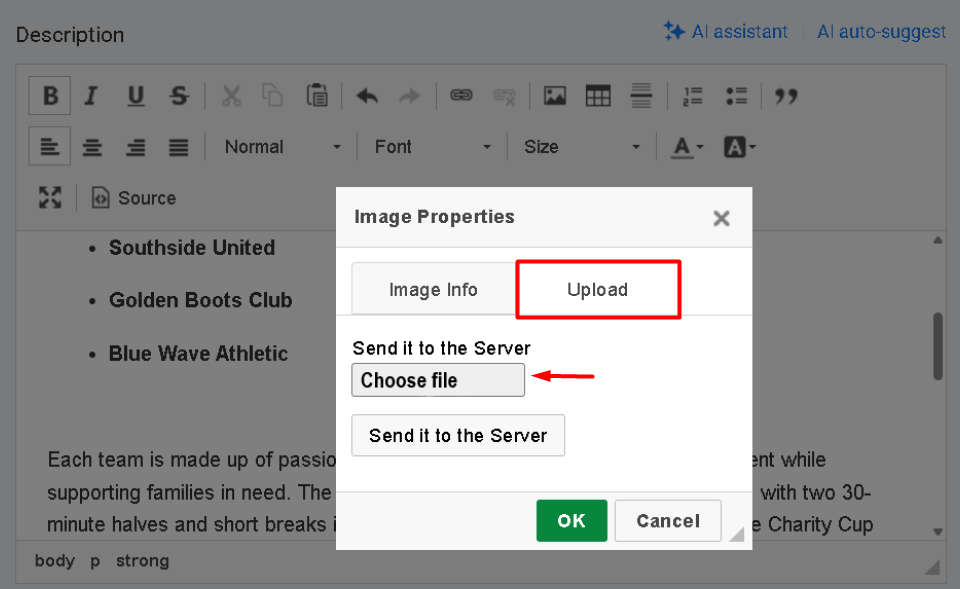
- After selecting the image from your computer, click Send it to the server.
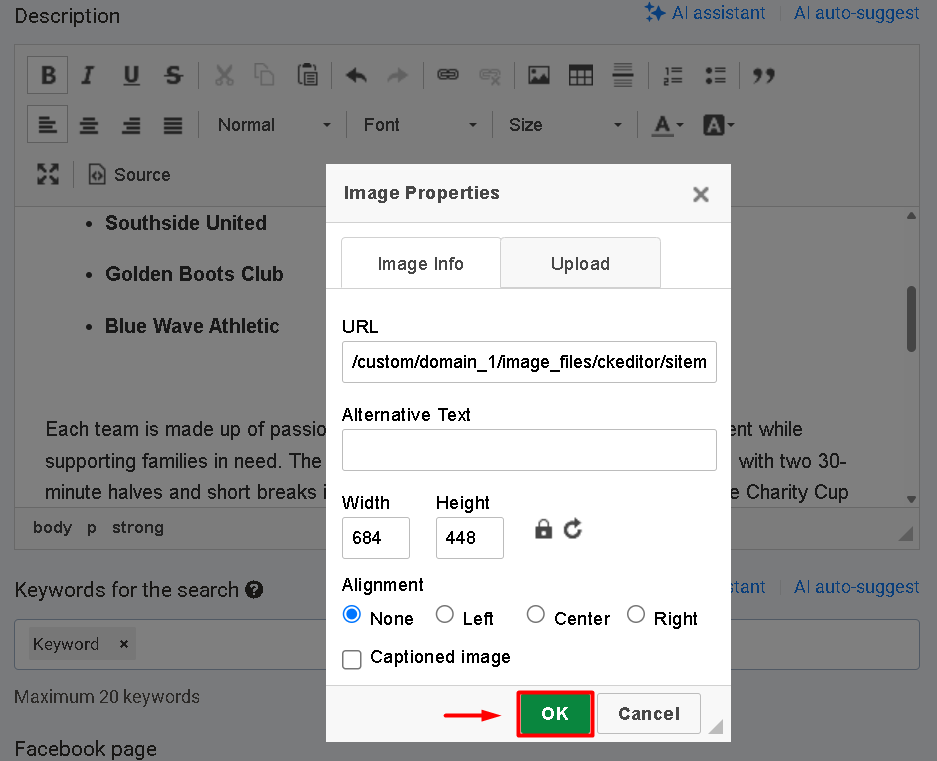
- Click OK.
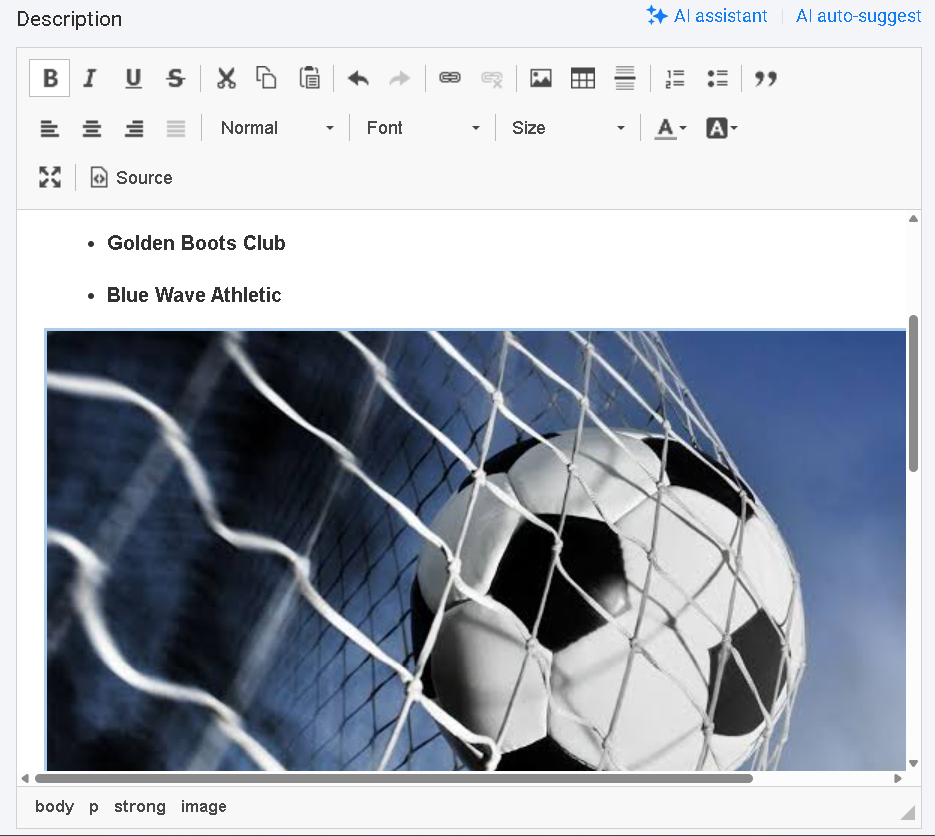
- The image is added to the description field successfully.
3.5. Add Tables
The HTML Editor also allows you to create tables.
Tables can be useful for organizing information that is easier to understand in rows and columns.
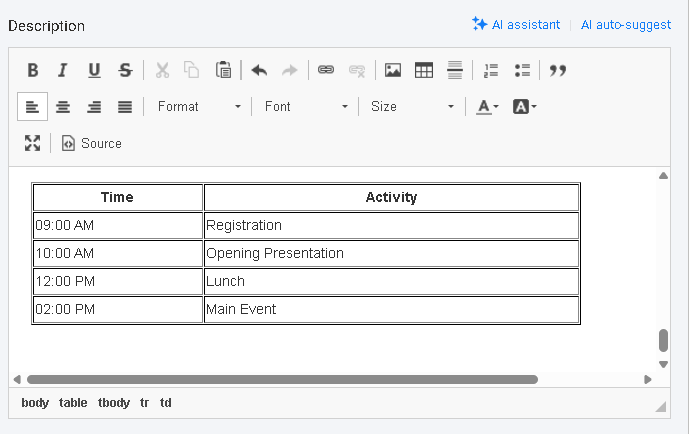
For example, an event owner could create a schedule:
| Time | Activity |
|---|---|
| 9:00 AM | Registration |
| 10:00 AM | Opening Presentation |
| 12:00 PM | Lunch |
| 2:00 PM | Main Event |
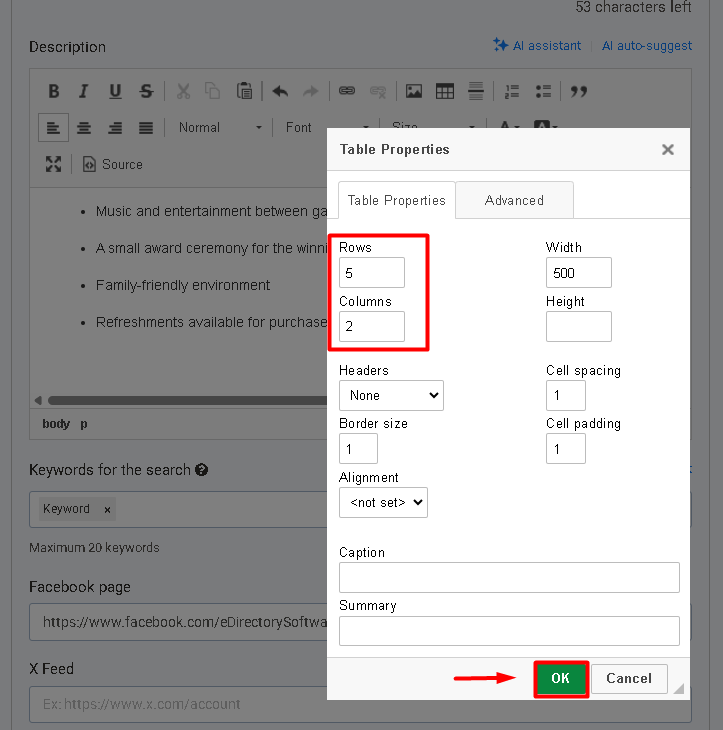
- To add a table, click the table icon.
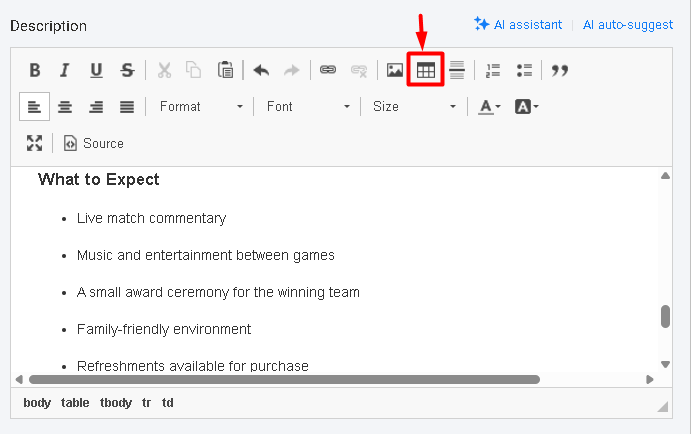
- Type the number of rows and columns and click OK.
- Populate your table with the desired content.
Tables can also be useful for:
- Event schedules
- Pricing information
- Speaker information
- Workshop sessions
- Event packages
- Comparisons
3.6. Create Bulleted and Numbered Lists
You can create bulleted lists or numbered lists to organize information.
Use a bulleted list when the order of the items is not important.
For example:
- Networking
- Live presentations
- Food and drinks
- Guest speakers
Use a numbered list when the order of the items is important.
For example:
- Register for the event.
- Complete your payment.
- Receive your confirmation email.
- Attend the event.
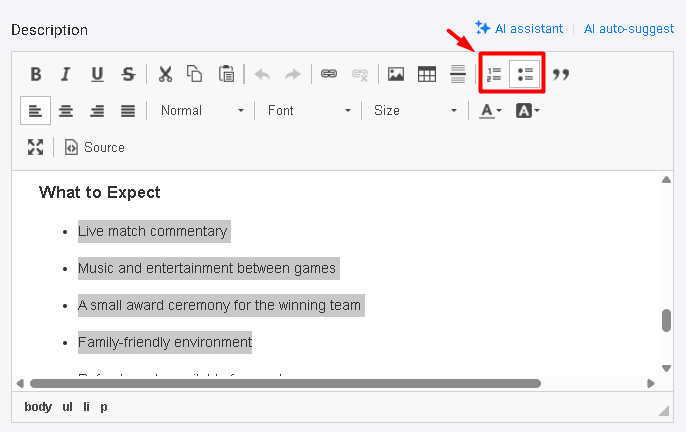
Lists can make schedules, requirements, features, and other information easier for visitors to scan.
3.7. Add Block Quotes
The HTML Editor also provides a Block Quote option.
Block quotes can be used to highlight a quotation, testimonial, important statement, or excerpt from another source.
For example, an event organizer could highlight a testimonial from a previous attendee:
"This was one of the best networking events we have attended."
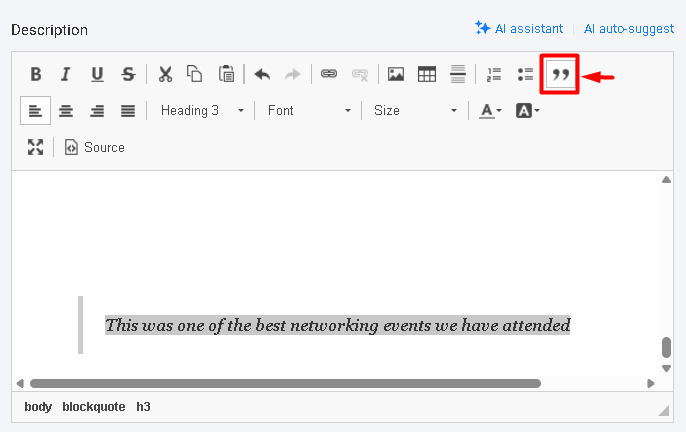
This can help visually separate important quotations from the rest of the event description.
3.8. Use the Source Option
The Source button allows advanced users to access and edit the HTML source code of the event description.
When you click Source, the editor displays the underlying HTML code of the content.
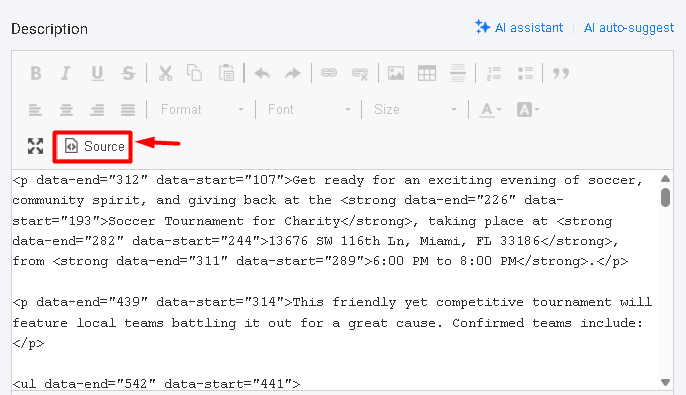
Users with knowledge of HTML and CSS can use this area to manually add or modify code.
For example, an advanced user may use the Source option to make a specific HTML/CSS customization that is not available through the standard editor tools.
Important: We recommend using the Source option only if you have experience with HTML and CSS and understand the changes you are making. For regular use, we recommend using the standard formatting tools available in the HTML Editor. This helps reduce the possibility of introducing code or formatting that may not display correctly on the live website.
3.9. Avoid Pasting Formatted Text From Other Sources
When adding content to the HTML Editor, we recommend typing the text directly into the editor whenever possible and applying the formatting using the editor's own tools.
Copying and pasting content from another source, especially content that is already formatted, can cause compatibility issues.
For example, if you copy content from Microsoft Word, Google Docs, another website, or another HTML editor, the copied text may already contain formatting such as:
- Bold text
- Text colors
- Background colors
- Different fonts
- Different font sizes
- Alignment
- Justification
- Links
- Other hidden formatting or HTML code
When this content is pasted into the HTML Editor, some of the formatting may be interpreted differently.
As a result, you may see situations where:
- Part of the text is formatted and another part is not.
- The content looks correctly formatted in the Site Manager, but the formatting is different on the live website.
- Colors or fonts appear correctly in the editor but not on the live page.
- Bold, italic, alignment, or other formatting does not appear as expected.
- Additional or unwanted formatting is introduced into the description.
3.10. Recommended Method for Pasting Text
To avoid formatting compatibility issues, we recommend one of the following methods:
Option 1: Type the content directly in the HTML Editor
This is the recommended method. Type your content directly into the description field and apply the desired formatting using the HTML Editor tools.
Option 2: Paste the text without formatting
If you need to copy text from another source, paste it as plain text first and then apply the formatting directly in the HTML Editor.
Windows
On Windows, use Ctrl + Shift + V
This pastes the copied content without its original formatting in applications that support the shortcut.
Mac
On macOS, use Command (⌘) + Shift + V
This pastes the content without its original formatting in applications that support the shortcut.
Note: The exact behavior of these shortcuts can vary depending on the application you are copying from and the browser being used. If the shortcut does not work, another option is to paste the content into a plain-text application first, copy it again, and then paste it into the HTML Editor.
After pasting the plain text, you can use the HTML Editor's formatting tools to apply the desired font, size, colors, alignment, headings, links, lists, and other formatting.
This approach helps ensure that the formatting is created directly by the eDirectory HTML Editor and is more likely to display consistently on the live event page.
Step 4: Save the Event
After creating and formatting the description, complete the remaining event information and save the event.
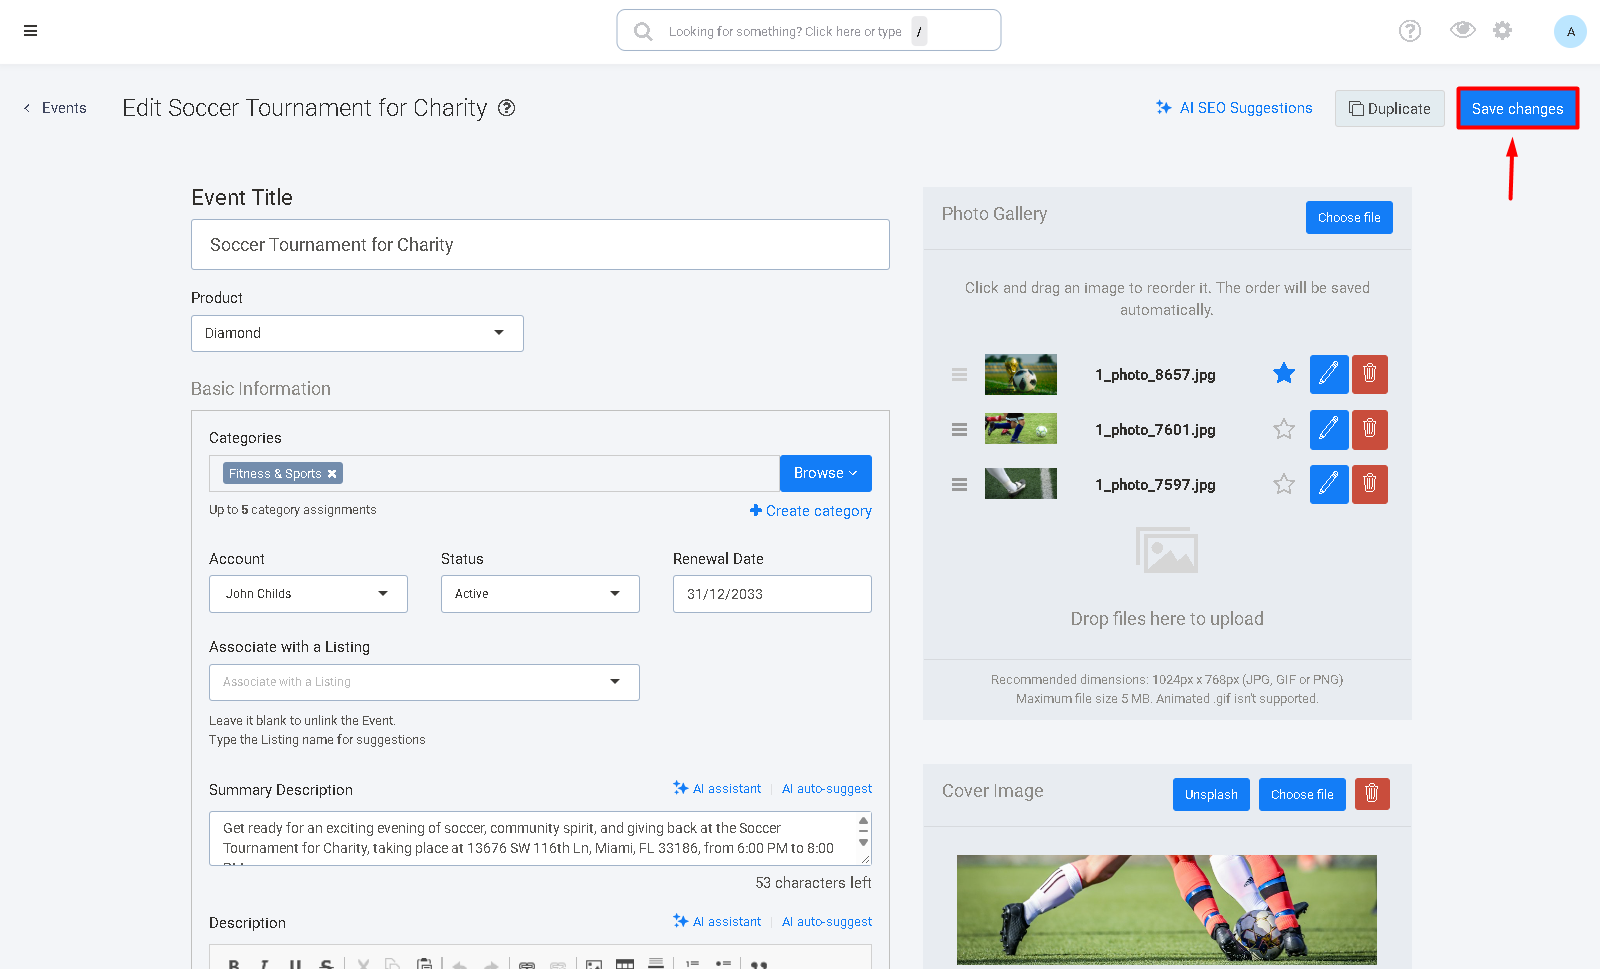
The HTML content will be saved together with the event.
If you are editing an existing event, save your changes after completing the description.
Step 5: View the Event Description
After saving the event, open the event's public detail page.
The HTML content created in the Site Manager should be displayed on the event detail page using the formatting configured in the editor.
This allows event owners to create descriptions that are more visually organized and engaging for visitors.
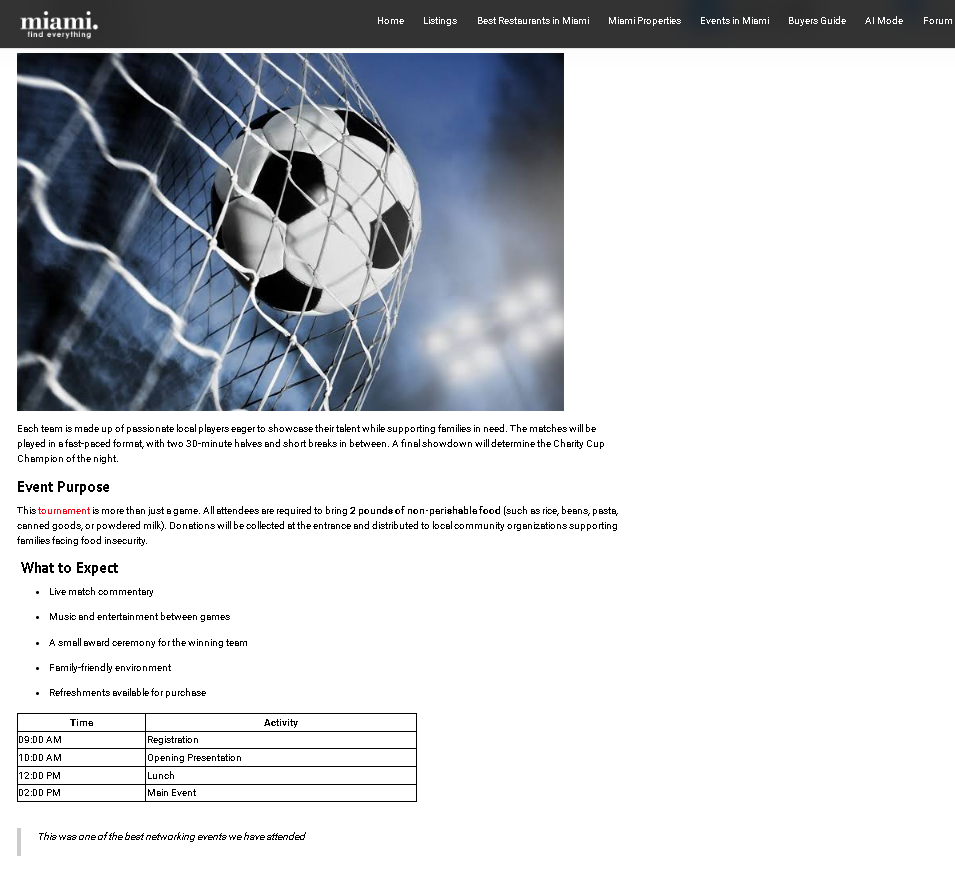
Step 6: Restrict HTML Descriptions to Specific Plans
You can configure the HTML description feature so that it is available only to specific plans.
This can be useful if you want to offer HTML descriptions as a premium feature for higher-tier plans.
6.1. Open Product Settings
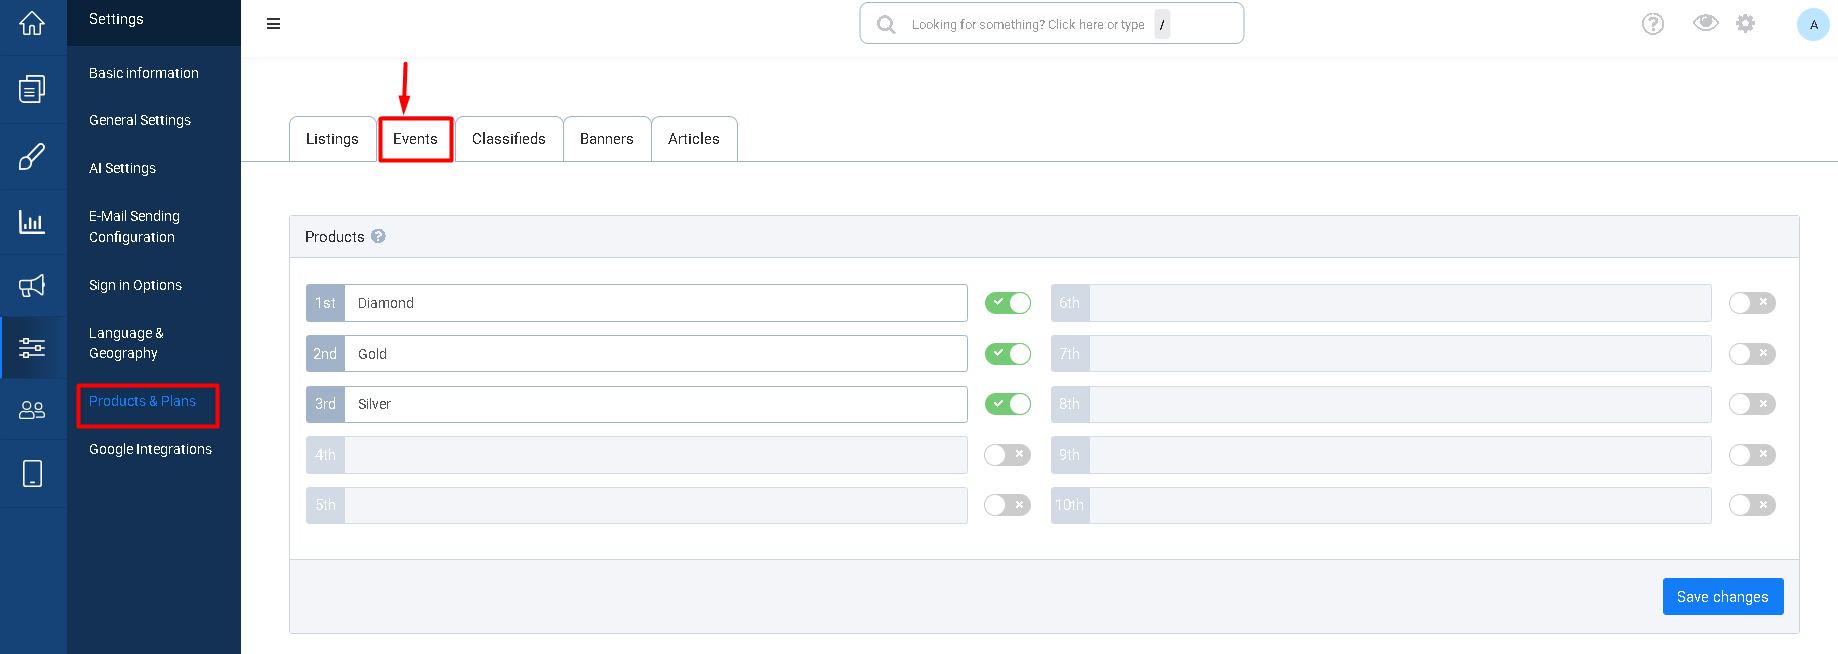
Navigate to Settings > Products & Plans > Manage Products
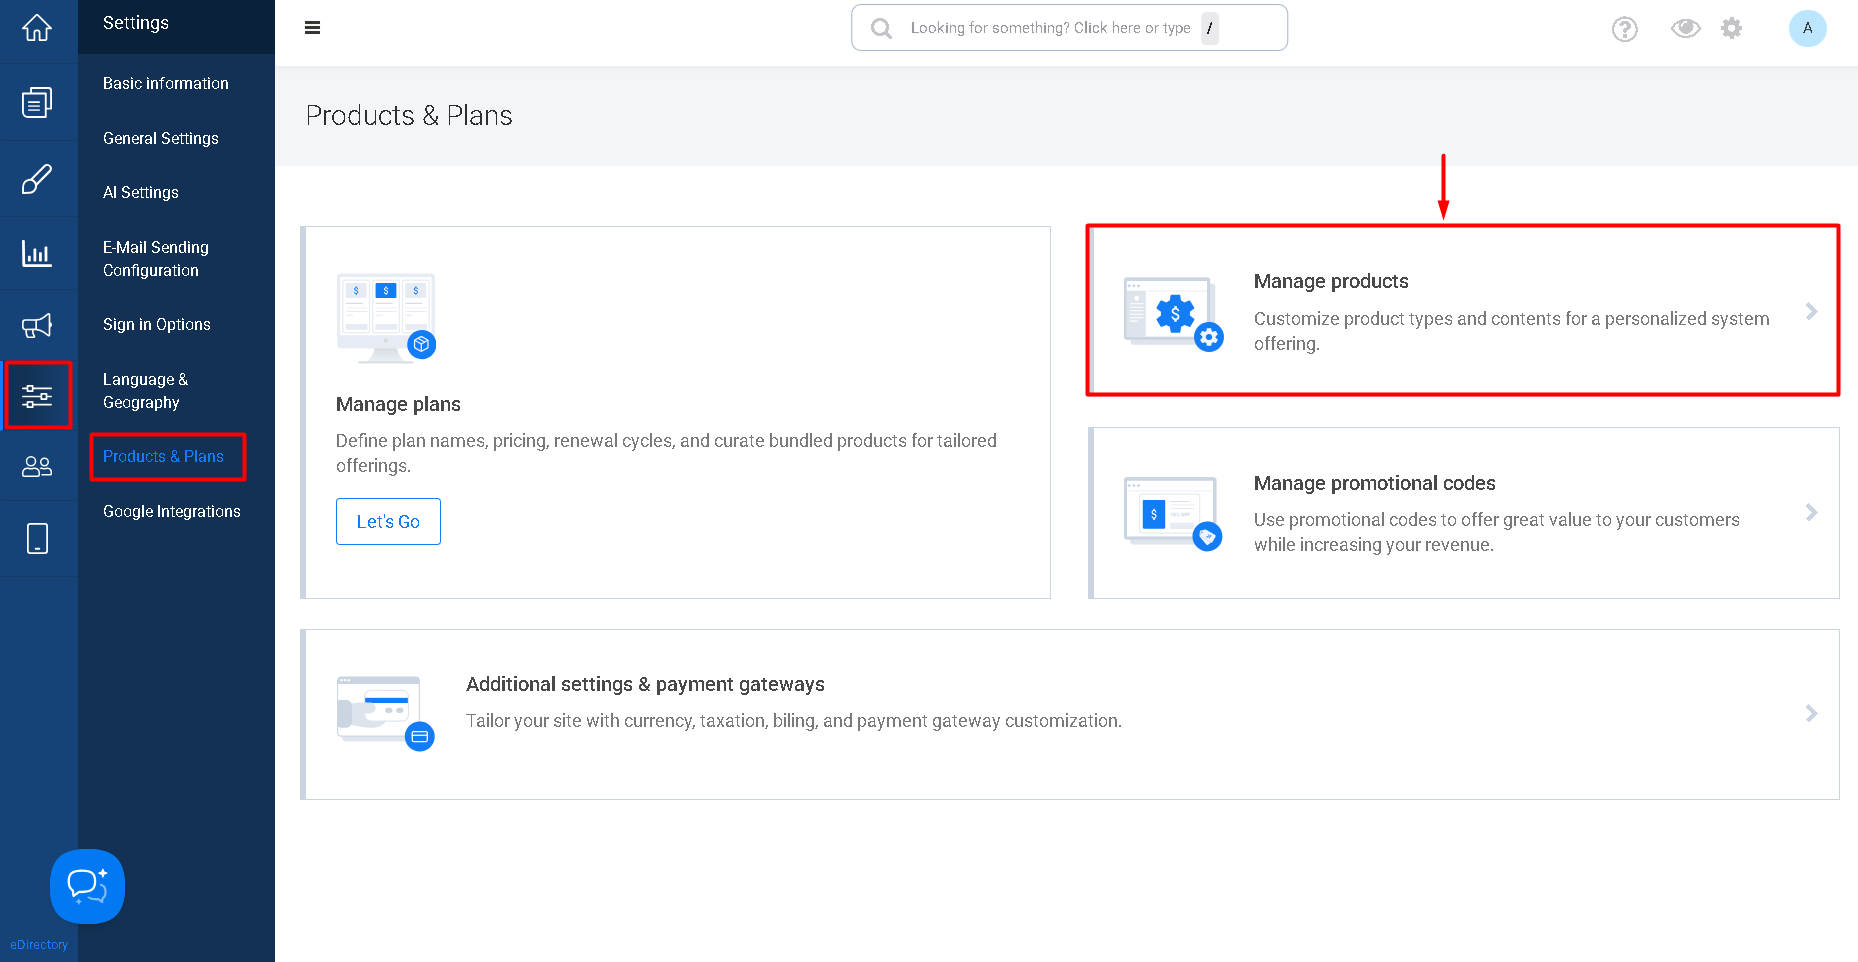
6.2. Locate the Long Description Option
Select the Events tab, and scroll down to locate the Long Description option.
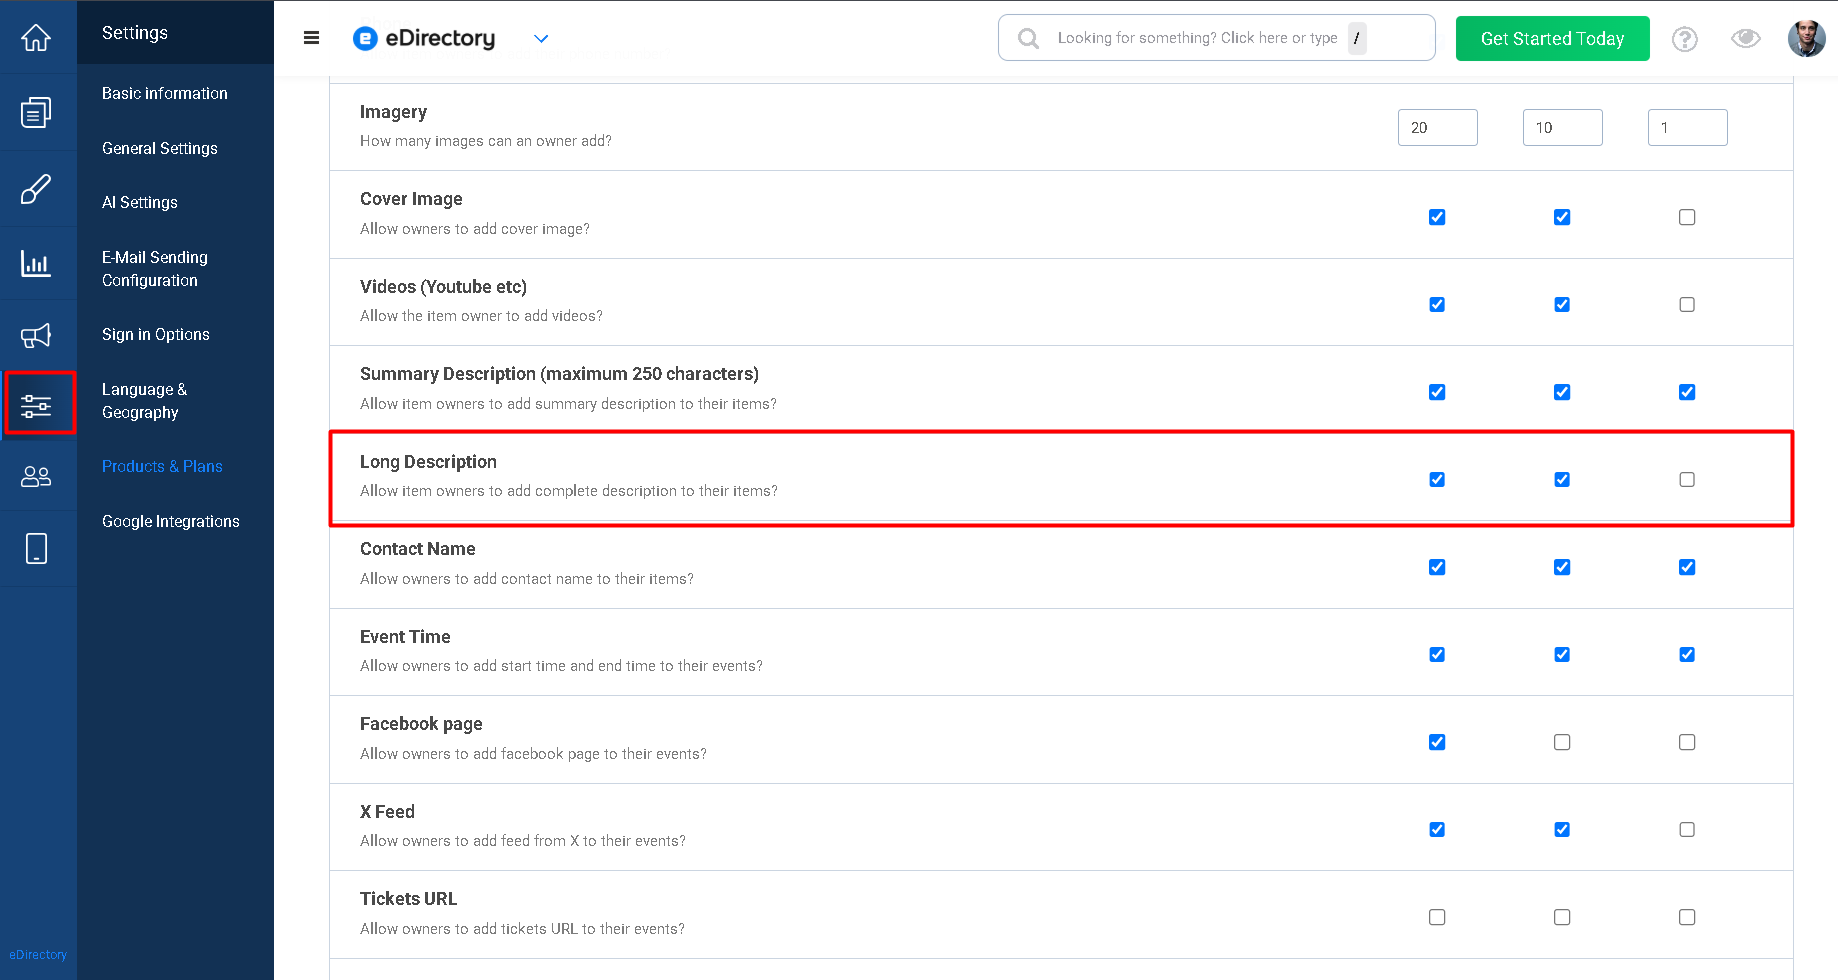
This option controls whether the plan has access to the enhanced description functionality.
6.3. Enable or Disable the Feature
Enable Long Description for the plans that should have access to the HTML description feature.
Disable it for plans that should not have access.
6.4 Save the Changes
Save the product settings after configuring the plans.
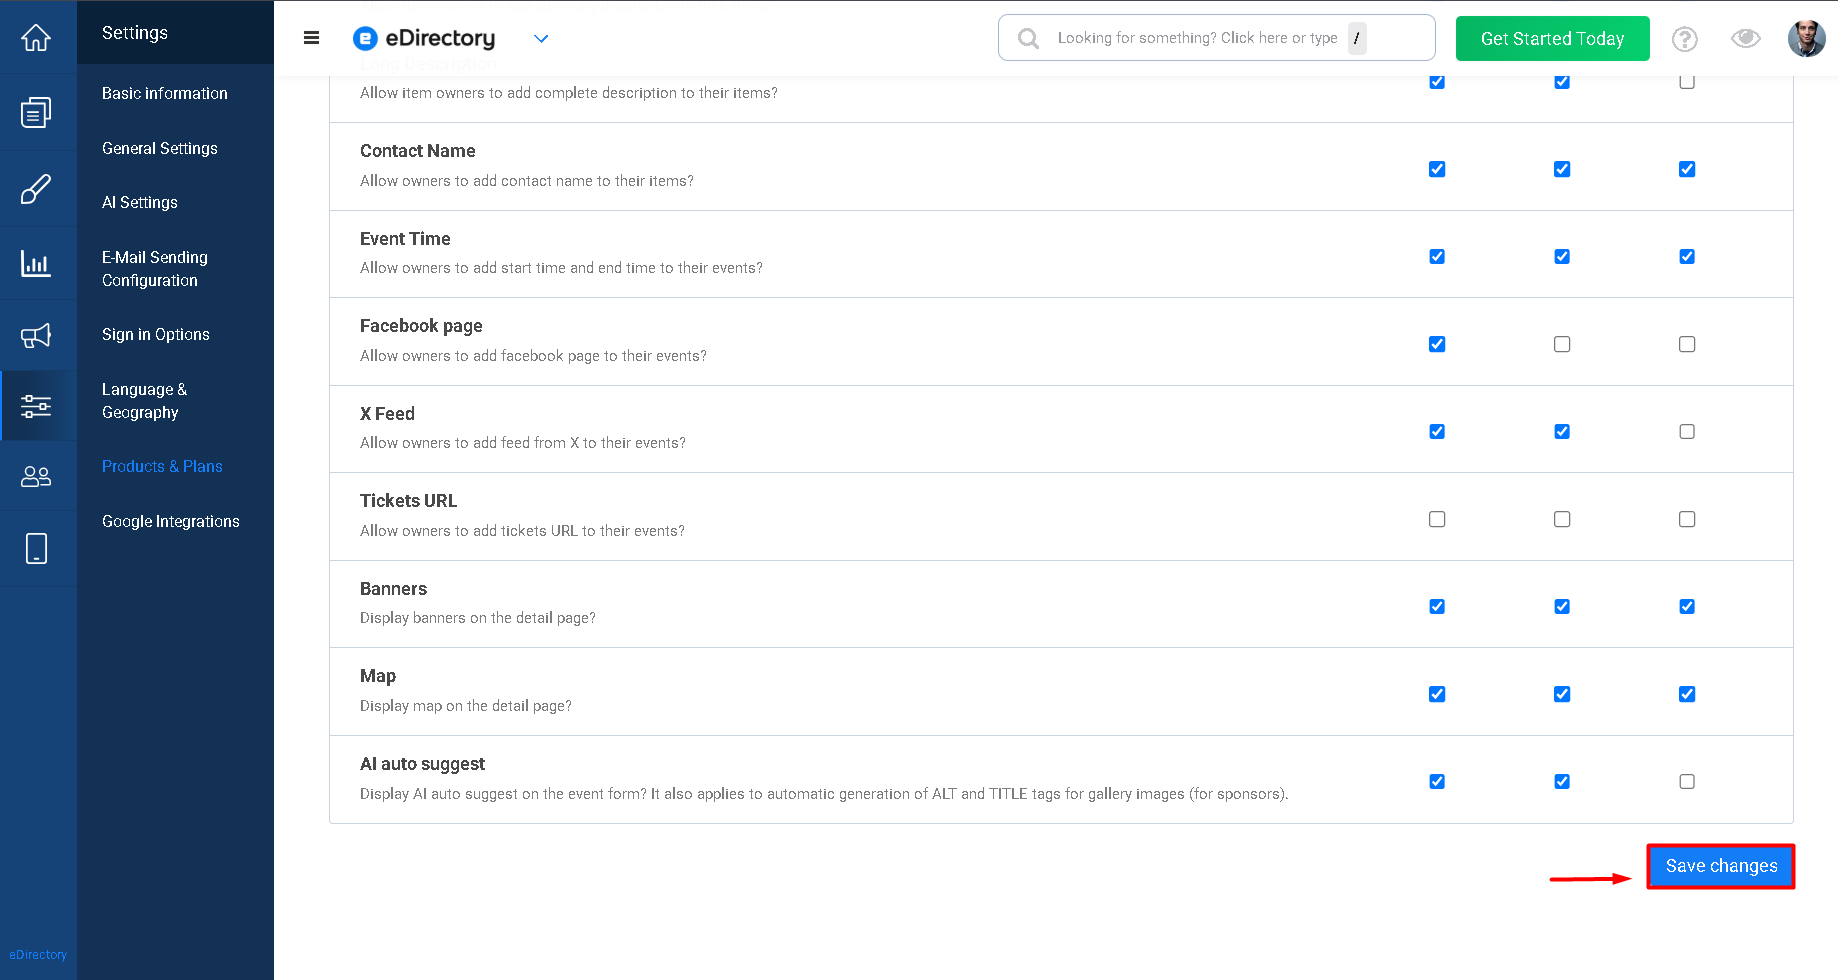
The HTML description feature will then be available according to the plan configuration.
Step 7: Verify the Configuration
After configuring the plugin and plans, test the feature to make sure it works as expected.
7.1. Create or Edit an Event
Create a new event or edit an existing event using a plan that has access to the HTML description feature.
7.2. Add Formatted Content
Add text and test some of the available formatting options, such as:
- Bold or italic text
- Different text sizes
- Lists
- Links
- Images
- Text alignment
7.3. Save the Event
Save the event after making your changes.
7.4. Check the Public Event Page
Open the event detail page and verify that the content is displayed correctly.
The formatting configured in the HTML Editor should be reflected on the public-facing event page.
Troubleshooting
The HTML Editor Does Not Appear
If the HTML Editor does not appear in the event form, check the following:
- Confirm that the HTML Editor for Event plugin is installed.
- Confirm that the plugin is installed: How to view your installed plugins
- Make sure you are editing or creating an event.
- Check whether the plan being used has access to the Long Description feature.
- Confirm that the correct product settings have been saved.
If the plugin is not installed on your site, contact your dedicated sales representative to learn more about purchasing the premium plugin.
The HTML Editor Is Not Available for a Specific Plan
If the HTML Editor works for one plan but not another, check the plan configuration.
Navigate to Settings > Products & Plans > Manage Products.
Open the affected plan and make sure Long Description is enabled.
Save the plan settings and test the event again.
The Formatting Does Not Appear on the Public Event Page
If the content is saved but the formatting does not appear correctly on the public event detail page, the issue may be related to formatting copied from another source.
First, check whether the content was copied and pasted from another application, website, or editor. Content copied from sources such as Microsoft Word, Google Docs, or other HTML editors may contain hidden formatting or HTML/CSS code that is not fully compatible with the eDirectory HTML Editor.
For example, the content may:
- Look correctly formatted in the Site Manager but differently on the live website.
- Display some text as bold while other text that should also be bold is not.
- Show different colors or fonts than those configured in the editor.
- Display incorrect alignment or justification.
- Contain formatting that appears correctly in the editor but is not rendered on the public page.
To troubleshoot the issue:
- Open the event in the Site Manager.
- Check the description in the HTML Editor.
- If the content was copied from another source, try removing the affected formatting.
- Save the event and check the public event detail page again.
- If the issue continues, create a new test description by typing the text directly into the HTML Editor.
- Apply the formatting using the editor's own tools, such as bold, alignment, colors, headings, lists, and other available options.
- Save the event and check the public page again.
If the formatting works correctly when the content is typed directly into the editor, the original issue was likely caused by formatting or code copied from the other source.
Recommendation: To avoid formatting compatibility issues, type content directly into the HTML Editor whenever possible. If you need to copy text from another source, paste it without formatting using Ctrl + Shift + V on Windows or Command (⌘) + Shift + V on Mac, and then apply the desired formatting directly in the HTML Editor.
If the issue continues even when using text entered and formatted directly in the HTML Editor, contact our support team so the behavior can be investigated further.
An Image or Link Does Not Work
If an image or hyperlink does not work as expected, verify that the content was inserted correctly in the HTML Editor.
For links, make sure the destination URL is correct.
For images, make sure the image was successfully inserted and that its source is accessible.
The Feature Is Available When It Should Not Be
If a plan is not supposed to have access to the HTML description feature, navigate to Settings > Products & Plans > Manage Products
Open the affected plan and verify whether Long Description is enabled.
Disable the option if the plan should not include the feature, then save the changes.
Conclusion
The HTML Editor for Event plugin provides event owners with greater control over the appearance and organization of their event descriptions. Instead of relying on plain text, organizers can use formatting, lists, links, images, fonts, and other editing options to create more informative and engaging event pages.
Site managers can also use the Long Description option under Settings > Products & Plans > Manage Products to control which plans have access to the enhanced description feature.