iOS App Building and Submission
Introduction
This article provides a detailed walkthrough of the process required to build your iOS application. It covers essential steps from setting up your Apple Developer Account and configuring certificates and identifiers to integrating with Firebase and preparing your app for the App Store Connect. Follow these instructions carefully to ensure a successful build and submission of your iOS app.
Note: Please be aware that since this process is carried out on a third-party platform (Apple), the steps outlined in this article may be subject to change. Apple reserves the right to modify the procedure without prior notice, and you may also encounter a different layout. Should you observe any discrepancies, we encourage you to contact support@edirectory.com to inform us of the need to update this article.
Prerequisites
Before you begin, ensure you have:
- An active Apple Developer Account.
- Access to your app builder platform.
- A Firebase account.
- Access to the Google Cloud Platform.
- An App Store Connect account.
Step-by-Step Instructions
- Log into Your Developer Account: Begin by navigating to the Apple Developer website (https://developer.apple.com/) and logging in with your developer credentials.

- Navigate to Certificates, Identifiers & Profiles: Once logged in, locate and click on the "Certificates, Identifiers & Profiles" section.

- Create a New Certificate: Within the "Certificates, Identifiers & Profiles" menu, select "Certificates" under the "Certificates" heading. Click the "+" button to create a new certificate.

- Select Apple Distribution Certificate: Under the "Software" section, choose "Apple Distribution" as the certificate type and then click "Continue."

- Generate Certificate Signing Request (CSR): Go to your eDirectory app builder in your Site Manager. Once you're ready with the app, click on 'Build' and there will be a section for iOS build settings where you can generate and find a highlighted link to save a Certificate Signing Request file. Save this file to your computer with the ".certSigningRequest" extension.

- Upload CSR to Apple Developer Account: Return to the Apple Developer portal. On the certificate creation page, click "Choose File," select the .certSigningRequest file you generated in the previous step, and upload it. Then, click "Continue."

- Download Your Distribution Certificate: After uploading the CSR, your distribution certificate will be generated. Click the "Download" button to save the
.cerfile to your computer. Then, go back to the main "Certificates" menu.

- Upload Certificate to App Builder: Navigate back to your eDirectory app builder platform's iOS build settings. There should be an option to upload your iOS Distribution Certificate. Upload the
.cerfile you downloaded in the previous step.

- Create a New Identifier: Return to the Apple Developer portal. In the "Certificates, Identifiers & Profiles" menu, select "Identifiers" under the "Identifiers" heading. Click the "+" button to create a new identifier.

- Select App IDs: On the "Register a New Identifier" page, select "App IDs" as the identifier type and then click "Continue."

- Select App: Under "Select a type," ensure "App" is selected and click "Continue."

- Configure App ID: On the "Register an App ID" page, enter a descriptive name for your identifier in the "Description" field. In the "Bundle ID" field, enter the exact Bundle Identifier used in your app builder project. Ensure these match precisely.


- Enable Capabilities: On the same "Register an App ID" page, under the "Capabilities" section, check the boxes for "Push Notifications" and "Sign in with Apple." Then, click "Continue."

- Register App ID: Review the details of your App ID and click the "Register" button. Once registered, go back to the main "Certificates, Identifiers & Profiles" menu and then to the "Certificates" menu.

- Create a New Provisioning Profile: In the "Certificates, Identifiers & Profiles" menu, select "Profiles" under the "Provisioning Profiles" heading. Click the "+" button to create a new profile.

- Select App Store Distribution Profile: Under "Distribution," select "App Store" as the provisioning profile type and then click "Continue."

- Select Your App ID: On the "Select App ID" page, choose the App ID you created earlier in this article from the dropdown menu and click "Continue."

- Select Your Distribution Certificate: On the "Select Certificates" page, select the Apple Distribution certificate you created in the earlier steps and then click "Continue."

- Generate Provisioning Profile: Choose a descriptive name for your provisioning profile in the "Profile Name" field and click the "Generate" button.

- Download Provisioning Profile and Upload to App Builder: Once generated, click the "Download" button to save the
.mobileprovisionfile to your computer. Then, go back to your app builder platform and upload this provisioning profile file in the designated iOS build settings area.


- Create a New iOS App in Firebase: Open your Firebase console by navigating to console.firebase.google.com and log in with your Google account. Click "Add project" if you haven't created one yet, or select your existing project. Within your project, click the iOS icon ("Add app") to create a new iOS app.


- Register Your App with Firebase: In the "Register app" workflow, copy the Bundle Identifier from your app builder project and paste it into the "App Bundle ID" field in Firebase. Enter a nickname for your app (this is for internal Firebase use). Click "Register app." After registration, click the "X" button to return to your Firebase project dashboard.

- Access Firebase Project Settings: Select the iOS app you just created in your Firebase project dashboard. Click the gear icon (Project settings) located next to your project name in the top-left corner.

- Download the GoogleService-Info.plist File: In the "Your apps" section, find your iOS app. Click on the "GoogleService-Info.plist" file to download it to your computer.

- Upload GoogleService-Info.plist to App Builder: Go back to your app builder platform and upload the
GoogleService-Info.plistfile you just downloaded in the designated Firebase integration or iOS settings section.

- Enable Maps SDK for iOS in Google Cloud Platform: Open the Google Cloud Platform Console (https://console.cloud.google.com) and select the Google Cloud project associated with your Firebase project. In the left-hand navigation menu, go to "APIs & Services" and then "Enabled APIs & Services." Click the "+ ENABLE APIS AND SERVICES" button.

- Search and Enable Maps SDK: In the API Library, search for "Maps SDK for iOS" and select it. Click the "ENABLE" button to enable the API for your project. After enabling, navigate back to the "APIs & Services" dashboard and go to the "Credentials" area.


- Create a New API Key: On the "Credentials" page, click the "+ CREATE CREDENTIALS" button at the top and select "API key."

- Copy API Key (Incorrect Step - Should be Bundle ID): Correction: This step in the original article is incorrect for setting up API restrictions. Instead of copying a generated hash here, you will later restrict the API key to your app's Bundle ID. For now, just note the newly generated API key. You will configure it in the next steps.


- Select and Edit the Newly Generated API Key: In the "Credentials" list, find the API key you just created and click on its name to edit its settings.

- Configure API Key Restrictions:
- Change the Key name: Give your API key a descriptive name.
- Application restrictions: Select "iOS apps" as the application restriction. Click "+ Add item" and enter the Bundle Identifier of your iOS app (the same one used in your app builder and Firebase). You can add multiple Bundle IDs if needed.
- API restrictions: It is generally recommended to restrict the API key to only the "Maps SDK for iOS" to enhance security. Select "Restrict key" and then choose "Maps SDK for iOS" from the list.
- Click "Save" to apply the restrictions.

- Create Your App on App Store Connect: Open the App Store Connect website (https://appstoreconnect.apple.com/apps) and log in with your Apple Developer Account credentials. Click on "My Apps."

- Add a New App in App Store Connect: On the "My Apps" page, click the "+" button in the top-left corner and select "New App."

- Fill App Store Connect Details: In the "New App" dialog:
- Select "iOS" as the platform.
- Enter the desired name for your app in the "Name" field.
- Choose the primary language for your app.
- Select the exact Bundle ID of your app from the dropdown menu (this must match the one used throughout the process).
- In the "SKU" field, you can paste your Bundle ID from the app builder as a common identifier.
- Click "Create."

- Enable Sign in with Apple: You need to configure Sign in with Apple in your App Store Connect account for it to function correctly in your app. Follow the instructions in this article. This typically involves configuring Services IDs and enabling Sign in with Apple for your App ID.
- Invite our Account: Before building your app, you must invite our account as Admin to your Apple Developer because this way, the app build will be automatically submitted to your account. Follow the steps outlined in this article.
- Build Your App: After completing all the previous steps, you can now initiate the build process in your eDirectory app builder platform. If you have invited
contatestearca@gmail.comas a developer to your Apple Developer Account (as mentioned in the previous step), the built app will automatically be sent to your App Store Connect account. Otherwise, you will typically need to download the build artifact (e.g.,.ipafile) from your app builder and manually upload it to App Store Connect using Xcode or the Transporter app.

- App Build on iOS: After your app was successfully created, it will be automatically uploaded to your App Store. (If it’s not, please use the Application Loader to check what’s the error).
- App Information: Under the App Information tab, configure the Age Restriction settings checking 'No' and 'None' in all options.


- App Privacy: Under the 'App Privacy' section, click on 'Get Started', check the option 'No, we do not collect data from this app' and then click on 'Edit' to load your website's Privacy Policy page URL then click on 'Publish'.


- Pricing and Availability: Under the 'Pricing and Availability' section, click on 'Add Pricing' and set up the pricing of your app. Set the pricing to zero dollars if it'll be Free. Then click on 'Set Up Availability' and select which countries will be able to download your app.

- Prepare for Submission: Under the tab 'Prepare for Submission', fill out the necessary information of your app, loading your app screenshots and app details such as name and promotional text.

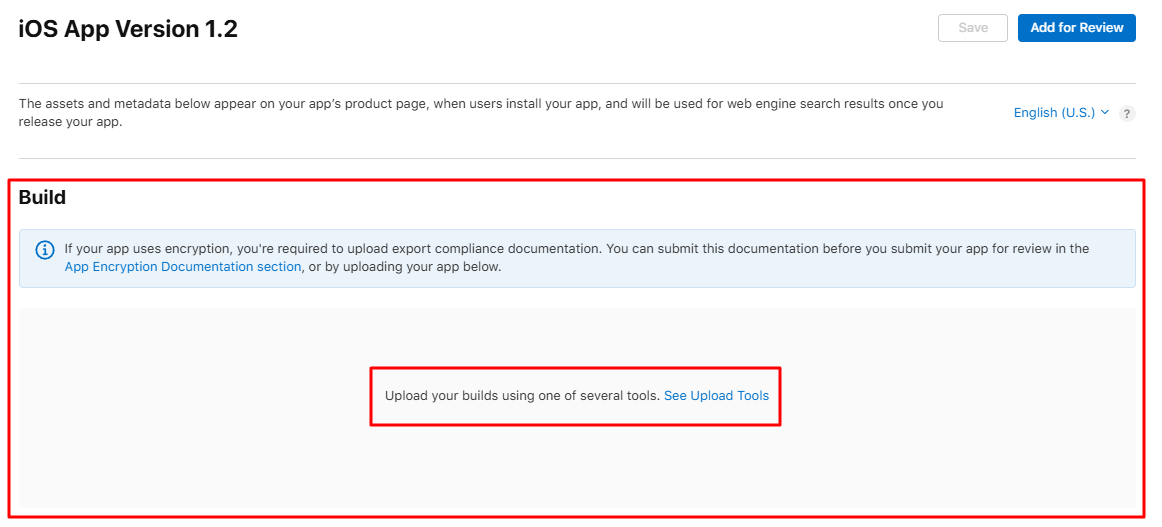
- Add the Build: Select your app on https://appstoreconnect.apple.com/apps and under the tab 'Prepare for Submission' scroll down to the section "Build". You should see a "Add Build" button available. If not, please wait a few more minutes. Select the app build available and hit the 'Done' button. After that, click on 'Manage' next to "Missing Compliance" and select the option "None of the algorithms mentioned above".
Important Note: If you have just built the app, the button labeled “Add Build” may not appear immediately, and this is expected. Apple requires some time to receive the app build generated by our Mobile App Builder and to make it available in your account. Depending on Apple’s system, it can take anywhere from 5 to 30 minutes.
As a result, if you do not see the “Add Build” button just like in the screenshot below, please wait a few minutes and refresh this page until the “Add Build” option becomes available. Once it appears, you can proceed with the next steps.


- App Review: After loading the app, now it's time to submit the app for review.

Once approved, your app will appear live on the App Store based on your release settings. Congratulations on your iOS app launch! 🎉🚀
Note: Please be aware that since this process is carried out on a third-party platform (Apple), the steps outlined in this article may be subject to change. Apple reserves the right to modify the procedure without prior notice, and you may also encounter a different layout. Should you observe any discrepancies, we encourage you to contact support@edirectory.com to inform us of the need to update this article.
Conclusion
Building an iOS app involves a multi-faceted process of configuring your developer accounts, generating necessary certificates and profiles, integrating with backend services like Firebase and Google Maps, and finally preparing your app for submission on App Store Connect. By meticulously following these steps, you can successfully build your iOS application and take it one step closer to being available to users on the App Store. Remember to consult the official documentation for each platform (Apple Developer, Firebase, Google Cloud Platform, and App Store Connect) for the most up-to-date information and troubleshooting guidance.