
Listing Templates: Designing Powerful and Flexible Listing Pages in eDirectory
Introduction
Creating engaging and well-structured listing pages is essential for delivering a great user experience and showcasing the value of your directory website. To help you achieve this, eDirectory provides a powerful feature called Listing Templates.
Listing Templates allow you to fully customize the layout, structure, and content of your listing detail pages using a flexible widget-based system — no coding required.
With an intuitive drag-and-drop interface, you can:
- Create professional listing layouts
- Organize content into tabs
- Display different information for different business types
- Build niche-specific listing experiences
- Customize layouts visually
Whether you are building a restaurant directory, medical directory, real estate platform, or local business guide, Listing Templates give you complete control over how your listings appear.
What Is a Listing Template?
A Listing Template is a customizable layout that defines how listing detail pages are displayed on your site.
Using widgets, you can design pages that display:
- Business information
- Photos and videos
- Reviews
- Contact information
- Social media feeds
- Promotional content
- Advertising banners
- Custom sections unique to your niche
Listing Templates use the same widget logic available in the Page Editor, making them easy to manage even without technical knowledge.
What You Can Do With Listing Templates
With Listing Templates, you can:
- Create one-column or two-column layouts
- Organize information using tabs
- Use up to 37 different widgets
- Create multiple templates for different business types
- Display dynamic content only when information exists
- Build highly customized listing experiences
Accessing Listing Templates
When your eDirectory website is created, a default listing template named Listing is automatically added to your site.
To access your listing templates:
- Navigate to: Content → Listings → Listing Templates
- Click Edit on the template you want to customize.

Creating Multiple Listing Templates
You are not limited to a single template.
By clicking Add Listing Template, you can create templates tailored to different business categories, such as:
- Restaurants
- Dentists
- Doctors
- Hotels
- Lawyers
- Real Estate Agencies
Each template can have:
- Different layouts
- Different widgets
- Different tabs
- Different category restrictions

This allows you to create highly specialized listing experiences for different niches.
Template Settings Explained
Template Title
The Template Title identifies the template both internally and, in some cases, to your users.
Examples:
- Restaurants
- Medical Professionals
- Hotels
- Automotive Businesses

Important
If your site only has one listing template, it will automatically be used for all listings and users will not see the template selection option.
If your site has multiple templates, users will be prompted to select a template during listing submission. Because of this, template titles should be clear and descriptive.

Categories
The Categories setting determines which categories can use the template.
You can:
- Restrict the template to specific categories
- Allow all categories
Example
If you create a Restaurant template, you may want to limit available categories to:
- Restaurants
- Cafes
- Bars
- Bakeries
This keeps the submission process cleaner and more intuitive for users.
Site Manager Area:
In this example, the Site Manager configured the Restaurant listing template so that users can only access and select the parent category “Food and Dining” along with its associated subcategories automatically linked to it.
Sponsor End:
On the Restaurant listing template, users will only see the parent category “Food and Dining” and its corresponding subcategories, such as “Bagel Shops,” “Coffee Shops,” and “Restaurants.”

Summary Cards (Search Results Appearance)
Summary Cards control how listings appear on search result pages.
eDirectory includes 11 different summary card layouts with variations such as:
- Circular images
- Square images
- Different content alignments
- Different information displays
These layouts are important because they define the first impression users have when browsing your directory.
Site Manager Area:

User End:

Detail View Header
The Detail View Header controls the top section of the listing detail page.
By default, a standard header layout is applied, but you can customize it by:
- Clicking Add a Widget

- Selecting a different header layout

eDirectory provides 9 different header designs.
Site Manager Area:

User End:

Using Tabs in Listing Templates
Tabs help organize content and improve navigation on listing detail pages.
Instead of displaying everything in a single long page, you can separate information into sections such as:
- Overview
- Photos
- Reviews
- Videos
- Contact Information
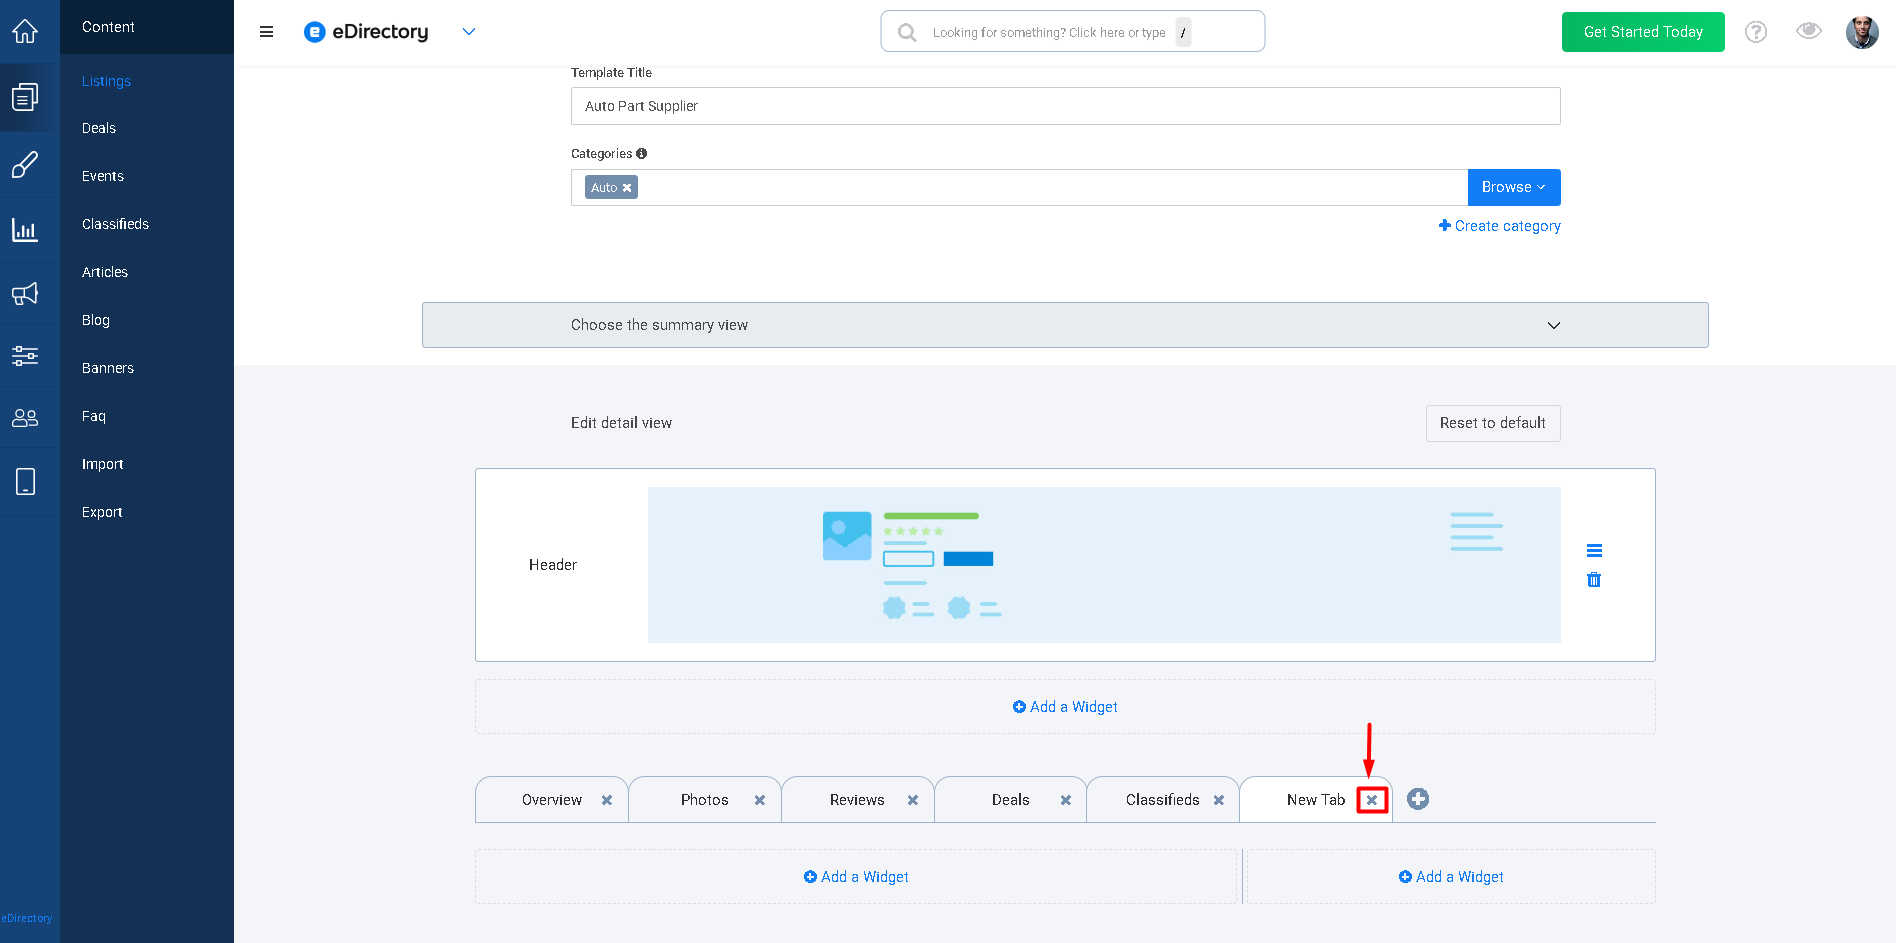
Managing Tabs
- Add a tab: Click the “+” button.

- Rename a tab: Click on the tab name and edit the text

- Add widgets: Add relevant widgets by clicking on the “Add a widget button”

-
Delete a tab: Click the “×” icon
Dynamic Tab Display
Tabs in eDirectory are dynamic. If a tab has no content, it will automatically be hidden from the front end.
Example
If no videos are added to a listing:
- The Videos tab will not appear.
This helps keep listing pages clean and user-friendly.

Understanding How Widgets Work
Widgets are the building blocks of Listing Templates.
Each widget serves a specific purpose and can display:
- Existing listing information
- New custom fields
- Media content
- Reviews
- Social feeds
- Banners
- Related content
Two Types of Widgets
Widgets in eDirectory work in two different ways.
Understanding this distinction is extremely important when building listing templates.
1. Widgets That Pull Information From Existing Listing Fields
These widgets display information that already exists in the standard listing form.
They do not create new fields.
Complete list of widgets:
- Summary Description
- Long Description
- About
- Additional file
- Hours
- Contact Information
- Photo Gallery
- Video
- Reviews
- Features
- Associated deals
- Associated classifieds
- Related listings
- Banner widgets (It pulls from the banner module)
- Hours
- Contact information
- Summary Description
- Summary Description Plus Photo
- Facebook Feed
- Location
- Social Buttons
- Twitter (X), Facebook and Tik Tok Feed
- Badges
These widgets simply display existing data in different layouts.
2. Widgets That Create New Custom Fields
Some widgets generate entirely new fields in the listing form.
When these widgets are added:
- New fields appear in the listing submission form
- Sponsors can fill out the information
- The information is automatically displayed on the listing detail page
Complete list of widgets:
- Description
- Check List
- Call to Action
- More details
- Range
- Specialties
- Products and Services
- Linked Listings
- Additional image
These widgets allow you to create highly customized listing experiences without coding.
Important: Assigning Custom Field Widgets to Listing Levels
Widgets that create new custom fields must also be assigned to specific listing levels.
After adding one of these widgets to a template, you must define which listing levels will have access to that widget and its corresponding fields.
To configure this:
- Navigate to: Settings → Products & Plans → Manage Products

- Scroll down until you locate the listing template name
- Click the dropdown menu under the template name

- You will see the custom widgets added to that template
- Use the checkboxes to select which listing levels should have access to each widget

Why This Step Is Important
If a widget is not enabled for a listing level:
- The field will not appear in the listing form
- Sponsors using that level will not be able to fill out the information
- The widget content will not display on the front end
This allows you to create advanced feature differences between listing plans.
Example
You can:
- Enable Products & Services only for Premium listings
- Enable Call to Action buttons only for Gold listings
- Enable Specialties only for Professional plans
This gives you more flexibility when creating monetized listing packages.
Widget Options Explained (Complete Guide)
Widgets are the building blocks of your Listing Template. Each widget serves a specific purpose and can be placed in Column 1, Column 2, or both, depending on the layout rules of the system.
Below is a complete breakdown of all available widgets, including their functionality and placement availability.
📊 Widget Placement Overview (Quick Reference)
| Column 1 | Column 2 |
|
|

Core Content Widgets
About Widget
Placement: Column 1 Only
Field Type: Uses Existing Listing Fields
What This Widget Does
Displays:
- Summary Description
- Long Description
- First gallery image
This is one of the main content widgets used to showcase listing information.
Data Source
This widget pulls information from existing listing fields.
| Widget | Data Source | Front-End Display |
|
|
|
|


Description Widget
Placement: Column 1 & Column 2
Field Type: Creates New Custom Field
Requires Listing Level Assignment: Yes
What This Widget Does
Creates a customizable text section inside the listing page.
This widget is useful for:
- Additional business information
- Policies
- FAQs
- Custom business sections
- Industry-specific content
Data Source
This widget creates a brand-new field inside the listing form.
Listing Level Configuration
After adding this widget:
- Navigate to Settings → Products & Plans → Manage Products
- Expand the template dropdown
- Locate the Description widget
- Select which listing levels should have access to it
If the widget is not enabled for a listing level, sponsors using that level will not see the field.
| Widget | Data Source | Front-End Display |
|
|
|
|


Long Description Widget
Placement: Column 1 Only
Field Type: Uses Existing Listing Fields
What This Widget Does
Displays the complete long description of the listing.
Data Source
Pulls information from the existing Long Description field.
| Widget | Data Source | Front-End Display |
|
|
|
|


Summary Description Widget
Placement: Column 1 Only
Field Type: Uses Existing Listing Fields
What This Widget Does
Displays a shorter summary version of the listing description.
Data Source
Pulls information from the existing Summary Description field.
| Widget | Data Source | Front-End Display |
|
|
|
|


Summary Description Plus Photo Widget
Placement: Column 1 Only
Field Type: Uses Existing Listing Fields
What This Widget Does
Displays the Summary Description together with a listing image.
Data Source
Pulls information from:
- Summary Description
- Listing Image
| Widget | Data Source | Front-End Display |
|
|
|
|


More Details Widget
Placement: Column 1 & Column 2
Field Type: Creates New Custom Field
Requires Listing Level Assignment: Yes
What This Widget Does
Allows you to create smaller structured informational fields grouped into a single section.
This widget is commonly used for:
- Amenities
- Business details
- Policies
- Specifications
Data Source
Creates custom fields inside the listing form.
Listing Level Configuration
This widget must be enabled for the listing levels that should have access to the custom fields.
| Widget | Data Source | Front-End Display |
|
|
|
|


Media Widgets
Photo Gallery Widget
Placement: Column 1 Only
Field Type: Uses Existing Listing Fields
What This Widget Does
Displays all uploaded listing images.
Data Source
Pulls information from the Image Gallery field.
| Widget | Data Source | Front-End Display |
|
|
|
|


Video Widget
Placement: Column 1 & Column 2
Field Type: Uses Existing Listing Fields
What This Widget Does
Embeds videos into the listing page.
Data Source
Pulls information from the Video URL field.
| Widget | Data Source | Front-End Display |
|
|
|
|


Additional File Widget
Placement: Column 1 & Column 2
Field Type: Uses Existing Listing Fields
What This Widget Does
Displays downloadable files such as PDFs or documents.
Data Source
Pulls information from the existing uploaded file field.
| Widget | Data Source | Front-End Display |
|
|
|
|


Additional Image Widget
Placement: Column 1 & Column 2
Field Type: Creates New Custom Field
Requires Listing Level Assignment: Yes
What This Widget Does
The Additional Image widget allows listing owners to upload extra images directly through the listing submission form. These images can be displayed within the listing detail page to provide additional visual content beyond the standard image gallery.
This widget is ideal for showcasing:
- Product photos
- Team images
- Menus or brochures
- Certifications
- Additional business visuals
Data Source
This widget creates a new custom image upload field inside the listing form. Images uploaded by the listing owner are automatically displayed on the frontend through the widget.
Listing Level Configuration
After adding this widget to a Listing Template, it must be enabled for the listing levels that should have access to the field.
| Widget | Data Source | Front-End Display |
|
|
|
|


Engagement & Trust Widgets
Reviews (Paginated) Widget
Placement: Column 1 Only
Field Type: Uses the reviews users post under a listing
What This Widget Does
Displays all listing reviews with pagination controls.
Data Source
Pulls information from the Reviews system.
| Widget | Data Source | Front-End Display |
|
|
|
|


Recent Reviews Widget
Placement: Column 1 Only
Field Type: Uses Existing Listing Fields
What This Widget Does
Highlights the latest reviews submitted for the listing.
Data Source
Pulls information from the Reviews system.
| Widget | Data Source | Front-End Display |
|
|
|
|


Check List Widget
Placement: Column 1 & Column 2
Field Type: Creates New Custom Field
Requires Listing Level Assignment: Yes
What This Widget Does
Allows sponsors to select predefined checklist items.
Data Source
Creates checklist fields inside the listing form.
Listing Level Configuration
This widget must be enabled for the listing levels that should have access to it.
| Widget | Data Source | Front-End Display |
|
|
|
|


Features Widget
Placement: Column 1 & Column 2
Field Type: Uses Existing Listing Fields
What This Widget Does
Displays features or amenities associated with the listing.
Data Source
Pulls information from existing Features data.
| Widget | Data Source | Front-End Display |
|
|
|
|


Badges Widget
Placement: Column 1 & Column 2
Field Type: Uses Existing Listing Fields
What This Widget Does
Displays badges or recognitions assigned to the listing.
Data Source
Pulls information from the assigned badges in the user’s listing form.
| Widget | Data Source | Front-End Display |
|
|
|
|


Note: In order for badges to appear in the listing form and be available for assignment to listings, you must first upload your own badge images to the site. For step-by-step instructions on how to upload and configure badges, please refer to the following article: Setting Up Awards & Badges for Listings
Business Information Widgets
Hours Widget
Placement: Column 1 & Column 2
Field Type: Uses Existing Listing Fields
What This Widget Does
Displays business hours of operation.
Data Source
Pulls information from the Hours field.
| Widget | Data Source | Front-End Display |
|
|
|
|


Location Widget
Placement: Column 2 Only
Field Type: Uses Existing Listing Fields
What This Widget Does
Displays the business location and map.
Data Source
Pulls information from Address and Map fields.
| Widget | Data Source | Front-End Display |
|
|
|
|


Note: In order for the map to display and function correctly on your eDirectory site, it is necessary to complete the integration with Google Maps. To configure this integration, please follow the steps outlined here: How to Activate Google Maps on eDirectory
Contact Information Widget
Placement: Column 1 & Column 2
Field Type: Uses Existing Listing Fields
What This Widget Does
Displays:
- Phone number
- Email address
- Physical address
Data Source
Pulls information from Contact Information fields.
| Widget | Data Source | Front-End Display |
|
|
|
|


Note: Although the email address is one of the pieces of information retrieved by this widget, it is not displayed publicly on the front-end of the site. Instead, eDirectory displays a “Send a Message” button, allowing visitors to contact the user through a protected contact form. This is the default behavior in eDirectory and is designed to help prevent spam while protecting users’ privacy and email information.
Additionally, in order for visitors to successfully send messages through this button, it is necessary to configure your site’s email sending settings correctly. You can find the step-by-step instructions for configuring email delivery here: Getting Started #9 - Email Settings
Products and Services Widget
Placement: Column 1 & Column 2
Field Type: Creates New Custom Field
Requires Listing Level Assignment: Yes
What This Widget Does
Allows businesses to create structured lists of products or services.
Data Source
Creates custom Products and Services fields under a tab in the listing form top.
Listing Level Configuration
After adding this widget, enable it for the listing levels that should display Products and Services.
| Widget | Data Source | Front-End Display |
|
|
|
|


Specialties Widget
Placement: Column 1 & Column 2
Field Type: Creates New Custom Field
Requires Listing Level Assignment: Yes
What This Widget Does
Allows businesses to highlight specialties or areas of expertise.
Data Source
Creates a Specialty dropdown field that allows users to select a single option from the available dropdown menu choices.
Listing Level Configuration
This widget must be enabled for the desired listing levels.
| Widget | Data Source | Front-End Display |
|
|
|
|


Range Widget
Placement: Column 1 & Column 2
Field Type: Creates New Custom Field
Requires Listing Level Assignment: Yes
What This Widget Does
Allows businesses to define ranges such as pricing or service levels.
Data Source
Creates custom Range fields.
Listing Level Configuration
This widget must be enabled for the listing levels that should use the Range field.
| Widget | Data Source | Front-End Display |
|
|
|
|


Monetization & Promotion Widgets
Call to Action Widget
Placement: Column 1 & Column 2
Field Type: Creates New Custom Field
Requires Listing Level Assignment: Yes
What This Widget Does
Adds customizable action buttons linked to URLs.
Examples:
- Book Now
- Order Online
- Request Quote
- Schedule Appointment
Data Source
Creates a custom field that allows the listing owner to enter a URL associated with the button destination.
Listing Level Configuration
After adding this widget, select which listing levels should have access to the Call to Action fields.
| Widget | Data Source | Front-End Display |
|
|
|
|


Associated Content Widgets
Placement: Column 1 Only
Field Type: Uses Existing Listing Fields
Available Widgets
- Associated Deals Widget
- Associated Classifieds Widget
What These Widgets Do
These widgets display content associated with the listing, helping showcase related deals and classified listings connected to the account.
Data Source
These widgets display Deals and Classifieds that are specifically associated with the listing through the related association fields.
For example, if the Classified field “Associate with a Listing” is filled by selecting a specific listing, that Classified will automatically appear in the widget on the corresponding listing detail page. The same behavior applies to Deals associated with that listing.
| Widget | Data Source | Front-End Display |
|
|
|
|
|
|
|
|


Advertisement Banner Widgets
Field Type: Uses Existing Banners in the site.
Available Widgets & Placement:
- Sponsored Links Widget — Column 1 & Column 2
- Billboard Banner — Column 1 only
- Large Mobile Banner — Column 1 & Column 2
- Square Banner — Column 1 & Column 2
- Wide Skyscraper Banner — Column 2 only
- Half Page Banner — Column 2 only
What These Widgets Do
These widgets display rotating advertisement banners throughout the listing detail page in various banner formats and placements. The banners shown are not necessarily associated with the current listing, as the system dynamically rotates through the active banners available on the site. This setup is commonly recommended for lower-tier listing levels, as it provides an incentive for users to upgrade to premium levels that can remove third-party advertisements from their listing pages.
Data Source
Pulls information from the Banner Module under Content >Banners, where all advertisement banners configured on the site are managed and stored.
| Widget | Data Source | Front-End Display |
|
|
|
|


Social & External Content Widgets
Social Media Feed Widgets
Placement: Column 2 Only
Field Type: Uses Existing Listing Fields
Available Widgets
- Facebook Feed Widget
- X (Twitter) Feed Widget
- TikTok Feed Widget
What These Widgets Do
These widgets display social media content directly within the listing detail page, allowing visitors to view posts, updates, and media from the listing’s connected social media profiles.
Data Source
Pulls information from the corresponding social media fields configured for the listing, including the Facebook Page URL, X/Twitter profile, and TikTok profile fields.
| Widget | Data Source | Front-End Display |
|
|
|
|


Social Buttons Widget
Placement: Column 2 Only
Field Type: Uses Existing Listing Fields
What This Widget Does
Displays social media icons linking to business profiles.
Data Source
Pulls information from Social Media URL fields.
| Widget | Data Source | Front-End Display |
|
|
|
|


Discovery & Navigation Widgets
Related Listings Widget
Placement: Column 1 & Column 2
Field Type: Does not create a new custom field
Requires Listing Level Assignment: Yes
What This Widget Does
Displays related listings based on the categories and/or location of the listing currently being viewed.
Data Source
This widget automatically compares the listing currently being displayed with other listings registered on the site. Based on this comparison, it identifies listings that share the same categories and/or location, according to the widget configuration, and then displays those related results.
You can configure the widget to display related listings by:
- Categories only
- Location only
- Both categories and location combined
This widget does not create new custom fields. It simply uses the existing information from the current listing to dynamically compare it with other listings on the site.
| Widget | Front-End Display |
|
|
|


Linked Listings Widget
Placement: Column 1 & Column 2
Field Type: Creates New Custom Field
Requires Listing Level Assignment: Yes
What This Widget Does
Displays listings that were manually linked by the listing owner within the listing form.
Users can only link listings that already exist under their own account. For example, if a user owns multiple listings on the site, they can connect/link those listings together so they are displayed as related linked listings on the frontend.
Data Source
Creates a custom field under a tab in the top section of the listing form, allowing users to select and link their existing listings associated with their account.
| Widget | Data Source | Front-End Display |
|
|
|
|


Separator Widget
Placement: Column 1 & Column 2
What This Widget Does
Adds a visual divider between sections of the page.
Data Source
This widget does not use or create fields.
| Widget | Front-End Display |
|
|
|


Conclusion
Listing Templates are one of the most powerful customization tools available in eDirectory.
By combining:
- Flexible layouts
- Dynamic tabs
- Drag-and-drop widgets
- Existing listing fields
- Custom generated fields
you can create highly professional and niche-specific listing experiences without coding knowledge.
Understanding:
- which widgets use existing information
- which widgets create new fields
- and how to assign those fields to listing levels
will help you build cleaner, more organized, and more effective listing pages for both sponsors and visitors.
Take time to experiment with different widget combinations and layouts to create listing pages that are visually engaging, informative, and optimized for conversions.
Happy designing! 🎉